![]()
Recon is a team of invariant testing engineers and security researchers that provide invariant testing as a service while also developing tools and educational content to make it easier for anyone to test invariants on their smart contracts.
Our goal is to make Invariant Testing a baseline for all projects building on the EVM.
We're amongst the most prolific invariant testing writers, with our template being used over 300 times by multiple professionals.
Recon Pro is a tool for running invariant tests in the cloud.
- Video Tutorial: Intro to Recon Pro V2 (1min)
The Recon Extension is an open source VS Code Extension to scaffold a Invariant Testing Boilerplate using the Chimera Framework.
Navigating the Book
Writing Invariant Tests
If you're new to invariant testing with fuzzing, use the Learn Invariant Testing section to learn the background info you'll need to get started.
You can then follow along with the Example Project to see how to set up a project using the Chimera Framework and Create Chimera App template.
Once you've gotten the hang of writing invariants and are using them in real projects, check out the Advanced Fuzzing Tips section for best practices we've developed after using our Chimera framework for over a year on dozens of engagements.
Building Handlers
Learn how to use the Recon UI to add a test harness to your Foundry project.
Running Jobs
Learn how to offload a fuzzing job using the Recon cloud runner.
Using Recipes
Learn how to reuse fuzzer configurations when running jobs on the Recon cloud runner using recipes.
Adding Alerts
Learn how to add alerts for jobs run on the Recon cloud runner that can notify you of broken properties via Telegram or webhook.
Dynamic Replacement
You can test your existing invariant suite with different setup configurations without having to modify the existing setup using dynamic replacement.
Governance Fuzzing
Simulate on-chain changes that modify the system state (function calls) or system configuration (governance function calls) in a forked testing environment so you can preview changes and their side effects before they happen on-chain using governance fuzzing.
Useful Tips
Learn how to make the most of Recon's features so that you can fuzz more effectively.
Recon Extension
The Visual Studio Code extension that combines our most useful fuzzing tools into one so you can get to fuzzing faster. Learn how to use it here.
Recon Tools
Recon's free tools can help you turn fuzzer logs into Foundry reproducers (Echidna/Medusa).
Our bytecode tools can help you compare the bytecode of two different contracts and generate an interface for a given contract's bytecode.
Video Tutorials:
- All Recon Tools (1min)
- Bytecode Tools (6min)
- Storage & Governance Tools (3min)
- Economic Tools (4min)
Open Source Contributions
Recon has created a number of open source tools to make invariant testing easier. These can be found in the OSS Repos section.
OpSec
Learn about best practices for operational security for web3 teams and the services that Recon provides to help projects with this.
Glossary
See the glossary for terminology used throughout the book.
Learn Invariant Testing
Most of our guides and documentation are focused on using fuzzing tools, primarily Echidna and Medusa because we use them internally at Recon. However, we also support running other tools on our cloud infrastructure such as Foundry (fuzzing), Halmos (formal verification), and Kontrol (formal verification).
After having chosen a tool best suited to your needs and downloading it locally, you can get started with the tutorials below.
If you're new to invariant testing, we recommend starting with the following series of posts to get you from 0 to 1:
- First Day At Invariant School
- How To Define Invariants
- Implementing Your First Smart Contract Invariants: A Practical Guide
If you prefer a full end-to-end bootcamp, checkout the written version here based on the livestreamed series here for everything you need to know about invariant testing.
Once you've grasped the basics of invariant testing you can setup your first suite to test with a fuzzing tool. For a step-by-step guide on how to do this, check out the example project.
If you have any questions about how to use Recon or invariant testing in general, you can reach out to our team on Discord.
Additional Learning Resources
Invariant Testing In General
If you're looking for more resources to help you get started with invariant testing, see the following:
Fuzzers
For more resources on our favorite fuzzers (Echidna and Medusa) see the following:
Retrospectives
Deep dives into the work we've done with our elite customers with tips and tricks on building effective invariant testing suites:
- Corn Retrospective
- eBTC Retrospective
- Centrifuge Retrospective part 1
- Centrifuge Retrospective part 2
Videos
Podcasts
- Fuzzing a RewardsManager with the Recon Extension | Alex & the Remedy Team on Stateful Fuzzing for Security
- Workshop on how to go from a simple foundry test to a full blown critical exploit with fuzzing | Alex & Secureum on fuzzing for security research
- Fuzzing Sablier with the Recon Extension | Alex & Shafu on Invariant Testing
- Fuzzing MicroStable with Echidna | Alex & Shafu on Invariant Testing
- How can I run my Fuzz tests longer? Getrecon interview with Alex | Alex & Patrick Collins (Cyfrin Audits)
- Using Recon Pro to test invariants in the cloud | Alex & Austin Griffith
Office Hours
Office hours are live recordings of useful tips and tricks for invariant testing.
- Fuzz Fest | The best Talks of 2024 on Fuzzing for Security
- The Dangers of Arbitrary Calls | How to write safe contracts that use arbitrary calls and the risk tied to them
- Centrifuge Retrospective Pt1 | On scaffolding and getting to coverage
- Centrifuge Retrospective Pt2 | On breaking properties and the importance of understanding the system you're testing
- How we missed a bug with fuzzing! | On the dangers of clamping
- Finding bugs with Differential Fuzzing | Using differential fuzzing to find bugs
- Fuzzing Bytecode Directly
Trophies
A sample of some publicly disclosed bugs we've found using invariant testing. You can use these to understand what kinds of properties will help you find issues that manual review sometimes can't.
Example Project
In this section, we'll use the Create Chimera App template to create a simple contract and run invariant tests on it.
Prerequisites: the example shown below requires that you have Foundry and Medusa installed on your local machine
Getting started
Clone the create-chimera-app-no-boilerplate repo.
Or
Use forge init --template https://github.com/Recon-Fuzz/create-chimera-app-no-boilerplate
Writing the contract
First, in the src/ directory we'll create a simple Points contract that allows users to make a deposit and earn points proportional to the amount of time that they've deposited for, where longer deposits equal more points:
// SPDX-License-Identifier: UNLICENSED
pragma solidity ^0.8.13;

import {MockERC20} from "@recon/MockERC20.sol";

contract Points {
    mapping (address => uint88) depositAmount;
    mapping (address => uint256) depositTime;
    uint256 totalDeposits;

    MockERC20 public token;

    constructor(address _token) {
        token = MockERC20(_token);
    }

    function deposit(uint88 amt) external {
        depositAmount[msg.sender] += amt;
        depositTime[msg.sender] = block.timestamp;
        totalDeposits += amt;

        token.transferFrom(msg.sender, address(this), amt);
    }

    function power() external view returns (uint256) {
        return depositAmount[msg.sender] * (block.timestamp - depositTime[msg.sender]);
    }
}
Adding to Setup
Now with a contract that we can test, we can deploy it in the Setup contract:
abstract contract Setup is BaseSetup, ActorManager, AssetManager, Utils {
    Points points;

    /// === Setup === ///
    function setup() internal virtual override {
        _newAsset(18); // deploys an 18 decimal token

        // Deploy Points contract
        points = new Points(_getAsset()); // uses the asset deployed above and managed by the AssetManager

        // Mints the deployed asset to all actors and sets max allowances for the points contract
        address[] memory approvalArray = new address[](1);
        approvalArray[0] = address(points);
        _finalizeAssetDeployment(_getActors(), approvalArray, type(uint256).max);
    }

    /// === MODIFIERS === ///
    modifier asAdmin {
        vm.prank(address(this));
        _;
    }

    modifier asActor {
        vm.prank(address(_getActor()));
        _;
    }
}
The AssetManager allows us to deploy assets (using _newAsset) that we can use in our Points contract with simplified fetching of the currently set asset using _getAsset().
We then use the _finalizeAssetDeployment utility function provided by the AssetManager to approve the deployed asset for all actors (tracked in the ActorManager) to the Points contract.
Running the fuzzer
We can now run the fuzzer with no state exploration since we haven't added handler functions.
Before we run the fuzzer however we'll use Foundry to check that the project compiles correctly because it provides faster feedback on this than Medusa.
Running forge build we see that it compiles successfully, meaning the deployment in the Setup contract works as expected:
$ forge build
[⠊] Compiling...
[⠘] Compiling 44 files with Solc 0.8.28
[⠃] Solc 0.8.28 finished in 717.19ms
Compiler run successful!
We can now run the Medusa fuzzer using medusa fuzz, which gives us the following output:
medusa fuzz
⇾ Reading the configuration file at: /temp/example-recon/medusa.json
⇾ Compiling targets with crytic-compile
⇾ Running command:
crytic-compile . --export-format solc --foundry-compile-all
⇾ Finished compiling targets in 5s
⇾ No Slither cached results found at slither_results.json
⇾ Running Slither:
slither . --ignore-compile --print echidna --json -
⇾ Finished running Slither in 7s
⇾ Initializing corpus
⇾ Setting up test chain
⇾ Finished setting up test chain
⇾ Fuzzing with 16 workers
⇾ [NOT STARTED] Assertion Test: CryticTester.switch_asset(uint256)
⇾ [NOT STARTED] Assertion Test: CryticTester.add_new_asset(uint8)
⇾ fuzz: elapsed: 0s, calls: 0 (0/sec), seq/s: 0, branches hit: 289, corpus: 0, failures: 0/0, gas/s: 0
⇾ [NOT STARTED] Assertion Test: CryticTester.asset_approve(address,uint128)
⇾ [NOT STARTED] Assertion Test: CryticTester.asset_mint(address,uint128)
⇾ [NOT STARTED] Assertion Test: CryticTester.switchActor(uint256)
⇾ fuzz: elapsed: 3s, calls: 70172 (23389/sec), seq/s: 230, branches hit: 481, corpus: 126, failures: 0/692, gas/s: 8560148887
⇾ fuzz: elapsed: 6s, calls: 141341 (236
You can now stop medusa with CTRL + C.
At this point, we expect almost no lines to be covered (indicated by the low corpus value in the console logs). We can note however that because the corpus value is nonzero, something is being covered, in our case this is the exposed functions in the ManagerTargets which provide handlers for the functions in the AssetManager and ActorManager.
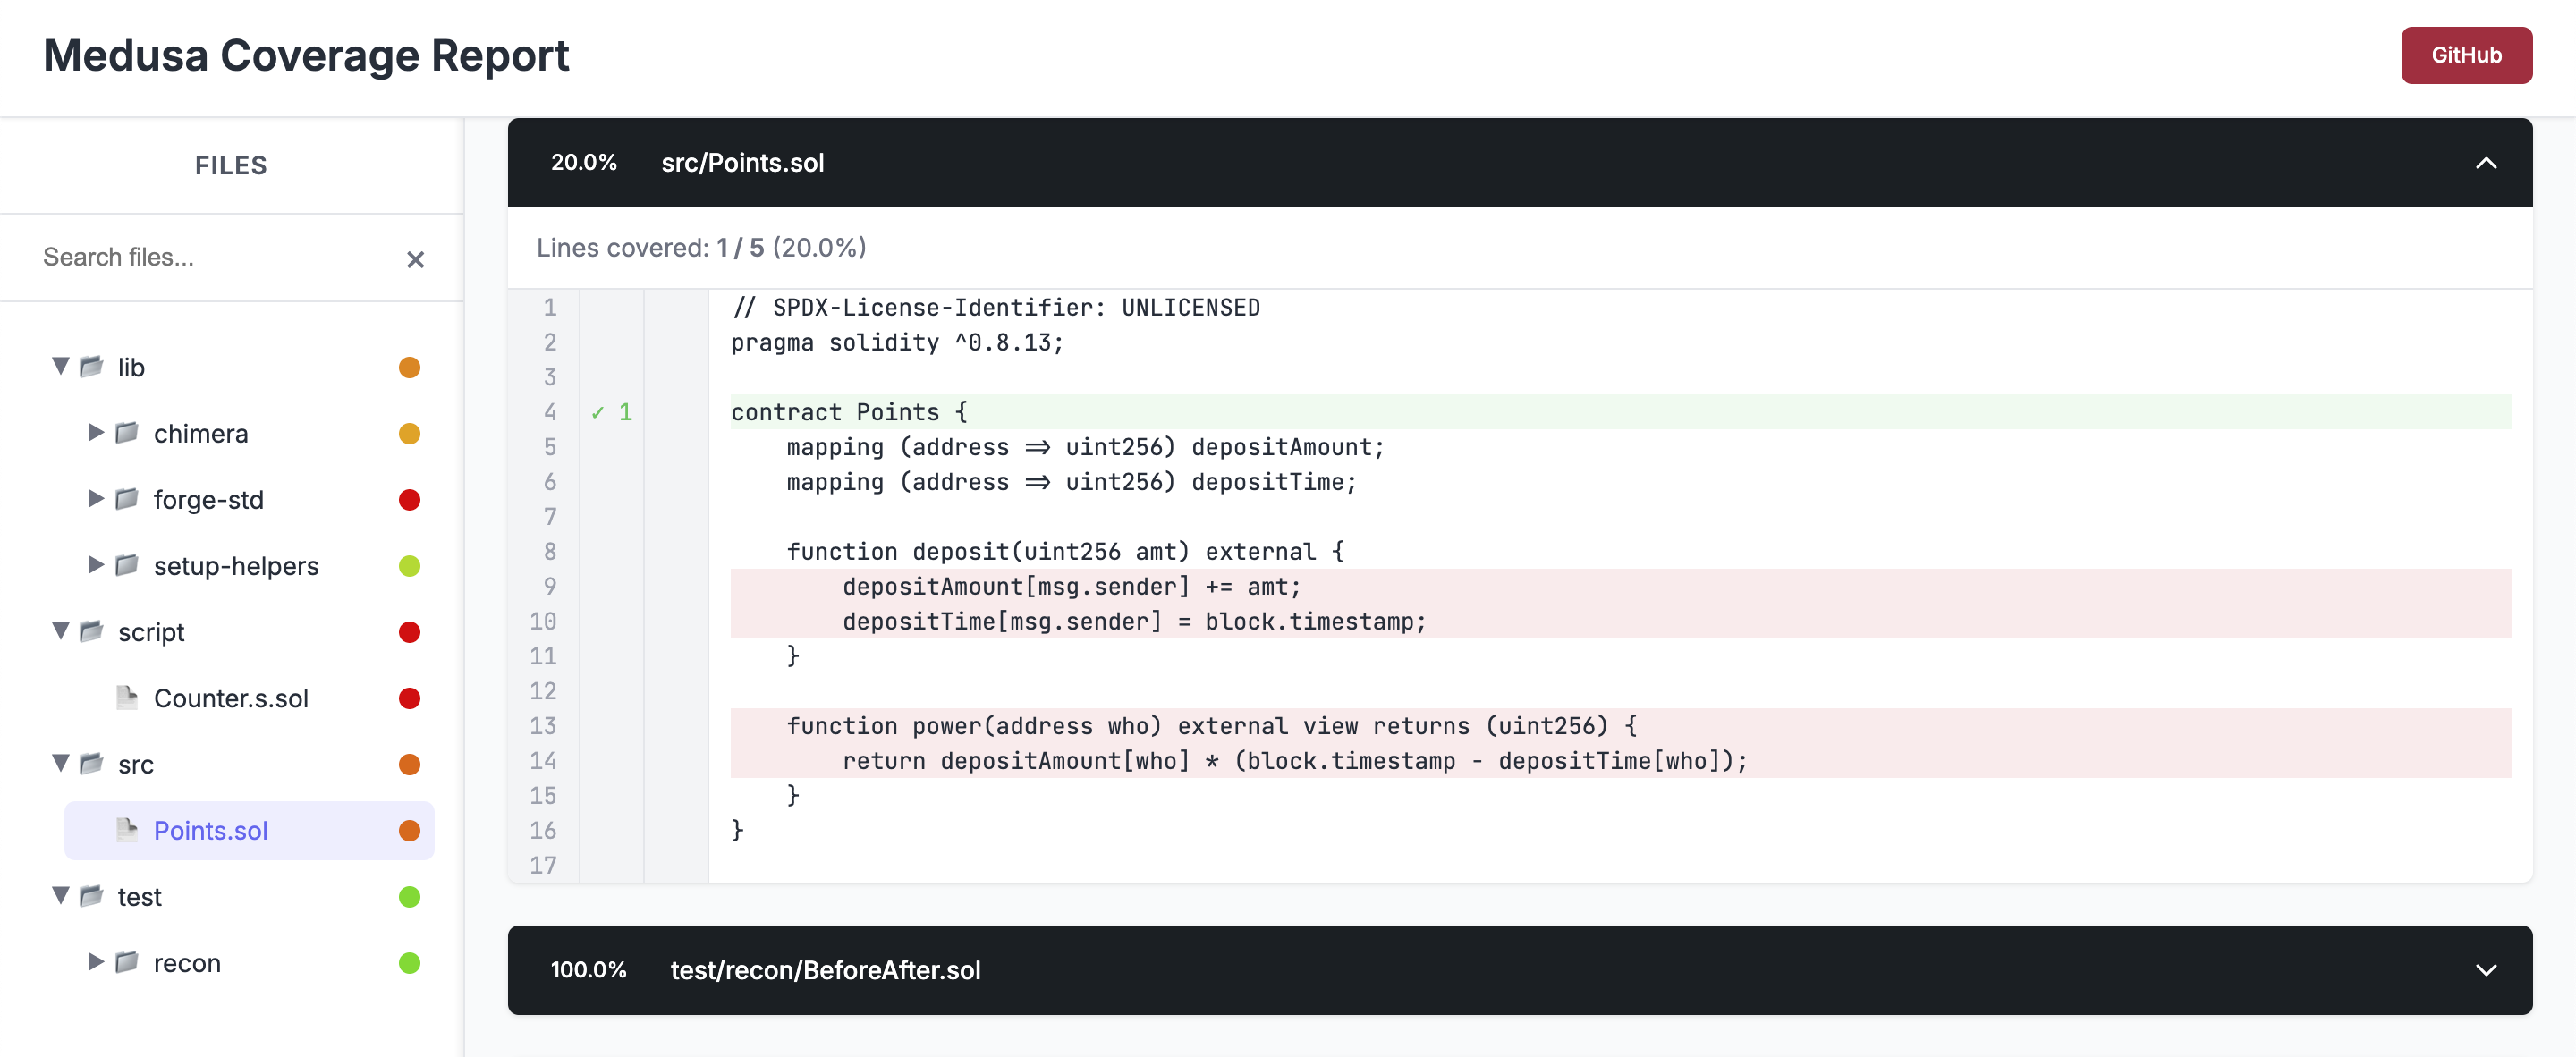
We can now open the coverage report located at /medusa/coverage/coverage_report.html to confirm that none of the lines in the Points contract are actually being covered.
In our coverage report a line highlighted in green means the line was reached by the fuzzer, a line highlighted in red means the line was not.
Let's rectify the lack of coverage in our Points contract by adding target function handlers.
Building target functions
Foundry produces an /out folder any time you compile your project which contains the ABI of the Points contract.
We'll use this in conjunction with our Invariants builder to quickly generate target function handlers for our TargetFunctions contract using the following steps:
- Open
out/Points.sol/Points.json - Copy the entire contents
- Navigate to the Invariants Builder
- Paste the ABI
- Rename the contract to
pointsreplacing the text in the "Your_contract" form field
This generates a TargetFunctions contract for Points. In our case we'll first just add the handler created for the deposit function:
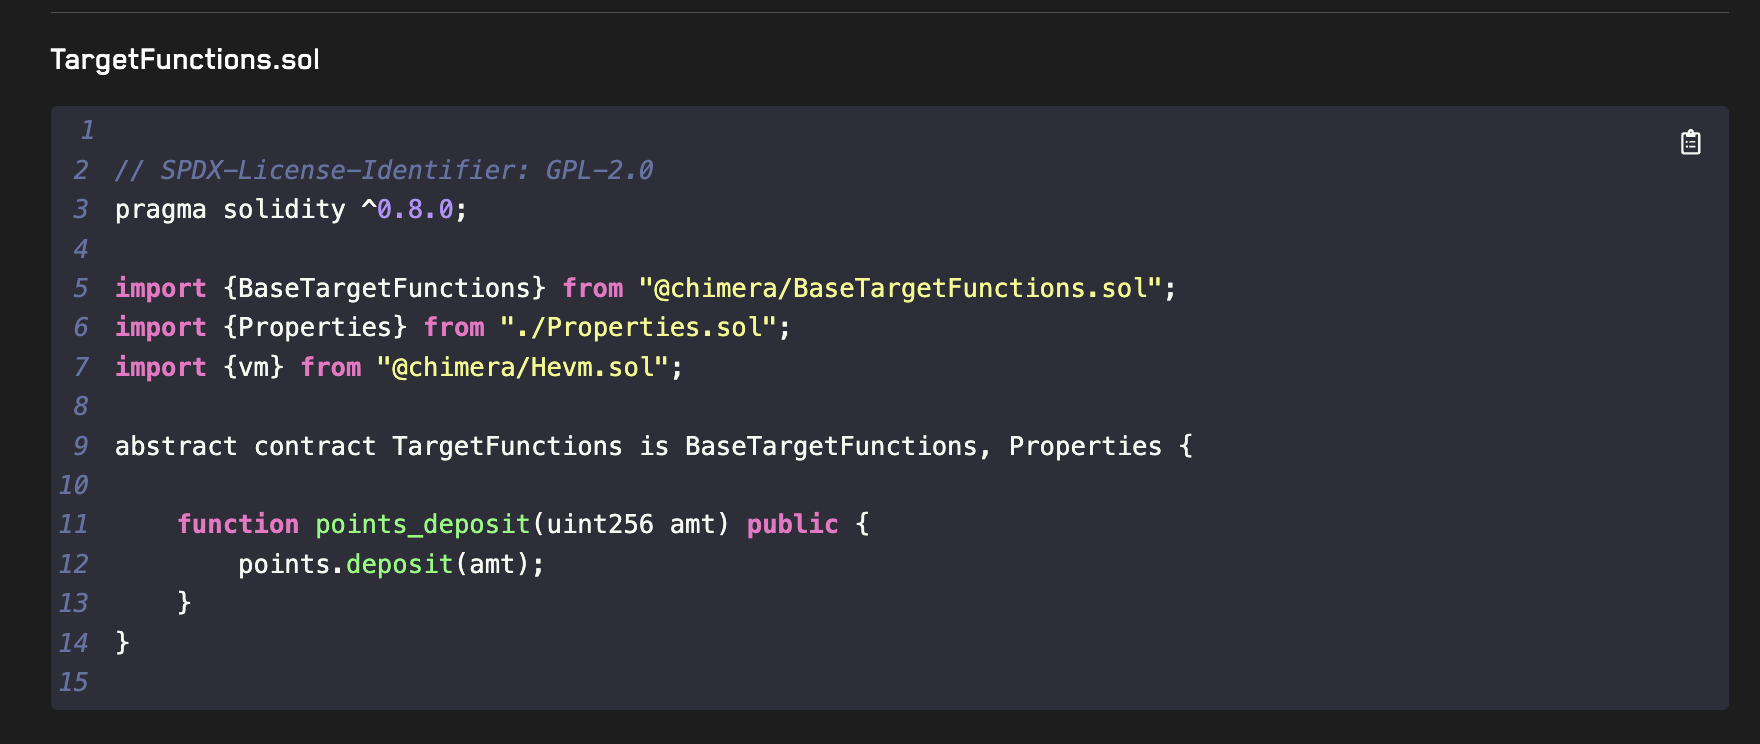
In this case you can just copy the points_deposit handler into your TargetFunctions.sol contract. When working on a larger project however, you can use the Download All Files button to add multiple handlers directly into your project at once.
Make sure to add the updateGhosts and asActor modifiers to the points_deposit function if they are not present:
updateGhosts- will update all ghost variables before and after the call to the functionasActor- will ensure that the call is made by the currently active actor (returned by_getActor())
Your TargetFunctions contract should now look like:
abstract contract TargetFunctions is
    AdminTargets,
    DoomsdayTargets,
    ManagersTargets
{
    function points_deposit(uint88 amt) public updateGhosts asActor {
        points.deposit(amt);
    }
}
We can now run Medusa again to see how our newly added target function has changed our coverage.
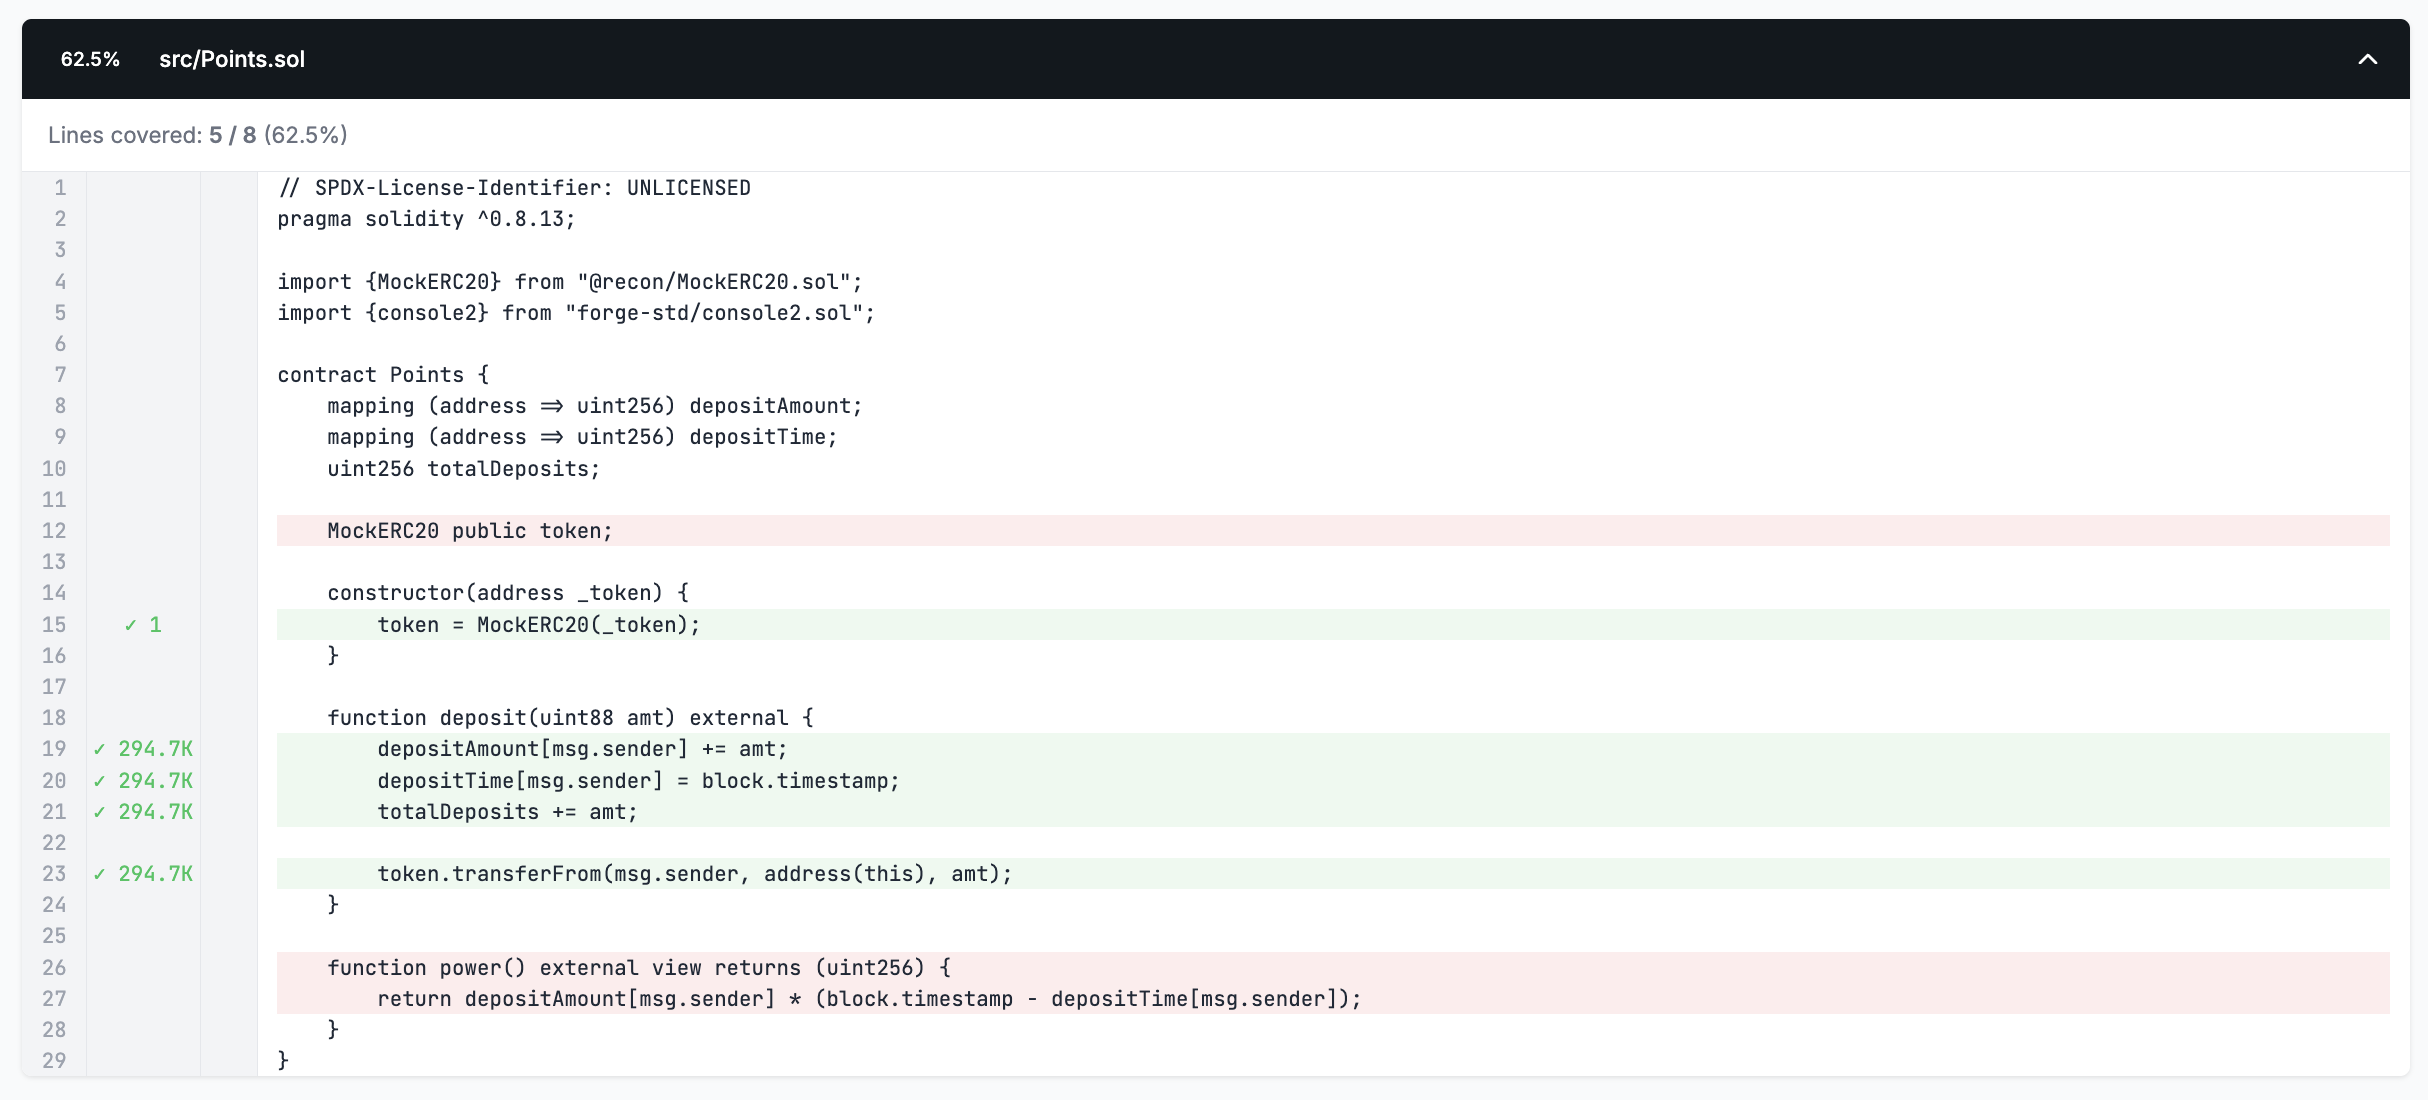
We now see that the deposit function is fully covered, but the power function is not since we haven't added a handler for it. Since the power function is non-state-changing (indicated by the view decorator) we'll leave it without a handler for now as it won't affect our ability to test properties.
The coverage report is effectively our eyes into what the fuzzer is doing.
We can now start defining properties to see if there are any edge cases in our Points contract that we may not have expected.
Implementing Properties
Checking for overflow
A standard property we might want to check in our Points contract is that it doesn't revert due to overflow.
Reverts due to over/underflow are not detected by default in Medusa and Echidna, so to explicitly test for this we can use a try-catch block in our DoomsdayTargets contract (this contract is meant for us to define things that should never happen in the system):
...
import {Panic} from "@recon/Panic.sol";

abstract contract DoomsdayTargets is
    BaseTargetFunctions,
    Properties
{
    /// Makes a handler have no side effects
    /// The fuzzer will call this and because it reverts it will be removed from call sequences during shrinking
    modifier stateless() {
        _;
        revert("stateless");
    }

    function doomsday_deposit_revert(uint88 amt) public stateless asActor {
        try points.deposit(amt) {
            // success
        } catch (bytes memory err) {
            expectedError = checkError(err, Panic.arithmeticPanic); // catches the specific revert we're interested in
            t(!expectedError, "should never revert due to under/overflow");
        }
    }
}
We use the
checkErrorfunction from the Utils contract to allow us to check for a particular revert message. ThePaniclibrary allows us to easily check for an arithmetic panic in particular without having to specify the panic code (note that this needs to be added as an import in the above).
We use the stateless modifier so that state changes made by this function call aren't preserved because they make the same changes as the points_deposit function.
Having two handlers that make the same state changes makes it more difficult to debug when we have a broken call sequence because we can easily tell what the points_deposit function does but it's not as clear from the name what the doomsday_deposit_revert does. Having doomsday_deposit_revert be stateless ensures that it only gets executed as a test in a call sequence for specific behavior that should never happen.
This pattern is very useful if you want to perform extremely specific tests that would make your normal handlers unnecessarily complex.
Testing for monotonicity
We can say that the Points contract's power variable value should be monotonically increasing (always increasing) since there's no way to withdraw, which we can prove with a global property and ghost variables.
To keep things simple, we'll only test this property on the current actor (handled by the ActorManager) which we can fetch using _getActor().
Next we'll need a way to fetch the power for the deposited user before and after each call to our points_deposit target function using the BeforeAfter contract:
abstract contract BeforeAfter is Setup {
    struct Vars {
        uint256 power;
    }

    Vars internal _before;
    Vars internal _after;

    modifier updateGhosts {
        __before();
        _;
        __after();
    }

    function __before() internal {
        // reads value from state before the target function call
        _before.power = points.power();
    }

    function __after() internal {
        // reads value from state after the target function call
        _after.power = points.power();
    }
}
This will update the power value in the _before and _after struct when the updateGhosts modifier is called on the points_deposit handler.
Now that we can know the state of the system before our state changing call, we can specify the property in the Properties contract:
abstract contract Properties is BeforeAfter, Asserts {
    function property_powerIsMonotonic() public {
        gte(_after.power, _before.power, "property_powerIsMonotonic");
    }
}
If we now run medusa fuzz we should get two broken properties!
Broken properties
Generating reproducers
After running the fuzzer you should see the following broken property in the console logs:
⇾ [FAILED] Assertion Test: CryticTester.doomsday_deposit_revert(uint88)
Test for method "CryticTester.doomsday_deposit_revert(uint88)" resulted in an assertion failure after the following call sequence:
[Call Sequence]
1) CryticTester.points_deposit(uint88)(235309800868430114045226835) (block=2, time=573348, gas=12500000, gasprice=1, value=0, sender=0x10000)
2) CryticTester.doomsday_deposit_revert(uint88)(102431335005787171573853953) (block=2, time=573348, gas=12500000, gasprice=1, value=0, sender=0x30000)
[Execution Trace]
 => [call] CryticTester.doomsday_deposit_revert(uint88)(102431335005787171573853953) (addr=0x7D8CB8F412B3ee9AC79558791333F41d2b1ccDAC, value=0, sender=0x30000)
         => [call] StdCheats.prank(address)(0x7D8CB8F412B3ee9AC79558791333F41d2b1ccDAC) (addr=0x7109709ECfa91a80626fF3989D68f67F5b1DD12D, value=0, sender=0x7D8CB8F412B3ee9AC79558791333F41d2b1ccDAC)
                 => [return ()]
         => [call] Points.deposit(uint88)(102431335005787171573853953) (addr=0x6804A3FF6bcf551fACf1a66369a5f8802B3C9C58, value=0, sender=0x7D8CB8F412B3ee9AC79558791333F41d2b1ccDAC)
                 => [panic: arithmetic underflow/overflow]
         => [event] Log("should never revert due to under/overflow")
         => [panic: assertion failed]
For all but the simplest call sequences this is very difficult to read and even harder to debug. This is why we made the Chimera Framework extremely opinionated, because we believe that reading Medusa and Echdina traces is a very slow and difficult way to debug broken properties.
As a result of this, all of our templates come with the ability to reproduce broken properties as unit tests in Foundry.
So instead of debugging our broken property from the Medusa logs directly, we'll use Foundry:
- Copy the Medusa output logs in your terminal
- Go to the Medusa Log Scraper tool
- Paste the logs
- A reproducer unit test will be created for the broken property automatically
- Click the dropdown arrow to show the unit test
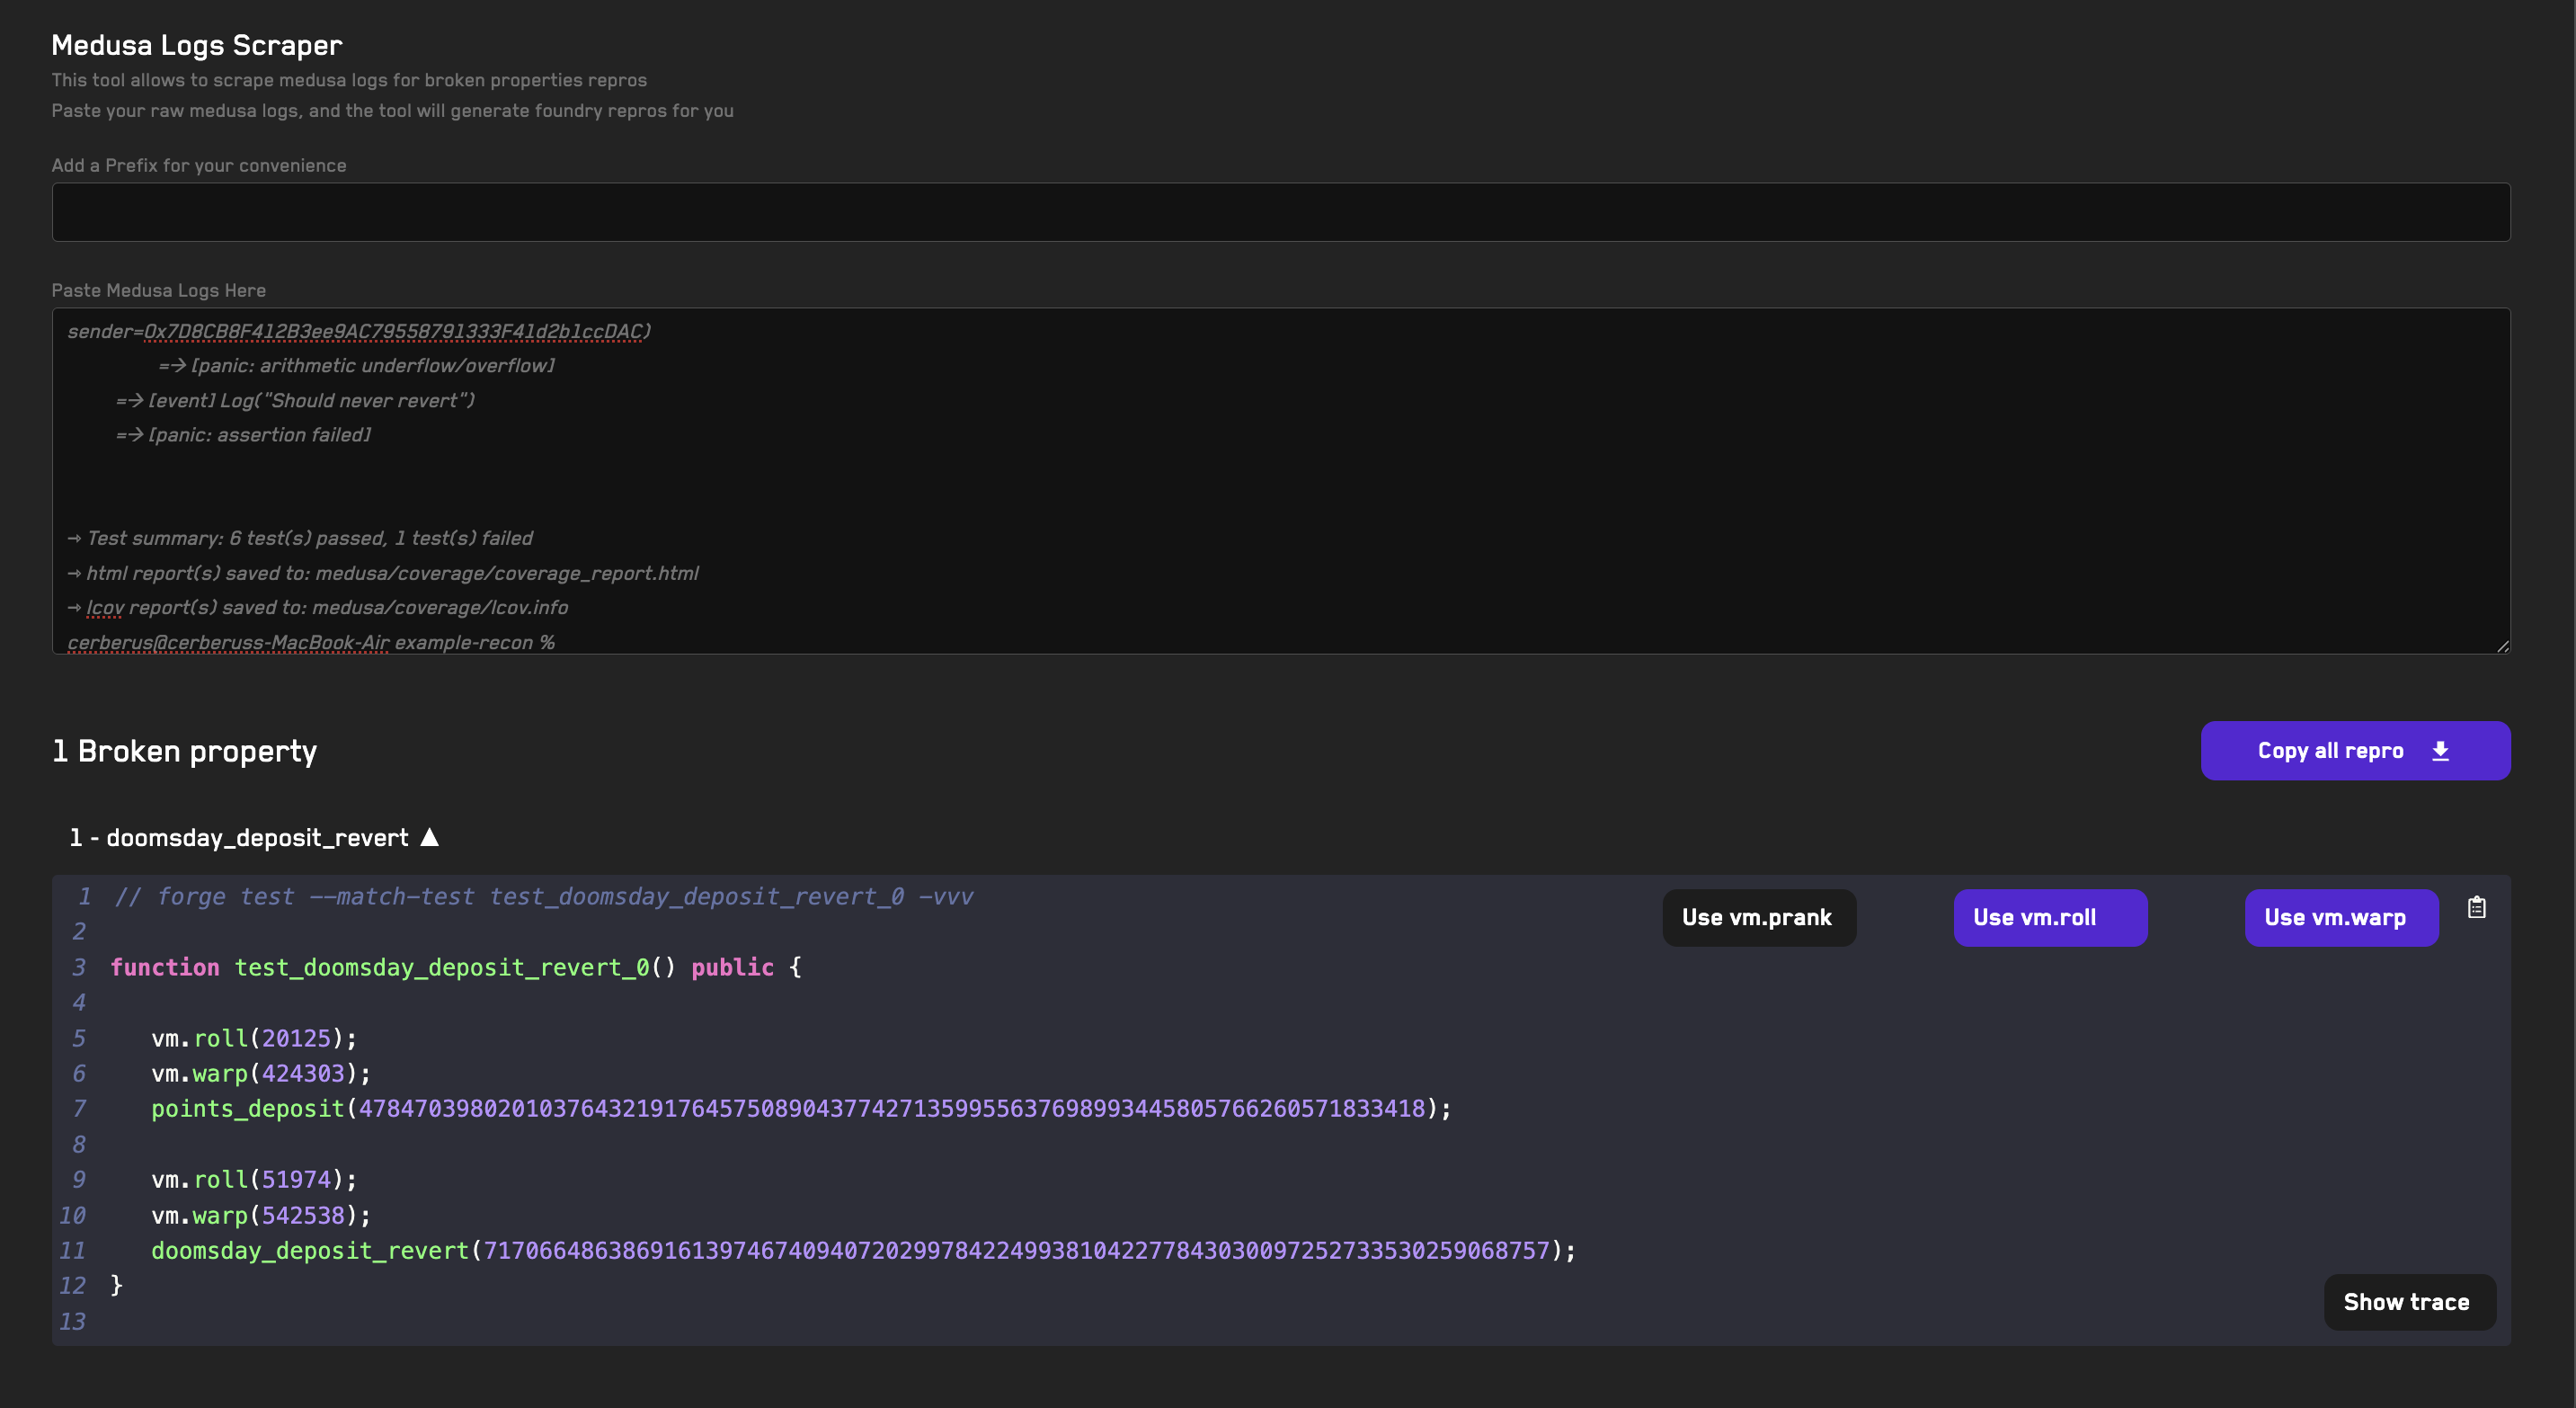
- Disable the
vm.prankcheatcode by clicking the button (as we're overriding Medusa's behavior) - Click on the clipboard icon to copy the reproducer
- Open the
CryticToFoundrycontract and paste the reproducer unit test - Run it with Foundry using the
forge test --match-test test_doomsday_deposit_revert_0 -vvvcommand in the comment above it
// forge test --match-contract CryticToFoundry -vv
contract CryticToFoundry is Test, TargetFunctions, FoundryAsserts {
    function setUp() public {
        setup();
    }

    // forge test --match-test test_doomsday_deposit_revert_0 -vvv
    function test_doomsday_deposit_revert_0() public {
        vm.roll(2);
        vm.warp(573348);
        points_deposit(235309800868430114045226835);

        vm.roll(2);
        vm.warp(573348);
        doomsday_deposit_revert(102431335005787171573853953);
    }
}
We now have a Foundry reproducer! This makes it much easier to debug because we can quickly test only the call sequence that causes the property to break and add logging statements wherever needed.
You'll also notice that although intuitively the property_powerIsMonotonic property should not break because we don't allow deposits to be withdrawn, the fuzzer breaks it:
⇾ [FAILED] Assertion Test: CryticTester.property_powerIsMonotonic()
Test for method "CryticTester.property_powerIsMonotonic()" resulted in an assertion failure after the following call sequence:
[Call Sequence]
1) CryticTester.points_deposit(uint88)(38781313) (block=9757, time=110476, gas=12500000, gasprice=1, value=0, sender=0x10000)
2) CryticTester.points_deposit(uint88)(0) (block=44980, time=367503, gas=12500000, gasprice=1, value=0, sender=0x20000)
3) CryticTester.property_powerIsMonotonic()() (block=44981, time=422507, gas=12500000, gasprice=1, value=0, sender=0x10000)
[Execution Trace]
 => [call] CryticTester.property_powerIsMonotonic()() (addr=0x7D8CB8F412B3ee9AC79558791333F41d2b1ccDAC, value=0, sender=0x10000)
         => [event] Log("property_powerIsMonotonic")
         => [panic: assertion failed]
Debugging the cause of this break is left as an exercise for the reader, but we'll learn some useful tricks in the next section below for debugging the broken property in points_deposit.
Debugging the overflow property
Running the reproducer for the doomsday_deposit_revert property we can clearly see that we get an over/underflow but it's not very clear from the call trace where this happens exactly:
    ├─ [843] Points::deposit(102431335005787171573853953 [1.024e26])
    │   └─ ← [Revert] panic: arithmetic underflow or overflow (0x11)
    ├─ [7048] Utils::checkError(0x4e487b710000000000000000000000000000000000000000000000000000000000000011, "Panic(17)")
    │   ├─ [6142] Utils::_getRevertMsg(0x4e487b710000000000000000000000000000000000000000000000000000000000000011)
    │   │   ├─ [930] Utils::_checkIfPanic(0x4e487b710000000000000000000000000000000000000000000000000000000000000011)
    │   │   │   └─ ← true
    │   │   ├─ [5062] Utils::_getPanicCode(0x4e487b710000000000000000000000000000000000000000000000000000000000000011)
    │   │   │   └─ ← "Panic(17)", false
    │   │   └─ ← "Panic(17)", false
    │   └─ ← true
    ├─ [0] VM::assertTrue(false, "should never revert due to under/overflow") [staticcall]
    │   └─ ← [Revert] should never revert due to under/overflow
    └─ ← [Revert] should never revert due to under/overflow
We can add console logs to the Points contract and the reproducer to see where exactly it overflows:
    function deposit(uint88 amt) external {
        console2.log("here 1");
        depositAmount[msg.sender] += amt;
        console2.log("here 2");
        depositTime[msg.sender] = block.timestamp;
        console2.log("here 3");
        totalDeposits += amt;
        console2.log("here 4");

        token.transferFrom(msg.sender, address(this), amt);
    }
    function test_doomsday_deposit_revert_0() public {
        console2.log("=== Before Deposit ===");
        vm.roll(2);
        vm.warp(573348);
        points_deposit(235309800868430114045226835);

        console2.log("=== Before Doomsday ===");
        vm.roll(2);
        vm.warp(573348);
        doomsday_deposit_revert(102431335005787171573853953);
    }
Which gives us the following console logs when we run the test:
  === Before Deposit ===
  here 1
  here 2
  here 3
  here 4
  === Before Doomsday ===
  here 1
This indicates to us that the issue is in the second increment of depositAmount. If we check the type of depositAmount we see that it's a uint88.
contract Points {
    mapping (address => uint88) depositAmount;
    ...
}
This indicates that we must be depositing more than type(uint88).max, and if we check if the sum of the deposited amounts in the test is greater than type(uint88).max, we get the following:
  sum of deposits 337741135874217285619080788
  type(uint88).max 309485009821345068724781055
  sum of deposits > type(uint88).max true
So we can see that the issue happens because in our Setup we initially mint type(uint256).max to the actor so they can deposit more than type(uint88).max over multiple calls:
    function setup() internal virtual override {
        ...
        _finalizeAssetDeployment(_getActors(), approvalArray, type(uint256).max);
    }
This means that to fix the broken property we either need to change the type of the depositAmount variable to uint256 or limit the amount that we initially mint to the actor. For our purposes we'll change the type of the depositAmount variable.
Now when we run the fuzzer we can see that the property no longer breaks:
^C⇾ Fuzzer stopped, test results follow below ...
⇾ [PASSED] Assertion Test: CryticTester.add_new_asset(uint8)
⇾ [PASSED] Assertion Test: CryticTester.asset_approve(address,uint128)
⇾ [PASSED] Assertion Test: CryticTester.asset_mint(address,uint128)
⇾ [PASSED] Assertion Test: CryticTester.doomsday_deposit_revert(uint88)
⇾ [PASSED] Assertion Test: CryticTester.points_deposit(uint88)
⇾ [PASSED] Assertion Test: CryticTester.switch_asset(uint256)
⇾ [PASSED] Assertion Test: CryticTester.switchActor(uint256)
⇾ [FAILED] Assertion Test: CryticTester.property_powerIsMonotonic()
Test for method "CryticTester.property_powerIsMonotonic()" resulted in an assertion failure after the following call sequence:
[Call Sequence]
1) CryticTester.points_deposit(uint88)(73786976294838206465) (block=19477, time=38924, gas=12500000, gasprice=1, value=0, sender=0x30000)
2) CryticTester.asset_mint(address,uint128)(0x7D8CB8F412B3ee9AC79558791333F41d2b1ccDAC, 79387721835223434743036999817) (block=43362, time=399548, gas=12500000, gasprice=1, value=0, sender=0x10000)
3) CryticTester.points_deposit(uint88)(0) (block=43362, time=399548, gas=12500000, gasprice=1, value=0, sender=0x10000)
4) CryticTester.property_powerIsMonotonic()() (block=43363, time=882260, gas=12500000, gasprice=1, value=0, sender=0x30000)
[Execution Trace]
 => [call] CryticTester.property_powerIsMonotonic()() (addr=0x7D8CB8F412B3ee9AC79558791333F41d2b1ccDAC, value=0, sender=0x30000)
         => [event] Log("property_powerIsMonotonic")
         => [panic: assertion failed]


⇾ Test summary: 7 test(s) passed, 1 test(s) failed
This is one of the key benefits of having properties defined, they allow you to check your codebase against any changes you make to ensure that you don't introduce new bugs.
Note that changing the
depositAmounttouint256only resolves this issue when we have a single actor that deposits, if there are multiple actors that deposit whose balances sum to more thantype(uint256).maxthe property will break again.
Now it's your turn, see if you can apply the techniques discussed here to figure out why the property_powerIsMonotonic breaks!
If you get stuck or need help, reach out to the Recon team in our discord!
Implementing Properties
Implementing properties is the most important part of invariant testing, here we'll look at the different types of properties that you can define and how these can be implemented (inlined or global) along with the different techniques that you can use to implement your properties as code using an ERC4626 vault as an example.
What are properties?
Properties allow us to define behaviors that we expect in our system. In the context of testing we can say that properties are logical statements about the system that we test after state-changing operations are made via a call to one of the target function handlers.
We can use the term invariants to specify properties of a system that should always hold true, meaning after any state-changing operation.
We can use an ERC20 token as an example and define one property and one invariant for it:
- Property: a user’s balance should increase only after calls to the
transferandmintfunctions - Invariant: the sum of user balances should never be greater than the
totalSupply
We prefer to use the term properties throughout this book because it covers invariants as well properties since invariants are a subset of properties but properties are not a subset of invariants.
Property types
In this presentation, Certora lays out the five fundamental types of properties we’re interested in when writing invariants.
Namely these types of properties are:
- Valid States - checking that the system only stays in one of the expected states
- State Transitions - checking transitions between valid/invalid states
- Variable Transitions - checking that variables only change to/from certain expected values
- High-Level Properties - checking broad system behavior
- Unit Tests - checking specific behavior within functions
For more info on understanding these different types of properties, see this post.
Inlined vs global properties
After having implemented many suites ourselves, we realized that methods to implement properties fall into major categories: inlined and global.
We call properties defined inside a function handler inlined, like the following from the Create Chimera App template:
    function counter_setNumber2(uint256 newNumber) public asActor {
        // same example assertion test as counter_setNumber1 using ghost variables
        __before();
        counter.setNumber(newNumber);
        __after();


        if (newNumber != 0) {
            t(_after.counter_number == newNumber, "number != newNumber");
        }
    }
Because these properties are defined within the handlers themselves, they are only checked after the call to the target handler. This means that by definition they aren't required to hold for other function calls.
We call properties defined as standalone public functions in the Properties contract that read some state or ghost variable global; the following example is also taken from the Create Chimera App template:
    function invariant_number_never_zero() public {
        gt(counter.number(), 0, "number is zero");
    }
Because global properties are publicly exposed functions, they can be called by the fuzzer after any call to one of the state-changing handlers (just like how boolean properties normally work). This lets us check that a property holds for any function call, so we can use it to implement our system's invariants.
Testing mode
Echidna and Medusa, the two primary fuzzers that we use, allow defining properties using assertions as well as boolean properties.
The same global property in the example above could be rewritten as an Echidna boolean property like so:
    function echidna_number_never_zero() public returns (bool) {
        return counter.number() == 0;
    }
Any property that can be written as a boolean property however can also be writen using an assertion, simplifying the test writing process and allowing us to run only one job with Echidna in assertion mode rather than one job in assertion and one in property mode, since Echidna doesn't support using two testing modes at the same time.
Most professionals write all properties as assertions to run them with echidna
Example
We'll be using the scaffolding setup on this simplified ERC4626 vault repo on the book/example branch.
In the scaffolded setup linked to above, the handlers each explicitly clamp any addresses that receive shares using the
_getActor()function from theActorManager. This allows us to ensure that only actors that we've added to the Setup receive share tokens and makes it easier to check properties on them.
Vault Properties
We'll be looking at how we can implement the following properties on an ERC4626 vault.
- The
totalSupplyof the vault's shares must be greater than or equal to the shares accounted to each user. - The
depositfunction should never revert for a depositor that has sufficient balance and approvals. - The price per share shouldn't increase on removals.
1. totalSupply check
Looking at the property definition, we can see that it doesn't specify any operation that we should check the property after, so we can define this as a global property in the Properties contract.
Since this property only requires that we know the value of state variables after a given operation, we can just read these state values directly from the contract and make an assertion:
    /// @dev Property: The `totalSupply` of the vault's shares must be greater than or equal to the shares accounted to each user
    function property_total_supply_solvency() public {
        uint256 totalSupply = vault.totalSupply();
        // the only depositors in the system will be the actors that we added in the setup
        address[] memory users = _getActors();

        uint256 sumUserShares;
        for (uint256 i = 0; i < users.length; i++) {
            sumUserShares += vault.balanceOf(users[i]);
        }

        lte(sumUserShares, totalSupply, "sumUserShares must be <= to totalSupply");
    }
Using the
/// @dev PropertyNatSpec tag makes clear to any collaborators what the property checks without them having to reason through the property themselves
We use the less-than-or-equal-to (lte) assertion in this case because we only care that the vault doesn't round up against the protocol. If it rounds in favor of the protocol, causing the sum of user balances to be less than the totalSupply, we can consider this acceptable because it still means the vault is solvent and users don't have more shares than expected.
2. Vault deposit never fails
This property is explicitly stating that the check should only be made for the deposit function. This means we can implement this property as an inlined property inside the vault_deposit function.
    /// @dev Property: The `deposit` function should never revert for a depositor that has sufficient balance and approvals
    function vault_deposit(uint256 assets) public updateGhosts asActor {
        try vault.deposit(assets, _getActor()) {
            // success
        } catch (bytes memory reason) {
            bool expectedError =
                checkError(reason, "InsufficientBalance(address,uint256,uint256)") ||
                checkError(reason, "InsufficientAllowance(address,address,uint256,uint256)");

            // precondition: we only care about reverts for things other than insufficient balance or allowance
            if (!expectedError) {
                t(false, "deposit should not revert");
            }
        }
    }
We use the checkError helper function from the Recon setup-helpers repo, which allows us to check the revert message from the call to make sure it's not reverting for the expected reasons of insufficient balance or allowance.
3. Price per share increase
This property is more open-ended, but we can conclude from the definition that the price per share shouldn't change for operations that remove assets from the vault.
Since we have two target functions that remove assets from the vault (withdraw/redeem), we can check this as a global property that excludes operations that don't remove assets from the vault. This simplifies the implementation so we don't implement the same property in the vault_withdraw and vault_redeem handler.
To allow us to track the operation of interest, we add the updateGhostsWithOpType modifier to the vault_redeem and vault_withdraw handlers:
    function vault_redeem(uint256 shares) public updateGhostsWithOpType(OpType.REMOVE) asActor {
        vault.redeem(shares, _getActor(), _getActor());
    }

    function vault_withdraw(uint256 assets) public updateGhostsWithOpType(OpType.REMOVE) asActor {
        vault.withdraw(assets, _getActor(), _getActor());
    }
We then define the following update in the BeforeAfter contract, which allows us to track the price per share before and after any operation using the updateGhostsWithOpType/updateGhosts modifiers:
    function __before() internal {
        _before.pricePerShare = vault.previewMint(10**vault.decimals());
    }

    function __after() internal {
        _after.pricePerShare = vault.previewMint(10**vault.decimals());
    }
We can then define a global property that checks that removal operations do not change the price per share:
    function property_price_per_share_change() public {
        if (currentOperation == OpType.REMOVE) {
            eq(_after.pricePerShare, _before.pricePerShare, "pricePerShare must not change after a remove operation");
        }
    }
Running the fuzzer
Now with the properties implemented, all that's left to do is run the fuzzer to determine if any of the properties break.
Since we used the Create Chimera App template when scaffolding the above example, we can run Echidna locally using:
echidna . --contract CryticTester --config echidna.yaml
and Medusa using:
medusa fuzz
to run the job using the Recon cloud runner see the Running Jobs page.
Optimizing Broken Properties
Echidna's optimization mode is a powerful tool for understanding the maximum possible impact of a vulnerability discovered by a broken property.
Optimization mode often allows you to determine if the impact of a vulnerability can be greater than what's shown by the originally broken property or if it's minimal because it isn't increased by the optimization test.
As of the time of writing, optimization mode is only available in Echidna, not Medusa
What is optimization mode?
Optimization mode allows you to define a test function that starts with a special prefix (we tend to set this to optimize_ in the echidna.yaml), takes no arguments and returns an int256 value:
    function optimize_price_per_share_difference() public view returns (int256) {
        return maxPriceDifference;
    }
In the above example the maxPriceDifference value would be set by one of our target function handlers, then Echidna would call all the function handlers with random values in an attempt to maximize the value returned by optimize_price_per_share_difference.
Example
We'll now look at an example of how we can use optimization mode to increase the severity of a finding discovered by a broken property using this ERC4626 vault as an example.
Defining the property
First, because this is an ERC4626 vault without the possibility of accumulating yield or taking losses we can define a standard property that states: a user should not be able to change the price per share when adding or removing.
This check ensures that a malicious user cannot perform actions that would make it favorable for them to arbitrage the share token/underlying asset or allow them to steal funds from other users by giving themselves a more favorable exchange rate.
We specify when adding or removing in the property because these are the only operations that change the amount of underlying assets and shares in the vault so these are the ones that would affect the share price.
Given that an ERC4626 vault has user operations that don't exclusively add or remove shares and assets from the vault (tranfer and approve), we can use the OpType enum in the updateGhostsWithOpType modifier in our target handlers to only check the property after a call to one of our target functions of interest:
    function vault_deposit(uint256 assets) public updateGhostsWithOpType(OpType.ADD) asActor {
        vault.deposit(assets, _getActor());
    }

    function vault_mint(uint256 shares) public updateGhostsWithOpType(OpType.ADD) asActor {
        vault.mint(shares, _getActor());
    }

    function vault_redeem(uint256 shares) public updateGhostsWithOpType(OpType.REMOVE) asActor {
        vault.redeem(shares, _getActor(), _getActor());
    }

    function vault_withdraw(uint256 assets) public updateGhostsWithOpType(OpType.REMOVE) asActor {
        vault.withdraw(assets, _getActor(), _getActor());
    }
We can then add updates to the price per share in the BeforeAfter contract like so:
    function __before() internal {
        _before.pricePerShare = vault.convertToShares(10**underlyingAsset.decimals());
    }

    function __after() internal {
        _after.pricePerShare = vault.convertToShares(10**underlyingAsset.decimals());
    }
The above checks how many shares would be received for a deposit of 1 unit of the underlying asset (using the underlyingAsset's decimal precision) giving us an implicit price per share.
Finally, we can implement our property as:
    function property_user_cannot_change_price_per_share() public {
        if(currentOpType == OpType.ADD || currentOpType == OpType.REMOVE) {
            eq(_before.pricePerShare, _after.pricePerShare, "price per share should not change with user operations");
        }
    }
which simply checks that the pricePerShare stays the same after any of the user operations that add or remove tokens to the system (mint, deposit, withdraw and redeem).
For more details on how to implement properties using the above
OpTypeenum see this section.
Breaking the property
After a brief run of Echidna, the property is broken with less than 5000 tests run:
property_user_cannot_change_price_per_share(): failed!💥
  Call sequence:
    CryticTester.vault_mint(3)
    CryticTester.property_user_cannot_change_price_per_share()

Traces:
emit Log(«price per share should not change with user operations»)
This indicates that something in the ERC4626Vault::mint function is allowing the user to manipulate the price per share.
However, after running the unit test that we generate with the Echidna log scraper tool we can see that the pricePerShare only changes by 1 wei:
[FAIL: price per share should not change with user operations: 1000000000000000000 != 999999999999999999] test_property_user_cannot_change_price_per_share_0() (gas: 182423)
Logs:
  price per share difference 1
Given that any price manipulation by an attacker would allow them to perform arbitrage on the vault, we know this is already a vulnerability, but we can now create an optimization test to determine if the maximum price change is limited to this 1 wei value or if it can be made greater, potentially allowing an attacker to directly steal funds from other users as well.
Creating the optimization tests
Since we want to optimize the difference between the price per share, we can define two separate variables in our Setup contract for tracking this, one which tracks increases to the price per share and one that tracks decreases to it:
    int256 maxPriceDifferenceIncrease;
    int256 maxPriceDifferenceDecrease;
We can then define two separate optimization tests to optimize each of these values. If we were to only define one optimization test, we'd be losing information on other potential issue paths as the call sequence given at the end of the fuzzing run will only give us one maximized value.
For example, in our scenario if we only had one test for the price increasing and decreasing, if the price decrease was greater than the price increase, we'd only be able to analyze scenarios where it decreases. Given that we already knew from the initial property break that decreasing the price is possible, this would leave us unaware of exploits paths that could be executed with an increasing price.
We therefore define the following two optimization tests for the difference in price before and after a call to one of our handlers of interest in our Properties contract:
    function optimize_user_increases_price_per_share() public returns (int256) {
        if(currentOpType == OpType.ADD || currentOpType == OpType.REMOVE) {
            if(_before.pricePerShare < _after.pricePerShare) {
                maxPriceDifferenceIncrease = int256(_after.pricePerShare) - int256(_before.pricePerShare);
                return maxPriceDifferenceIncrease;
            }
        }
    }

    function optimize_user_decreases_price_per_share() public returns (int256) {
        if(currentOpType == OpType.ADD || currentOpType == OpType.REMOVE) {
            if(_before.pricePerShare > _after.pricePerShare) {
                maxPriceDifferenceDecrease = int256(_before.pricePerShare) - int256(_after.pricePerShare);
                return maxPriceDifferenceDecrease;
            }
        }
    }
which will set each of the respective maxPriceDifference variables accordingly.
Note that the tests above are optimizing the difference in price so they will allow us to confirm if we are able to change the price by more than the 1 wei which we already know is possible from the initial property break.
Running the optimization tests
We can then run the tests using optimization mode by either modifying the testMode parameter in the echidna.yaml config file or by passing the --test-mode optimization flag to the command we use to run Echidna. For our case we'll use the latter:
echidna . --contract CryticTester --config echidna.yaml --test-mode optimization --test-limit 100000
Note that we also increased the testLimit so that we can give the fuzzer plenty of chances to find a call sequence that optimizes the value. This is key in allowing you to generate a truly optimized value, in production codebases we tend to run optimization mode for 100,000,000-500,000,000 tests but theoretically for a test suite with many handlers and state variables that influence the value you're trying to optimize, the longer you run the tests for, the higher the possibility of finding an optimized value.
Typically when we've found a value that's sufficient to prove an increase in the severity of the vulnerability, by demonstrating that the value can be made greater than a small initial value in the original property break, we'll stop the optimization run.
Conversely, if the optimization run shows no increase after a few million tests it typically means it was incorrectly specified or there is in fact no way to increase the value further.
Note: stopping an Echidna optimization run early doesn't allow the call sequence that increased the value to be properly shrunk as of the time of writing (see this issue). If you've already found a sufficiently optimized value and don't want to wait until the run completes, you can stop the run and start a new run with a shorter
testLimitand reuse the corpus from the previous run to force Echidna to shrink the reproducer in the corpus.
After running the fuzzer for 100,000 runs for the above defined tests we get the following outputs in the console:
optimize_user_decreases_price_per_share: max value: 1000000000000000000

  Call sequence:
    CryticTester.asset_mint(0x2e234dae75c793f67a35089c9d99245e1c58470b,1005800180287214122)
    CryticTester.vault_deposit(1)

...

optimize_user_increases_price_per_share: max value: 250000000000000000

  Call sequence:
    CryticTester.vault_deposit(2)
    CryticTester.vault_deposit(1)
    CryticTester.vault_deposit(1)
    CryticTester.vault_withdraw(2)
from which we can see that an attacker can therefore not only decrease the price per share as our original property break implied, but they can also increase the price using a completely different call sequence. This is why it's key to define separate optimization tests for increases and decreases for whatever value your initial property breaks.
Investigating the issue
We can use the above call sequences with our Echidna log scraper tool to generate unit tests that allow us to debug the root cause of the issues by adding the following tests to our CryticToFoundry contract:
    // forge test --match-test test_optimize_user_decreases_price_per_share_0 -vvv
    function test_optimize_user_decreases_price_per_share_0() public {
        // Max value: 1000000000000000000;
        asset_mint(0x2e234DAe75C793f67A35089C9d99245E1C58470b,1005800180287214122);
        vault_deposit(1);
    }

    // forge test --match-test test_optimize_user_increases_price_per_share_1 -vvv
    function test_optimize_user_increases_price_per_share_1() public {
        // Max value: 250000000000000000;
        vault_deposit(2);
        vault_deposit(1);
        vault_deposit(1);
        vault_withdraw(2);
    }
Decreasing price
For the test_optimize_user_decreases_price_per_share_0 test, we see that the asset_mint is making a donation. We don't know which of the deployed contracts in the setup is deployed at the address to which the donation is made (0x2e234DAe75C793f67A35089C9d99245E1C58470b) but we can make an educated guess that it's the vault contract because if the test allows us to manipulate the share price it must be affecting the ratio of shares to assets in the vault.
Logging the value of the deployed vault in the test we can confirm this:
Logs:
  vault 0x2e234DAe75C793f67A35089C9d99245E1C58470b
So essentially this test is telling us that: "if I donate a large amount then make a deposit I can decrease the price per share".
Investigating further we can see that the ERC4626Vault::deposit function calls ERC4626Vault::previewDeposit which calls ERC4626Vault::convertToShares:
contract ERC4626Vault is MockERC20 {
    ...

    function deposit(uint256 assets, address receiver) public virtual returns (uint256) {
        uint256 shares = previewDeposit(assets);
        _deposit(msg.sender, receiver, assets, shares);
        return shares;
    }

    ...

    function previewDeposit(uint256 assets) public view virtual returns (uint256) {
        return convertToShares(assets);
    }

    ...

    function convertToShares(uint256 assets) public view virtual returns (uint256) {
        uint256 supply = totalSupply;
        if (supply == 0) return assets;

        // VULNERABILITY: Precision Loss Inflation Attack
        // This creates a subtle inflation vulnerability through precision loss manipulation
        // The attack works by exploiting division-before-multiplication in specific scenarios

        uint256 totalAssets_ = totalAssets();

        // Step 1: Calculate share percentage first (division before multiplication)
        uint256 sharePercentage = assets * 1e18 / totalAssets_;  // Get percentage with 18 decimals

        // Step 2: Apply percentage to total supply
        uint256 shares = sharePercentage * supply / 1e18;

        // The vulnerability: When totalAssets_ >> assets, sharePercentage rounds down to 0
        // This allows attackers to:
        // 1. Deposit large amount to inflate totalAssets
        // 2. Make small deposits from other accounts that get 0 shares due to rounding
        // 3. Withdraw their initial deposit plus the "donated" assets from failed deposits

        return shares;
    }

}
which identifies the bug that was planted.
If we expand the existing test, we can prove the observation in the comments that the first depositor's donation can drive the depositor's received shares for small deposits down to 0:
    function test_optimize_user_decreases_price_per_share_0() public {
        // Max value: 1000000000000000000;
        asset_mint(0x2e234DAe75C793f67A35089C9d99245E1C58470b,1005800180287214122);
        vault_deposit(1);

        // switch to the other actor and deposit a small amount
        switchActor(1);
        vault_deposit(1e18);
        console2.log("balance of actor 2 after deposit", vault.balanceOf(_getActor()));
    }
Logs:
  balance of actor 2 after deposit 0
this allows the attacker to steal shares of the other depositor(s) on withdrawal, an increase in severity of the originally identified bug of arbitraging by deflating the price.
Increasing price
For the test_optimize_user_increases_price_per_share_1 we can see that multiple small deposits followed by a withdrawal of a small amount allows the user to manipulate the price upward.
The root cause of this issue is the same but can you identify why it increases the price instead of decreasing it? What would the impact of being able to manipulate the price in this way?
Optimization Mode Gotchas
Coverage
When using optimization mode it's often best to run an extended job using the Recon cloud runner to increase the probability of finding a high maximized value by letting the fuzzer run for an extended period of time. If you need to stop this run midway through because you've already found a sufficiently high value you'll need to download the corpus so you can generate a shrunken reproducer locally (as mentioned in the Running the optimization tests section above).
To reuse the corpus from a Recon cloud run locally you can download it using the Download Corpus button on the job page:

Unlike normal corpus reuse in Echidna however, when reusing a downloaded corpus for optimization mode you need to copy the contents of the reproducers-optimization directory into the coverage directory:

You can then run Echidna in optimization mode and you should be able to locally reproduce the maximized value from your cloud run.
Corpus
If the interface of your handlers change, you'll need to delete your old corpus and start with a fresh corpus, otherwise your old corpus will introduce call sequences that are no longer valid and cause your optimization run to be less efficient, possibly not being able to find a true maximum value.
Zero Call Sequence
There's a bug in Echidna optimization mode that causes it to fail to effectively shrink if one of the optimization test functions returns a 0 value as its maximum with an empty call sequence, this causes echidna to crash and the shrinking to fail:

In the above image the optimize_maxRedeem_greater causes the shrinking for optimize_maxDeposit_less to fail.
To work around this issue you can either:
- use the
filterBlacklistconfiguration option set tofalsewith only the function you want to optimize passed tofilterFunctions - comment out all other optimization tests so that you only test the one of interest
Continue learning
To see how the Recon team used optimization mode in a real world project to escalate the severity of a vulnerability to critical during an audit of the Beraborrow codebase, check out this article.
To see how optimization mode was used to escalate the severity of a QA vulnerability discovered in the Liquity V2 governance codebase to a high severity, see this presentation.
Advanced Fuzzing Tips
This is a compilation of best practices that the Recon team has developed while using the Chimera framework.
Target Functions
For each contract you want to fuzz (your target contract), select the state-changing functions (target functions) you want to include in your fuzzing suite. Wrap the function in a handler which passes in the input to the function call and allows the fuzzer to test random values.
// contract to target
contract Counter {
       uint256 public number;

       function increment() public {
              number++;
       }
}

abstract contract TargetFunctions {
       // function handler that targets our contract of interest
       function counter_increment() public asActor {
              counter.increment();
       }
}
The easiest way to do this is with our Invariants Builder tool or with the Recon Extension directly in your code editor.
By using the asActor or asAdmin modifiers in combination with an Actor Manager ensures efficient fuzzing by not wasting tests that should be executed only by an admin getting executed by a non-admin actor. These modifiers prank the call to the target contract as the given actor, ensuring that the call is made with the actor as the msg.sender.
// contract to target
contract Yield {
       address admin;
       uint256 yield;

       modifier onlyAdmin() {
              require(msg.sender == admin);
       }

       function resetYield(address _newAdmin) public onlyAdmin {
              yield = 0;
       }
}

abstract contract TargetFunctions {
       // calling this as an actor would waste fuzz calls because it would always revert so we use the asAdmin modifier
       function yield_resetYield() public asAdmin {
              yield.resetYield();
       }
}
Clamping Target Functions
Clamping reduces the search space for the fuzzer, making it more likely that you'll explore interesting states in your system.
Clamped handlers should be a subset of all target functions by calling the unclamped handlers with the clamped inputs. This ensures that the fuzzer doesn't become overbiased, preventing it from exploring potentially interesting states, and also ensures checks for inlined properties which are implemented in the unclamped handlers are always performed.
contract Counter {
    uint256 public number = 1;

    function setNumber(uint256 newNumber) public {
        if (newNumber != 0) {
            number = newNumber;
        }
    }
}

abstract contract TargetFunctions {
       function counter_setNumber(uint256 newNumber) public asActor {
              // unclamped handler explores the entire search space; allows the input to be 0
              counter.setNumber(newNumber);

              // inlined property check in the handler always gets executed
              if (newNumber != 0) {
                     t(counter.number == newNumber, "number != newNumber");
              }
       }

       // NOTE: Clamped handler doesn't use `asActor` nor before after handlers, as it's going to use the unclamped handler
       function counter_setNumber_clamped(uint256 newNumber) public {
              // clamping prevents the newNumber passed into setNumber from ever being 0
              newNumber = between(newNumber, 1, type(uint256).max);
              // clamped handler calls the unclamped handler
              counter_setNumber(newNumber);
       }
}
Disabling Target Functions
Certain state-changing functions in your target contract may not actually explore interesting state transitions and therefore waste calls made by the fuzzer which is why our ABI to invariants tool only scrapes functions from the targeted contract ABI that are non-view/pure. Other functions (generally admin privileged ones) introduce so many false positives into properties being tested (usually via things like contract upgrades or token sweeping functions) that it's better to ignore them. Doing so is perfectly okay even though it will reduce overall coverage of the targeted contracts.
To make sure it's understood by others looking at the test suite that you purposefully meant to ignore a function we tend to prefer commenting out the handler or including a alwaysRevert modifier that causes the handler to revert every time it's called by the fuzzer.
Setup
This section covers a few rules we've come to follow in our engagements regarding setting up invariant testing suites.
- Create your own test setup
- Keep the story clean
- State exploration and coverage
- Programmatic deployment
- Implicit clamping
Create Your Own Test Setup
If you're working on a codebase which you didn't originally develop, it's tempting to use the Foundry test setup that the developers used for their unit tests, however this can lead to introducing any of the biases present in the existing setup into the invariant testing suite.
We've found that it's best to create the simplest setup possible starting from scratch, where you only deploy the necessary contracts of interest and periphery contracts.
Periphery contracts can also often be mocked (see this section on how to automatically generate mocks using the Recon Extension) if their behavior is irrelevant to the contracts of interest. This further reduces complexity, making the suite more easily understood by collaborators and making it more likely you'll get full line coverage over the contracts of interest more quickly.
Keep The Story Clean
We call the "story" the view of the state changes made by a given call sequence in a tester. By maintaining only one state-changing operation per target function handler, it makes it much simpler to understand what's happening within a call sequence when a tool generates a reproducer that breaks a property that you've defined.
If you include multiple state-changing operations within a single handler it adds additional mental overhead when trying to debug a breaking call sequence because you not only need to identify which handler is the source of the issue, but the individual operation within the handler as well.
Take the following example of handlers defined for an ERC4626 vault:
       // having multiple state-changing operations in one handler makes it difficult to understand what's happening in the story
       function vault_deposit_and_redeem(uint256 assets) public asActor {
              uint256 sharesReceived = vault.deposit(assets);

              vault.redeem(sharesReceived);
       }

       // having separate target function handlers makes it easier to understand the logical flow that lead to a broken property in a reproducer call sequence
       function vault_deposit(uint256 assets) public asActor {
              uint256 sharesReceived = vault.deposit(assets);
       }

       function vault_redeem(uint256 assets) public asActor {
              uint256 sharesReceived = vault.deposit(assets);

              vault.redeem(sharesReceived);
       }
Although this is a simplified example we can see that maintaining separate handlers for each state-changing function makes our story much simpler to read.
If you need to perform multiple state-changing operations to test a given property, consider making the function stateless as discussed in the inlined fuzz properties section
State Exploration and Coverage
The most important aspect of invariant testing is what you actually test, and what you actually test is implied by the target functions you define in your test suite setup.
Some contracts, like oracles, may be too complex to fully model (e.g. having to reach a quorom of 3 signers to update the price) because they would add overhead in terms of function handlers that require specific clamping and test suite setup.
In these cases, mocking is preferred because it simplifies the process for the fuzzer to change return values (price in the case of the oracle example) or allow more straightforward interactions to be made by your targeted contracts (without requiring things like input validation on the mocked contract's side).
Mocking is a destructive operation because it causes a loss of information, but the simplification it provides leads fuzzing and formal verification tools to explore possible system states much faster.
Adding additional handlers for things like token donations (transfering/minting tokens directly to one of your targeted contracts) can allow you to explore interesting states that otherwise wouldn't be possible if you only had handlers for your contracts of interest.
Programmatic Deployment
Most developers tend to write static deployments for their test suites where specific contract are deployed with some default values.
However, this can lead to missing a vast amount of possible system states, some of which would be considered admin mistakes (because they're related to deployment configurations), others which are valid system configurations that are never tested with fixed deployment parameters.
This is why we now prefer using programmatic deployments because they allow us to use the randomness of the fuzzer to introduce randomness into the system configuration that's being tested against. Although programmatic deployments make running a suite slower (because the fuzzer needs to find a valid deployment configuration before achieving meaningful line coverage), they turn simple suites into multi-dimensional ones.
This is best understood with an example of a system designed to accept multiple tokens. With a static deployment you may end up testing tokens with 6 and 18 decimals (the two most common extremes). However, with a programmatic deployment, you can test many token configurations (say all tokens with 6-24 decimals) to ensure that your system works with all of them.
We've standardized these ideas around programmatic deployments in our Manager contracts.
Programmatic deployment consists of adding 4 general function types:
- A
deployhandler, which will deploy a new version of the target (e.g a token via_newAssetin theAssetManager) - A
switchTohandler, to change the current target being used (e.g the_switchAssetfunction in theAssetManager) - A
getCurrentinternal function, to know which is the current active target (e.g the_getAssetfunction in theAssetManager) - A
getAllinternal function, to retrieve all deployments (e.g the_getAssetsfunction in theAssetManager)
Using the pattern of managers can help you add multi-dimensionality to your test setup and make tracking deployed components simpler.
Implicit Clamping
Based on your deployments, configuration, and the target functions you expose, a subset of all possible system states will be reachable. This leads to what we call implicit clamping as the states not reachable by your test suite setup will obviously not be tested and therefore have a similar effect as if they were excluded via clamping.
Mapping out what behavior is and isn't possible given your suite setup can therefore be helpful for understanding the limitations of your suite.
With these limitations outlined, you can write properties that define what behaviors should and shouldn't be possible given your setup. Checking these properties with fuzzing or formal verification won't necessarily prove they're always true, simply that they're true for the setup you've created.
This tends to be the source of bugs that are missed with fuzzing, as ultimately you can only detect what you test and if your system isn't configured so that it can reach a certain state in which there's a bug, you won't ever be able to detect it.
Ghost Variables
Ghost variables are a supporting tool that allow you to track system state over time. These can then be used in properties to check if the state has evolved as expected.
In the Chimera Framework we've concretized our prefered method of tracking ghost variables using a BeforeAfter contract which exposes an updateGhosts modifier that allows you to cache the system state before and after a call to a given target function.
As a rule of thumb it's best to avoid computation in your updates to the ghost variables as it ends up adding addtional operations that need to be performed for each call executed by the fuzzer, slowing down fuzzing efficiency.
Do NOT put any assertions in your ghost variables and avoid any operation or call that may cause a revert. These cause all operations in the call sequence created by the fuzzer to be undone, leaving the fuzzer with a blindspot because it will be unable to reach certain valid states.
Overcomplicating ghost variables has the unfortunate side effect of making the coverage report look promising as it will show certain lines fully covered but in reality might be applying implicit clamping by causing reverts that prevent edge cases for certain properties being explored since an update that reverts before the property is checked will not generate a reproducer call sequence.
contract Counter {
    uint256 public number = 1;

    function setNumber(uint256 newNumber) public {
        if (newNumber != 0) {
            number = newNumber;
        }
    }
}

abstract contract TargetFunctions {
       // updateGhosts updates the ghost variables before and after the call to the target function
       function counter_setNumber1(uint256 newNumber) public updateGhosts asActor {
              counter.setNumber(newNumber);
       }
}

abstract contract BeforeAfter is Setup {
    struct Vars {
       uint256 counter_difference;
       uint256 counter_number;
    }

    Vars internal _before;
    Vars internal _after;

    modifier updateGhosts {
       __before();
       _;
       __after();
    }

    function __before() internal {
       // this line would revert for any value where the number before < the new number
       _before.counter_difference = _before.counter_number - counter.number();
    }

    function __after() internal {
       _after.counter_difference = _before.counter_number - counter.number();
    }
}
In the above example we can see that the __before() function would revert for any values where the newNumber passed into setNumber is greater than the value stored in _before.counter_number. This would still allow the coverage report to show the function as covered however because for all newNumber values less than or equal to _before.counter_number the update would succeed. This means that fundamentally we'd be limiting the search space of the fuzzer, preventing it from exploring any call sequences where newNumber is greater than the value stored in _before.counter_number and potentially missing bugs because of it.
Grouping Function Types
A simple pattern for grouping function types using ghost variables so they can easily be used as a precondition to a global property check is to group operations by their effects.
For example, you may have multiple deposit/mint operations that have the effect of "adding" and others of "removing".
You can group these effects using an enum type as follows:
enum OpType {
    GENERIC,
    ADD,
    REMOVE
}

modifier updateGhostsWithType(OpType op) {
       currentOperation = op;
       __before();
       _;
       __after();
}

modifier updateGhosts() {
       currentOperation = OpType.GENERIC;
       __before();
       _;
       __after();
}
And add the updateGhostsWithType modifier only to handlers which perform one of the operations of interest. All other handlers using the standard updateGhosts modifier will default to the GENERIC operation type so that you don't have to refactor any existing modifiers.
Now with the ability to elegantly track the current operation you can easily use the operation type to write a global property for it like so:
contract Counter {
       uint256 public number = 1;

       function increment() public {
              number++;
       }

       function decrement() public {
              number--;
       }
}

abstract contract TargetFunctions {
       // we set the respective operation type on our target function handlers
       function counter_increment() public updateGhostsWithType(OpType.INCREASE) asActor {
              counter.setNumber(newNumber);
       }

       function counter_increment() public updateGhostsWithType(OpType.DECREASE) asActor {
              counter.setNumber(newNumber);
       }
}

abstract contract BeforeAfter is Setup {
       enum OpType {
              INCREASE,
              DECREASE
       }

       struct Vars {
              uint256 counter_number;
       }

       Vars internal _before;
       Vars internal _after;

       modifier updateGhosts {
              __before();
              _;
              __after();
       }

       modifier updateGhostsWithType(OpType op) {
              currentOperation = op;
              __before();
              _;
              __after();
       }

       function __before() internal {
              _before.counter_number = counter.number();
       }

       function __after() internal {
              _after.counter_number = counter.number();
       }
}

abstract contract Properties is BeforeAfter, Asserts {
       function propert_number_decreases() public {
              // we can use the operation type as a precondition to a check in a global property
              if(currentOperation == OpType.DECREASE)
                     gte(_before.counter_number, _after.counter_number, "number does not decrease");
              }
       }
}
Inlined Fuzz Properties
Inlined properties allow you to make an assertion about the system state immediately after a given state-changing target function call:
contract Counter {
    uint256 public number = 1;

    function setNumber(uint256 newNumber) public {
       if (newNumber != 0) {
           number = newNumber;
       }
    }
}

abstract contract TargetFunctions
{
    function counter_setNumber(uint256 newNumber) public updateGhosts asActor {
       try counter.setNumber(newNumber) {
              // if the call to the target contract was successful, we make an assertion about the expected system state after
              if (newNumber != 0) {
                     t(counter.number() == newNumber, "number != newNumber");
              }
       }
    }
}
Repeating the same inlined property in multiple places should be avoided whenever possible.
Implementing the same inlined property in multiple places is essentially asking the fuzzer to break the property, not change the state (as an assertion failure prevents the call to the handler from completing), then to break the same property in a different way via another handler while already knowing that the property breaks. This is a waste of computational resources as you're asking the fuzzer to prove a fact that you already know instead of asking it to prove a new fact for which you're not sure if there's a proof (in the sense of a broken property, not a mathematical proof) or not.
If you find yourself implementing the same inline property multiple times, you should refactor them to only be assessed in one handler or checked as a global property using ghost variables.
If you can only implement a property as an inlined test but don't want multiple state changes to be maintained as it would make the story difficult to read, you can make your handler stateless using a stateless modifier.
modifier stateless() {
       _;
       // the revert is only made after the handler function execution completes
       revert("stateless")
}
This causes the handler to revert only at the end of execution, meaning any coverage exploration will be maintained and any assertion failures will happen before the revert.
Exploring Rounding Errors
Fuzzing is a particularly useful technique for finding precision loss related issues, as highlighted by @DevDacian in this blog post.
Simply put the approach for finding such issues is as follows. For any place where there is a division operation which you believe may lead to potential loss of precision:
- Start by using and exact check in a property assertion to check if the return value of a variable/function is as expected.
- Run the fuzzer and allow it to find a case where the return value is not what's expected via a falsified assertion.
- Create an Echidna optimization test to increase the difference with the expected value.
The results of the optimization run will allow you to determine the severity of any potential precision loss and how it may be used as part of an exploit path.
Chimera Framework
The Chimera framework lets you run invariant tests with Echidna and Medusa that can be easily debugged using Foundry.
The framework is made up of the following contracts:
When you build your handlers using Recon these files get automatically generated and populated for you. To use the framework in your project, you just need to download these files that get generated for you and add the Chimera dependency to your project:
forge install Recon-Fuzz/chimera
How It Works
The Chimera Framework uses an inheritance structure that allows all the supporting contracts to be inherited by the CryticTester contract so you can add target function handlers for multiple contracts all with a single point of entry for the fuzzer via CryticTester:
⇾ Fuzzer stopped, test results follow below ...
⇾ [PASSED] Assertion Test: CryticTester.add_new_asset(uint8)
⇾ [PASSED] Assertion Test: CryticTester.asset_approve(address,uint128)
⇾ [PASSED] Assertion Test: CryticTester.asset_mint(address,uint128)
⇾ [PASSED] Assertion Test: CryticTester.counter_increment()
⇾ [PASSED] Assertion Test: CryticTester.counter_increment_asAdmin()
⇾ [PASSED] Assertion Test: CryticTester.counter_setNumber1(uint256)
⇾ [PASSED] Assertion Test: CryticTester.counter_setNumber2(uint256)
⇾ [PASSED] Assertion Test: CryticTester.invariant_number_never_zero()
⇾ [PASSED] Assertion Test: CryticTester.switch_asset(uint256)
⇾ [PASSED] Assertion Test: CryticTester.switchActor(uint256)
⇾ [FAILED] Assertion Test: CryticTester.doomsday_increment_never_reverts()
The above output is taken from a run on the create-chimera-app template and we can see that we can call handlers for multiple contracts all through the interface of the
CryticTestercontract.
Ultimately this allows you to have one Setup contract that can deploy multiple contracts that you'll be targeting and make the debugging process easier because each broken property can be turned into an easily testable unit test that can be run in the CryticToFoundry contract.
This also simplifies the testing process, allowing you to use the following commands to run fuzz tests without having to modify any configurations.
For Echidna:
echidna . --contract CryticTester --config echidna.yaml
For Medusa:
medusa fuzz
The Contracts
We'll now look at the role each of the above-mentioned contracts serve in building an extensible and maintainable fuzzing suite. We'll be looking at examples using the create-chimera-app template project.
Setup
This contract is used to deploy and initialize the state of your target contracts. It's called by the fuzzer before any of the target functions are called.
Any contracts you want to track in your fuzzing suite should live here.
In our create-chimera-app template project, the Setup contract is used to deploy the Counter contract:
abstract contract Setup is BaseSetup {
    Counter counter;

    function setup() internal virtual override {
        counter = new Counter();
    }
}
TargetFunctions
This is perhaps the most important file in your fuzzing suite, it defines the target function handlers that will be called by the fuzzer to manipulate the state of your target contracts.
Note: These are the only functions that will be called by the fuzzer.
Because these functions have the aim of changing the state of the target contract, they usually only include non-view and non-pure functions.
Target functions make calls to the target contracts deployed in the Setup contract. The handler that wraps the target function allows you to add clamping (reducing the possible fuzzed input values) before the call to the target contract and properties (assertions about the state of the target contract) after the call to the target contract.
In our create-chimera-app template project, the TargetFunctions contract is used to define the increment and setNumber functions:
abstract contract TargetFunctions is
    BaseTargetFunctions,
    Properties
{
    function counter_increment() public {
        counter.increment();
    }

    function counter_setNumber1(uint256 newNumber) public {
        // clamping can be added here before the call to the target contract
        // ex: newNumber = newNumber % 100;

        // example assertion test replicating testFuzz_SetNumber
        try counter.setNumber(newNumber) {
            if (newNumber != 0) {
                t(counter.number() == newNumber, "number != newNumber");
            }
        } catch {
            t(false, "setNumber reverts");
        }
    }

    function counter_setNumber2(uint256 newNumber) public {
        // same example assertion test as counter_setNumber1 using ghost variables
        __before();

        counter.setNumber(newNumber);

        __after();

        if (newNumber != 0) {
            t(_after.counter_number == newNumber, "number != newNumber");
        }
    }
}
Properties
This contract is used to define the properties that will be checked after the target functions are called.
At Recon our preference is to define these as Echidna/Medusa assertion properties but they can also be defined as boolean properties.
In our create-chimera-app template project, the Properties contract is used to define a property that states that the number can never be 0:
abstract contract Properties is BeforeAfter, Asserts {
    // example property test
    function invariant_number_never_zero() public {
        t(counter.number() != 0, "number is 0");
    }
}
CryticToFoundry
This contract is used to debug broken properties by converting the breaking call sequence from Echidna/Medusa into a Foundry unit test. When running jobs on Recon this is done automatically for all broken properties using the fuzzer logs.
If you are running the fuzzers locally you can use the Echidna and Medusa tools on Recon to convert the breaking call sequence from the logs into a Foundry unit test.
This contract is also useful for debugging issues related to the setup function and allows testing individual handlers in isolation to verify if they're working as expected for specific inputs.
In our create-chimera-app template project, the CryticToFoundry contract doesn't include any reproducer tests because all the properties pass.
The test_crytic function demonstrates the template for adding a reproducer test:
contract CryticToFoundry is Test, TargetFunctions, FoundryAsserts {
    function setUp() public {
        setup();

        targetContract(address(counter));
    }

    function test_crytic() public {
        // TODO: add failing property tests here for debugging
    }
}
BeforeAfter
This contract is used to store the state of the target contract before and after the target functions are called in a Vars struct.
These variables can be used in property definitions to check if function calls have modified the state of the target contract in an unexpected way.
In our create-chimera-app template project, the BeforeAfter contract is used to track the counter_number variable:
// ghost variables for tracking state variable values before and after function calls
abstract contract BeforeAfter is Setup {
    struct Vars {
        uint256 counter_number;
    }

    Vars internal _before;
    Vars internal _after;

    function __before() internal {
        _before.counter_number = counter.number();
    }

    function __after() internal {
        _after.counter_number = counter.number();
    }
}
CryticTester
This is the entrypoint for the fuzzer into the suite. All target functions will be called on an instance of this contract since it inherits from the TargetFunctions contract.
In our create-chimera-app template project, the CryticTester contract is used to call the counter_increment and counter_setNumber1 functions:
// echidna . --contract CryticTester --config echidna.yaml
// medusa fuzz
contract CryticTester is TargetFunctions, CryticAsserts {
    constructor() payable {
        setup();
    }
}
Assertions
When using assertions from Chimera in your properties, they use a different interface than the standard assertions from foundry's forge-std.
The following assertions are available in Chimera's Asserts contract:
abstract contract Asserts {
    // greater than
    function gt(uint256 a, uint256 b, string memory reason) internal virtual;

    // greater than or equal to
    function gte(uint256 a, uint256 b, string memory reason) internal virtual;

    // less than
    function lt(uint256 a, uint256 b, string memory reason) internal virtual;

    // less than or equal to
    function lte(uint256 a, uint256 b, string memory reason) internal virtual;

    // equal to
    function eq(uint256 a, uint256 b, string memory reason) internal virtual;

    // true
    function t(bool b, string memory reason) internal virtual;

    // between uint256
    function between(uint256 value, uint256 low, uint256 high) internal virtual returns (uint256);

    // between int256
    function between(int256 value, int256 low, int256 high) internal virtual returns (int256);

    // precondition
    function precondition(bool p) internal virtual;
}
Create Chimera App
To make getting started with Invariant Testing as easy as possible, we created the create-chimera-app template which you can use to create a new Foundry project with invariant testing built-in.
This template uses our Chimera framework to let you run invariant tests with Echidna, Medusa, Halmos, and Kontrol that can be easily debugged using Foundry. We've also incorporated contracts from our Setup Helpers repo which make managing the test suite setup much simpler.
Prerequisites
To make use of the fuzzing/formal verification tools that create-chimera-app supports, you'll need to install one of the following on your local machine:
Creating A New Project
First, you'll need to create a new project using the create-chimera-app template. You can use the Use this template button on GitHub to do this. This will automatically create a new repository using the create-chimera-app template on your GitHub account.
Note: you can also use the
forge init --template https://github.com/Recon-Fuzz/create-chimera-appcommand to create a new project locally, or just clone the repo directly usinggit clone https://github.com/Recon-Fuzz/create-chimera-app
Create-chimera-app ships with the default Foundry template as an example. This is a simple Counter contract that you can use to get a feel for how invariant testing works.
If you want to initialize a clean project without the boilerplate from the default Foundry template, you can use the create-chimera-app-no-boilerplate repo
Testing
An example invariant is implemented in the Properties contract and some inline properties are defined in the TargetFunctions contract.
You can test these properties using Echidna and Medusa using the following commands:
Echidna
echidna . --contract CryticTester --config echidna.yaml
Medusa
medusa fuzz
To run your tests on Recon, follow the instructions on the Running Jobs page.
Configurations
The create-chimera-app template includes two main configuration files that control how the fuzzers operate. We've set the defaults in the configuration so they work out-of-the-box with most repos so we recommend keeping most configurations set to their default except where noted below.
We've found that modifying configurations consistently can often be a source of errors and make it difficult for collaborators to understand what's going on. As a rule of thumb, we only modify our configuration at the beginning of an engagement (if at all), then leave it as is for the remainder of our testing campaign.
The only config we consistently change during testing is the
testLimitfor Echidna, by overriding the value with the--test-limitflag in the CLI.
echidna.yaml
The echidna.yaml file configures Echidna.
- testMode: Set to
"assertion"to run assertion-based property tests which we use as our default - prefix: Set to
"optimize_"because we don't use property mode, so this prefix is only used for optimization tests - coverage: Enables coverage-guided fuzzing and creates a corpus that can be reused in other runs for faster fuzzing
- corpusDir: Sets the name of the directory where the corpus file will be saved
- balanceAddr: Starting ETH balance for sender addresses
- balanceContract: Starting ETH balance for the target contract
- filterFunctions: List of function signatures to include or exclude from fuzzing (we recommend not using this and instead just not including function handlers in your
TargetFunctionsif you don't want to test a given function because it's clearer for collaborators) - cryticArgs: Additional arguments passed to the crytic-compile compilation process (leave this as is unless you need to link libraries)
- deployer: Address used to deploy contracts during the fuzzing campaign (set to
"0x7FA9385bE102ac3EAc297483Dd6233D62b3e1496"for consistency with Foundry) - contractAddr: Address where the target contract is deployed (this will be the
CryticTestercontract) - shrinkLimit: Number of attempts to minimize failing test cases by removing unnecessary calls from the sequence
Additional configuration options:
- testLimit: Number of transactions to execute before stopping (we typically run
100000000or higher for thorough testing) - seqLen: Maximum length of transaction sequences that Echidna will generate to try to break properties
- sender: Array of addresses that can send transactions to the target contracts (leave this set to the default because our framework switches senders via actors in the ActorManager instead)
The template is pre-configured to work with Foundry as the build system, allowing for seamless integration between compilation and fuzzing.
medusa.json
The medusa.json file configures Medusa. The configuration sections include:
Fuzzing Configuration:
- workers: Number of parallel workers to use during fuzzing (defaults to max workers possible on your system given the number of cores)
- workerResetLimit: Number of call sequences a worker executes before resetting (set to
50) - timeout: Maximum duration for the fuzzing campaign in seconds (set to
0for indefinite) - testLimit: Number of transactions to execute before stopping (set to
0for indefinite) - callSequenceLength: Maximum number of function calls to attempt to break a property (set to
100) - corpusDirectory: Directory where corpus items and coverage reports are stored (set to
"medusa") - coverageEnabled: Whether to save coverage-increasing sequences for reuse (set to
true) - deploymentOrder: Order in which contracts are deployed (ensures
CryticTesteris the target) - targetContracts: Array specifying which contracts to fuzz (ensures
CryticTesteris the target) - targetContractsBalances: Starting ETH balance for each target contract (hex-encoded)
- constructorArgs: Arguments to pass to contract constructors (unneeded because the
CryticTestershould never have a constructor; deploy all contracts in theSetup) - deployerAddress: Address used to deploy contracts during fuzzing (set to
"0x7FA9385bE102ac3EAc297483Dd6233D62b3e1496"for consistency with Foundry) - senderAddresses: Account addresses used to send function calls (leave this set to the default because our framework switches senders via actors in the ActorManager instead)
- blockNumberDelayMax: Maximum block number jump between transactions (set to
60480) - blockTimestampDelayMax: Maximum timestamp jump between transactions (set to
604800) - blockGasLimit: Maximum gas per block (you may need to raise this if your setup is very large)
- transactionGasLimit: Maximum gas per transaction (set to
12500000)
Testing Configuration:
- stopOnFailedTest: Whether to stop after the first failed test (set to
false) - stopOnFailedContractMatching: Whether to stop on bytecode matching failures (set to
false) - stopOnNoTests: Whether to stop if no tests are found (set to
true) - testAllContracts: Whether to test all contracts including dynamically deployed ones (set to
falsebecause we only want to test viaCryticTester) - traceAll: Whether to attach execution traces to failed tests (set to
false)
Assertion Testing Configuration:
- enabled: Whether assertion testing is enabled (set to
true) - testViewMethods: Whether to test view methods for assertions (set to
true) - panicCodeConfig: Configuration for which panic codes should fail tests
Optimization Testing Configuration:
- enabled: Whether optimization testing is enabled (set to
false) - testPrefixes: Prefixes for optimization test functions (set to
["optimize_"])
Chain Configuration:
- codeSizeCheckDisabled: Allows deployment of large contracts (set to
true) - cheatCodesEnabled: Whether cheatcodes are enabled (set to
truebecause we use thevm.prankcheatcode for switching actors) - forkConfig: Configuration for forking mode (enable for when you want to test against the live chain state)
Compilation Configuration (Do not change):
- platform: Compilation platform (set to
"crytic-compile") - target: Target directory for compilation (set to
".") - args: Additional compilation arguments (set to
["--foundry-compile-all"])
Linking Libraries
If your project requires the use of libraries with external functions like the following ChainlinkAdapter:
library ChainlinkAdapter {
    /// @notice Fetch price for an asset from Chainlink fixed to 8 decimals
    /// @param _source Chainlink aggregator
    /// @return latestAnswer Price of the asset fixed to 8 decimals
    /// @return lastUpdated Last updated timestamp
    function price(address _source) external view returns (uint256 latestAnswer, uint256 lastUpdated) {
        uint8 decimals = IChainlink(_source).decimals();
        int256 intLatestAnswer;
        (, intLatestAnswer,, lastUpdated,) = IChainlink(_source).latestRoundData();
        latestAnswer = intLatestAnswer < 0 ? 0 : uint256(intLatestAnswer);
        if (decimals < 8) latestAnswer *= 10 ** (8 - decimals);
        if (decimals > 8) latestAnswer /= 10 ** (decimals - 8);
    }
}
you'll need to link the library to its deployed bytecode manually, or you'll run into a runtime error in Echidna/Medusa that can't be debugged with Foundry.
To link the libraries, you simply need to modify the configuration files mentioned above like so, being sure to not remove the "--foundry-compile-all" flag as this allows easier debugging of compilation issues.
For Echidna:
cryticArgs: ["--compile-libraries=(ChainlinkAdapter,0xf04),"--foundry-compile-all"]
deployContracts: [
  ["0xf04", "ChainlinkAdapter"]
]
For Medusa:
"fuzzing": {
    ...
    "deploymentOrder": [
      "ChainlinkAdapter"
    ],
    ...
},
"compilation": {
    ...
    "platformConfig": {
      ...
      "args": [
        "--compile-libraries",
        "(ChainlinkAdapter,0xf04)",
        "--foundry-compile-all"
      ]
    }
  },
Expanding The Example Project
create-chimera-app is meant to be a starting point for your own project. You can expand the example project by adding your own contracts and properties. See the Chimera Framework section on what the role of each contract is and see the example project for how to implement properties using the framework.
If you're new to defining properties, check out this substack post which walks you through the process of converting invariants from English to Solidity using an ERC4626 vault as an example using Chimera.
Bootcamp Introduction
This bootcamp is meant to take you from no knowledge of invariant testing to a point where you feel comfortable writing invariant tests to find bugs in a production system.
The bootcamp is roughly inspired by the content covered by Alex The Entrprenerd in the first three livestreams here.
Over the four parts of the bootcamp we'll cover the following:
- How to scaffold an invariant testing suite using the Recon extension.
- How to create a simplified system deployment for your invariant testing suite.
- How to achieve full coverage over the contracts of interest in your invariant suite.
- How to implement properties to test with Foundry, Echidna, Medusa, Halmos and Kontrol.
- How to debug broken properties.
- How to use Echidna's optimization mode to increase the impact of broken properties.
The following is a breakdown of each lesson for easier navigation:
- Part 1 - scaffolding, setup and coverage
- Part 2 - achieving full coverage and multidimensional testing
- Part 3 - writing, breaking and debugging properties
- Part 4 - using optimization mode to increase the severity of broken properties
Note that each part is cumulative, building off of the topics and examples from the previous sections so it's recommended to work through them in order.
Below we cover some useful topics that can be helpful for beginners using fuzzing for invariant testing with the Chimera Framework for the first time. If you're already familiar with the Chimera Framework, you can skip ahead to the first section here.
What are invariants?
Invariants are defined as statements about a system that should always hold true.
Properties allow us to define invariants by outlining the behaviors that we expect in our system. In the context of testing we can say properties are logical statements about the system that we test after state-changing operations are made via a call to one of the target function handlers. We can therefore specify properties of a system that should always hold true to define our invariants.
We can use an ERC20 token as an example and define one property and one invariant for it:
- Property: a user’s balance should increase only after calls to the
transferandmintfunctions - Invariant: the sum of user balances should never be greater than the
totalSupply
We prefer to use the term properties throughout this bootcamp because it covers invariants as well as properties, since invariants are a subset of properties but properties are not a subset of invariants. So when we say invariant testing, we are really referring to using properties to test standalone properties as well as invariants.
What is fuzzing?
At Recon our preferred testing method is stateful fuzzing so it's what we'll use for our examples throughout the bootcamp.
Stateful fuzzing allows us to manipulate the state of deployed contracts in a test environment by chaining randomized calls to handler functions into sequences. This gives the fuzzer the ability to manipulate the contract's state in all possible ways that a user might, we can then test an assertion about the state of the system at any given point in time (where the assertion is the property being tested).
Stateless fuzzing, in contrast, only calls an individual test function with random inputs and therefore limits the possible states that can be explored before making an assertion.
For our use case of stateful fuzzing for invariant testing you just need to understand that the fuzzer makes a randomized series of calls with random inputs after which we can evaluate an assertion.
For a more complete introduction to how fuzzing works see the Echidna documentation
What is the Chimera framework?
Now with a general understanding of how fuzzing works, we can look at how the Chimera Framework works.
The Chimera Framework was created because previously, if you wanted to write tests for Foundry, Echidna, Medusa, Halmos or Kontrol, you'd need to use a different format for each. This meant you'd either have to maintain multiple test suites for each of these tools or find a way to stitch your test suite together so they all work.
The Chimera Framework solves for running all these tools by giving you a scaffolding so you can just drop in your tests, written with the most familiar format provided by Foundry, and they automatically work with all of the above-mentioned tools.
When you use the Recon extension or the Builder to scaffold your invariant testing suite, everything will be created with the Chimera framework already in place, so all you need to do is create a working setup and define properties to start testing.
The four phases of invariant testing
Invariant testing is unique in that it's a particularly labor-intensive form of testing when you consider all the necessary aspects like scaffolding, setup, debugging, writing properties, etc. This means there are many decisions to be made, which can ultimately lead to fatigue and building a subpar suite if not carefully considered.
Below we've outlined the primary steps we've identified from multiple invariant testing engagements, which should give you a step-by-step process to follow when building a suite to reduce decision-making fatigue and allow you to do a better job. We'll follow these steps throughout each part of the bootcamp.
Phase 1: Setup phase
In this phase, your only goal should be to deploy the contracts in a meaningful state so that you can successfully run the fuzzer.
Phase 2: Coverage
The coverage phase is about achieving line coverage over the contracts of interest that you're testing. This is key because without it, you can define any number of properties but they'll be worthless because you won't be meaningfully testing them without actually reaching all possible states in your target system.
Phase 3: Write properties
In this phase, you define properties using your understanding of the system in English, then translate them into implementations in Solidity.
Phase 4: Iterate
The final phase is iteration, where you reflect on the properties and setup you've written and determine if there are further properties to be written or improvements to the setup to be made that can improve state exploration.
The philosophy of testing
The key benefit of invariant testing is not necessarily the tests themselves but rather the ability that they give you to think about and test edge cases and your understanding of the system.
If you can learn to think in invariants even while only manually reviewing contracts, this can potentially lead you to exploit paths that may not have been considered. With an invariant suite in place you can then test these using tools that simulate how a user would interact with the system and have a greater likelihood of proving that they either hold or don't.
The Chimera framework and the phases outlined above are our attempt to minimize the required low-value thinking related to setting up the test suite to streamline the process and get you through achieving coverage and breaking properties as fast as possible.
Part 1 - Invariant Testing with Chimera Framework
For the recorded stream of this part of the bootcamp see here.
In this first part we're going to look at the Chimera Framework, what it is, why it exists and how we can use it to test a smart contract system using multiple different tools. By the end of part 1 you should be comfortable scaffolding a system and ensuring it has full coverage.
This bootcamp is roughly based on the first three parts of the bootcamp streamed by Alex The Entreprenerd here though some of the implementation details have changed, however you can still use it to follow along if you prefer consuming content in a video format.
The Chimera Framework Contracts
The key idea behind the Chimera framework is to use the following contracts as a scaffolding for your test suite:
Setup- where deployment configurations are locatedTargetFunctions- explicitly define all functions that should be called by the tool as part of state explorationProperties- used to explicitly define the properties to be testedBeforeAfter- used to track variables over time to define more complex propertiesCryticTester- the entrypoint from which a given tool will execute testsCryticToFoundry- used for debugging broken properties with Foundry
This scaffolding reduces the decisions you have to make about your test suite configuration so you can get to writing and breaking properties faster.
For more details on how to use the above contracts checkout the Chimera Framework page.
The primary contracts we'll be looking at in this lesson are Setup and TargetFunctions.
In the Setup contract we're going to locate all of our deployment configuration. This can become very complex but for now all you need to think about is specifying how to deploy all the contracts of interest for our tool.
The TargetFunctions contract allows you to explicitly state all the functions that should be called as part of state exploration. For more complex codebases you'll generally have multiple sub-contracts which specify target functions for each of the contracts of interest in the system which you can inherit into TargetFunctions. Fundamentally, any time you're thinking about exploring state the handler for the state changing call should be located in TargetFunctions.
Getting Started
To follow along, you can clone this fork of the Morpho repository. We'll then see how to use the Recon Builder to add all the Chimera scaffolding for our contract of interest.
Our primary goals for this section are:
- setup - create the simplest setup possible that allows you to test all interesting state combinations
- coverage - understand how to read a coverage report and resolve coverage issues
Practical Implementation - Setting Up Morpho
Once you've cloned the Morpho repo locally you can make the following small changes to speed up compilation and test run time:
- disable
via-irin thefoundry.tomlconfiguration - remove the
bytecode_hash = "none"from thefoundry.tomlconfiguration (this interferes with coverage report generation in the fuzzer) - delete the entire existing
testfolder
Our next step is going to be getting all the Chimera scaffolding added to our repo which we'll do using the Recon Extension because it's the fastest and simplest way.
You can also generate your Chimera scaffolding without downloading the extension using the Recon Builder instead
After having downloaded the extension you'll need to build the project so it can recognize the contract ABIs that we want to scaffold:

We can then select the contract for which we want to generate target functions for, in our case this will be the Morpho contract:

The UI additionally gives us the option to select which state-changing functions we'd like to scaffold by clicking the checkmark next to each. For our case we'll keep all the default selected target functions.
After scaffolding, all the Chimera Framework contracts will be added to a new test folder and fuzzer configuration files will be added to the root directory:

Fail Mode and Catch Mode
The extension offers additional "modes" for target functions: fail mode and catch mode:

Fail mode will force an assertion failure after a call is successful. We use this for defining what we call canaries (tests that confirm if certain functions are not always reverting) because the assertion will only fail if the call to the target function completes successfully.
Catch mode is useful to add a test to the catch block with an assertion to determine when it reverts. This is a key mindset shift of invariant testing with Echidna and Medusa because they don't register a revert as a test failure and instead skip reverting calls. Test failures in these fuzzers therefore only occur via an assertion failure (unlike Foundry where a reverting call automatically causes the test to fail).
This is important to note because without it you could end up excluding reverting cases which can reveal interesting states that could help find edge cases.
If you're ever using Foundry to fuzz instead of Echidna or Medusa, you should disable the
fail_on_revertparameter in your Foundry config to have similar behavior to the other fuzzers and allow tests written for them to be checked in the same way.
Setup
Generally you should aim to make the Setup contract as simple as possible, this helps reduce the number of assumptions made and also makes it simpler for collaborators to understand the initial state that the fuzzer starts from.
If you used the Recon Builder for scaffolding you'll most likely have to spend some time resolving compilation errors due to incorrect imports because it isn't capable of automatically resolving these in the same way that the extension does.
In our case, because of the relative simplicity of the contract that we're deploying in our test suite we can just check the constructor arguments of the Morpho contract to determine what we need to deploy it:
contract Morpho is IMorphoStaticTyping {
    ...

    /// @param newOwner The new owner of the contract.
    constructor(address newOwner) {
        require(newOwner != address(0), ErrorsLib.ZERO_ADDRESS);

        DOMAIN_SEPARATOR = keccak256(abi.encode(DOMAIN_TYPEHASH, block.chainid, address(this)));
        owner = newOwner;

        emit EventsLib.SetOwner(newOwner);
    }

    ...
}
from which we can see that we simply need to pass in an owner for the deployed contract.
We can therefore modify our Setup contract accordingly so that it deploys the Morpho contract with address(this) (the default actor that we use as our admin) set as the owner of the contract:
abstract contract Setup is BaseSetup, ActorManager, AssetManager, Utils {
    Morpho morpho;

    function setup() internal virtual override {
        morpho = new Morpho(_getActor());
    }

    ...
}
We now have the contract which we can call target functions on deployed and we can now run the fuzzer!
Aside: How We Can Reuse Tests
Because we only implemented our deployments in a single setup function this can be inherited and called in the CryticTester contract:
contract CryticTester is TargetFunctions, CryticAsserts {
    constructor() payable {
        setup();
    }
}
to allow us to test with Echidna or Medusa and also inherited in the CryticToFoundry contract to be tested with Foundry, Halmos and Kontrol:
contract CryticToFoundry is Test, TargetFunctions, FoundryAsserts {
    function setUp() public {
        setup();
    }
}
This gives us one of the primary benefits of using the Chimera Framework: if your project compiles in Foundry, it will work in any of the above mentioned tools automatically.
Running Your First Fuzzing Campaign
At this point, we've achieved compilation and our next step will simply be to figure out how far this allows the fuzzer to get in terms of line coverage over our contract of interest.
Before running you'll need to make sure you have Medusa downloaded on your local machine.
With Medusa downloaded you can use the Fuzz with Medusa button from the Recon Cockpit section of the Recon extension to start your fuzzing campaign:

You can also run Medusa using
medusa fuzzfrom the root of your project directory
We'll run the fuzzer for 10-15 minutes then stop the execution (using the cancel button from the Recon Cockpit or ctrl + c from the CLI) to analyze the results.
Understanding Fuzzer Output
From the output logs from Medusa we can see that its entrypoint into our created test scaffolding is the CryticTester contract:
⇾ [PASSED] Assertion Test: CryticTester.add_new_asset(uint8)
⇾ [PASSED] Assertion Test: CryticTester.asset_approve(address,uint128)
⇾ [PASSED] Assertion Test: CryticTester.asset_mint(address,uint128)
⇾ [PASSED] Assertion Test: CryticTester.morpho_accrueInterest((address,address,address,address,uint256))
⇾ [PASSED] Assertion Test: CryticTester.morpho_borrow((address,address,address,address,uint256),uint256,uint256,address,address)
⇾ [PASSED] Assertion Test: CryticTester.morpho_createMarket((address,address,address,address,uint256))
⇾ [PASSED] Assertion Test: CryticTester.morpho_enableIrm(address)
⇾ [PASSED] Assertion Test: CryticTester.morpho_enableLltv(uint256)
⇾ [PASSED] Assertion Test: CryticTester.morpho_flashLoan(address,uint256,bytes)
⇾ [PASSED] Assertion Test: CryticTester.morpho_liquidate((address,address,address,address,uint256),address,uint256,uint256,bytes)
⇾ [PASSED] Assertion Test: CryticTester.morpho_repay((address,address,address,address,uint256),uint256,uint256,address,bytes)
⇾ [PASSED] Assertion Test: CryticTester.morpho_setAuthorization(address,bool)
⇾ [PASSED] Assertion Test: CryticTester.morpho_setAuthorizationWithSig((address,address,bool,uint256,uint256),(uint8,bytes32,bytes32))
⇾ [PASSED] Assertion Test: CryticTester.morpho_setFee((address,address,address,address,uint256),uint256)
⇾ [PASSED] Assertion Test: CryticTester.morpho_setFeeRecipient(address)
⇾ [PASSED] Assertion Test: CryticTester.morpho_setOwner(address)
⇾ [PASSED] Assertion Test: CryticTester.morpho_supply((address,address,address,address,uint256),uint256,uint256,address,bytes)
⇾ [PASSED] Assertion Test: CryticTester.morpho_supplyCollateral((address,address,address,address,uint256),uint256,address,bytes)
⇾ [PASSED] Assertion Test: CryticTester.morpho_withdraw((address,address,address,address,uint256),uint256,uint256,address,address)
⇾ [PASSED] Assertion Test: CryticTester.morpho_withdrawCollateral((address,address,address,address,uint256),uint256,address,address)
⇾ [PASSED] Assertion Test: CryticTester.switch_asset(uint256)
⇾ [PASSED] Assertion Test: CryticTester.switchActor(uint256)
Which allows it to call all of the functions defined on our TargetFunctions contract (which in this case it inherits from MorphoTargets) in a random order with random values passed in.
The additional functions called in the above logs are defined on the
ManagersTargetswhich provide utilities for modifying the currently used actor (via theActorManager) and admin (via theAssetManager) in the setup.
After running the fuzzer, it also generates a corpus which is a set of call sequences that allowed the fuzzer to expand line coverage:

This will make it so that previous runs don't need to only explore random inputs each time and the fuzzer will be able to use inputs and call sequences that it found that expand coverage to guide its fuzzing process and add mutations (modifications) to them to attempt to unlock new coverage or break a property. You can think of the corpus as the fuzzer's memory which allows it to retrace its previous steps when it starts again.
If you modify the interface of your target function handlers you should delete your existing corpus and allow the fuzzer to generate a new one, otherwise it will make calls using the previous sequences which may no longer be valid and prevent proper state space exploration.
Understanding Coverage Reports
After stopping Medusa it will also generate a coverage report (Chimera comes preconfigured to ensure that Medusa and Echidna always generate a coverage report) which is an HTML file that displays all the code from your project highlighting in green: lines which the fuzzer reached and in red: lines that the fuzzer didn't reach during testing.

The coverage report is one of the most vital insights in stateful fuzzing because without it, you're blind to what the fuzzer is actually doing.
Debugging Failed Properties
Now we'll add a simple assertion that always evaluates to false (canary property) to one of our target function handlers to see how the fuzzer outputs breaking call sequences for us:
    function morpho_setOwner(address newOwner) public asActor {
        morpho.setOwner(newOwner);
        t(false, "forced failure");
    }
Using this we can then run Medusa again and see that it generates a broken property reproducer call sequence for us:
⇾ [FAILED] Assertion Test: CryticTester.morpho_setOwner(address)
Test for method "CryticTester.morpho_setOwner(address)" resulted in an assertion failure after the following call sequence:
[Call Sequence]
1) CryticTester.morpho_setOwner(address)(0x7109709ECfa91a80626fF3989D68f67F5b1DD12D) (block=29062, time=319825, gas=12500000, gasprice=1, value=0, sender=0x30000)
[Execution Trace]
 => [call] CryticTester.morpho_setOwner(address)(0x7109709ECfa91a80626fF3989D68f67F5b1DD12D) (addr=0x7D8CB8F412B3ee9AC79558791333F41d2b1ccDAC, value=0, sender=0x30000)
         => [call] StdCheats.prank(address)(0x7D8CB8F412B3ee9AC79558791333F41d2b1ccDAC) (addr=0x7109709ECfa91a80626fF3989D68f67F5b1DD12D, value=0, sender=0x7D8CB8F412B3ee9AC79558791333F41d2b1ccDAC)
                 => [return ()]
         => [call] <unresolved contract>.<unresolved method>(msg_data=13af40350000000000000000000000007109709ecfa91a80626ff3989d68f67f5b1dd12d) (addr=0xA5668d1a670C8e192B4ef3F2d47232bAf287E2cF, value=0, sender=0x7D8CB8F412B3ee9AC79558791333F41d2b1ccDAC)
                 => [event] SetOwner(0x7109709ECfa91a80626fF3989D68f67F5b1DD12D)
                 => [return]
         => [event] Log("forced failure")
         => [panic: assertion failed]
If you ran the fuzzer with the extension, it will give you the option to automatically add the generated reproducer unit test for this broken property to the CryticToFoundry contract:
    // forge test --match-test test_morpho_setOwner_uzpq -vvv
    function test_morpho_setOwner_uzpq() public {
       vm.roll(2);
       vm.warp(2);
       morpho_setOwner(0x0000000000000000000000000000000000000000);
    }
If you ran the fuzzer via the CLI you can copy and paste the logs into this tool to generate a Foundry unit test
This will be key once we start to break nontrivial properties because it gives us a much faster feedback loop to debug them.
Initital Coverage Analysis
If we look more closely at the Morpho contract which we're targeting with our TargetFunctions we can see from the 28% in our coverage report that our target functions are only allowing us to reach minimal exploration of possible states:

If we look at the coverage on our TargetFunctions directly however we see that we have 100% coverage and all the lines show up highlighted in green:

This is an indication to us that the calls to the target function handlers themselves are initially successful but once it reaches the actual function in the Morpho contract it reverts.
Understanding Morpho
Before we move on to looking at techniques that will allow us to increase coverage on the Morpho contract it'll help to have a bit of background on what Morpho is and how it works.
Morpho is a noncustodial lending protocol that functions as a lending marketplace where users can supply assets to earn interest and borrow against collateral.
The protocol uses a singleton architecture where all lending markets exist within a single contract, with each market defined by five parameters: loan token, collateral token, oracle, interest rate model, and loan-to-value ratio. It implements share-based accounting, supports permissionless market creation and includes liquidation mechanisms to maintain solvency.
Creating Mock Contracts
Now with a better understanding of Morpho we can see that for it to allow any user operations such as borrowing and lending it first needs a market to be created and for this we need an Interest Rate Model (IRM) contract which calculates dynamic borrow rates for Morpho markets based on utilization and can be set by an admin using the enableIrm function:
    function enableIrm(address irm) external onlyOwner {
        require(!isIrmEnabled[irm], ErrorsLib.ALREADY_SET);

        isIrmEnabled[irm] = true;

        emit EventsLib.EnableIrm(irm);
    }
Since the IRM can be any contract that implements the IIRM interface and there's none in the existing Morpho repo, we'll need to create a mock so that we can simulate its behavior which will allow us to achieve our short-term goal of coverage for now. If we find that the actual behavior of the IRM is interesting for any of the properties we want to test, we can later replace this with a more realistic implementation.
The Recon Extension allows automatically generating mocks for a contract by right-clicking it and selecting the Generate Solidity Mock option, but in our case since there's no existing instance of the IRM contract, we'll have to manually create our own as follows:
import {MarketParams, Market} from "src/interfaces/IMorpho.sol";

contract MockIRM {
    uint256 internal _borrowRate;

    function setBorrowRate(uint256 newBorrowRate) external {
        _borrowRate = newBorrowRate;
    }

    function borrowRate(MarketParams memory marketParams, Market memory market) public view returns (uint256) {
        return _borrowRate;
    }

    function borrowRateView(MarketParams memory marketParams, Market memory market) public view returns (uint256) {
        return borrowRate(marketParams, market);
    }
}
Our mock simply exposes functions for setting and getting the _borrowRate because these are the functions defined in the IIRM interface. We'll then expose a target function that calls the setBorrowRate function which allows the fuzzer to modify the borrow rate randomly.
Now the next contract we'll need for creating a market is the oracle for setting the price of the underlying asset. Looking at the existing OracleMock in the Morpho repo we can see that it's sufficient for our case:
contract OracleMock is IOracle {
    uint256 public price;

    function setPrice(uint256 newPrice) external {
        price = newPrice;
    }
}
Now we just need to deploy all of these mocks in our setup:
abstract contract Setup is BaseSetup, ActorManager, AssetManager, Utils {
    Morpho morpho;

    // Mocks
    MockIRM irm;
    OracleMock oracle;

    /// === Setup === ///
    function setup() internal virtual override {
        // Deploy Morpho
        morpho = new Morpho(_getActor());

        // Deploy Mocks
        irm = new MockIRM();
        oracle = new OracleMock();

        // Deploy assets
        _newAsset(18); // asset
        _newAsset(18); // liability
    }
}
In the above we use the _newAsset function exposed by the AssetManager to deploy a new asset which we can fetch using the _getAsset() function.
We introduced the
AssetManagerandActorManagerin V2 of Create Chimera App because the majority of setups will require multiple addresses to perform calls and use tokens in some way. Since our framework implicitly overrides the use of different senders via the fuzzer, theActorManagerallows us to replicate the normal behavior of having multiple senders using theasActormodifier. Similarly, tracking deployed tokens for checking properties or clamping previously required implementing unique configurations in theSetupcontract, so we've abstracted this into theAssetManagerto standardize the process and prevent needing to reimplement it each time.
Market Creation and Handler Implementation
Now to continue the fixes to our setup we'll need to register a market in the Morpho contract :
// Add import for MarketParams
import {Morpho, MarketParams} from "src/Morpho.sol";
And then we can register it by adding the following to our setup:
    function setup() internal virtual override {
        // Deploy Morpho
        morpho = new Morpho(_getActor());

        // Deploy Mocks
        irm = new MockIRM();
        oracle = new OracleMock();

        // Deploy assets
        _newAsset(18); // asset
        _newAsset(18); // liability

        // Create the market
        morpho.enableIrm(address(irm));
        morpho.enableLltv(8e17);

        address[] memory assets = _getAssets();
        MarketParams memory marketParams = MarketParams({
            loanToken: assets[1],
            collateralToken: assets[0],
            oracle: address(oracle),
            irm: address(irm),
            lltv: 8e17
        });
        morpho.createMarket(marketParams);
    }
It's important to note that this setup only allows us to test one market with the configurations we've added above, whereas if we want to truly be sure that we're testing all possibilities, we could use what we've termed as dynamic deployment to allow the fuzzer to deploy multiple markets with different configurations (we cover this in part 2).
We can then make a further simplifying assumption that will work as a form of clamping to allow us to get line coverage faster by storing the marketParams variable as a storage variable:
abstract contract Setup is BaseSetup, ActorManager, AssetManager, Utils {
    ...

    MarketParams marketParams;

    /// === Setup === ///
    /// This contains all calls to be performed in the tester constructor, both for Echidna and Foundry
    function setup() internal virtual override {
        ...

        address[] memory assets = _getAssets();
        marketParams = MarketParams({
            loanToken: assets[1],
            collateralToken: assets[0],
            oracle: address(oracle),
            irm: address(irm),
            lltv: 8e17
        });
        morpho.createMarket(marketParams);
    }
which then allows us to pass it directly into our target functions by deleting the input parameter for marketParams and using the storage variable from the setup instead:
abstract contract MorphoTargets is
    BaseTargetFunctions,
    Properties
{
    function morpho_accrueInterest() public asActor {
        morpho.accrueInterest(marketParams);
    }

    function morpho_borrow(uint256 assets, uint256 shares, address onBehalf, address receiver) public asActor {
        morpho.borrow(marketParams, assets, shares, onBehalf, receiver);
    }

    function morpho_createMarket() public asActor {
        morpho.createMarket(marketParams);
    }

    // Note: remove from ALL functions the parameter MarketParams marketParams so that it is used the storage var
    ...
}
The
asActormodifier explicitly uses the currently set actor returned by_getActor()to call the handler functions, whereas theasAdminmodifier uses the default admin actor (address(this)). In the above setup we only have the admin actor added to the actor tracking array but we use theasActoraddress to indicate that these are functions that are expected to be called by any normal user. Only target functions expected to be called by privileged users should use theasAdminmodifier.
This helps us get to coverage over the lines of interest faster because instead of the fuzzer trying all possible inputs for the MarketParams struct, it uses the marketParams from the setup to ensure it always targets the correct market.
Asset and Token Setup
At this point we also need to mint the tokens we're using in the system to our actors and approve the Morpho contract to spend them:
import {MockERC20} from "@recon/MockERC20.sol"; // import Recon MockERC20

abstract contract Setup is BaseSetup, ActorManager, AssetManager, Utils {
    ...

    function setup() internal virtual override {
        ...

        _setupAssetsAndApprovals();

        address[] memory assets = _getAssets();
        marketParams = MarketParams({
            loanToken: assets[1],
            collateralToken: assets[0],
            oracle: address(oracle),
            irm: address(irm),
            lltv: 8e17
        });
        morpho.createMarket(marketParams);
    }

    function _setupAssetsAndApprovals() internal {
        address[] memory actors = _getActors();
        uint256 amount = type(uint88).max;

        // Process each asset separately to reduce stack depth
        for (uint256 assetIndex = 0; assetIndex < _getAssets().length; assetIndex++) {
            address asset = _getAssets()[assetIndex];

            // Mint to actors
            for (uint256 i = 0; i < actors.length; i++) {
                vm.prank(actors[i]);
                MockERC20(asset).mint(actors[i], amount);
            }

            // Approve to morpho
            for (uint256 i = 0; i < actors.length; i++) {
                vm.prank(actors[i]);
                MockERC20(asset).approve(address(morpho), type(uint88).max);
            }
        }
    }
The _setupAssetsAndApprovals function allows us to mint the deployed assets to the actors (handled by the ActorManager) and approves it to the deployed Morpho contract. Note that we mint type(uint88).max to each user because it's a sufficiently large amount that allows us to realistically test for overflow scenarios.
Testing Your Setup
Now to ensure that our setup doesn't cause the fuzzer to revert before executing any tests we can run the default test_crytic function in CryticToFoundry which is an empty test that will just call the setup function, this will confirm that our next run of the fuzzer will actually be able to start state exploration:
Ran 1 test for test/recon/CryticToFoundry.sol:CryticToFoundry
[PASS] test_crytic() (gas: 238)
Suite result: ok. 1 passed; 0 failed; 0 skipped; finished in 6.46ms (557.00µs CPU time)
Testing Token Interactions
We can also create a simple unit test to confirm that we can successfully supply the tokens minted above to the system as a user:
    function test_crytic() public {
        // testing supplying assets to a market as the default actor (address(this))
        morpho_supply(1e18, 0, _getActor(), hex"");
    }
which, if we run with forge test --match-test test_crytic -vvvv --decode-internal, will allow us to see how many shares we get minted:
    │   ├─ emit Supply(id: 0x5914fb876807b8cd7b8bc0c11b4d54357a97de46aae0fbdfd649dd8190ef99eb, caller: CryticToFoundry: [0x7FA9385bE102ac3EAc297483Dd6233D62b3e1496], onBehalf: CryticToFoundry: [0x7FA9385bE102ac3EAc297483Dd6233D62b3e1496], assets: 1000000000000000000 [1e18], shares: 1000000000000000000000000 [1e24])
    │   ├─ [38795] SafeTransferLib::safeTransferFrom(<unknown>, 0x5615dEB798BB3E4dFa0139dFa1b3D433Cc23b72f, 0x7FA9385bE102ac3EAc297483Dd6233D62b3e1496, 1136628940260574992893479910319181283093952727985 [1.136e48])
    │   │   ├─ [34954] MockERC20::transferFrom(CryticToFoundry: [0x7FA9385bE102ac3EAc297483Dd6233D62b3e1496], Morpho: [0x5615dEB798BB3E4dFa0139dFa1b3D433Cc23b72f], 1000000000000000000 [1e18])
    │   │   │   ├─ emit Transfer(from: CryticToFoundry: [0x7FA9385bE102ac3EAc297483Dd6233D62b3e1496], to: Morpho: [0x5615dEB798BB3E4dFa0139dFa1b3D433Cc23b72f], value: 1000000000000000000 [1e18])
    │   │   │   └─ ← [Return] true
    │   │   └─ ←
    │   └─ ← [Return] 1000000000000000000 [1e18], 1000000000000000000000000 [1e24]
    └─ ← [Return]
showing that we received 1e24 shares for the 1e18 assets deposited.
If we then expand our test to see if we can supply collateral against which a user can borrow:
    function test_crytic() public {
        morpho_supply(1e18, 0, _getActor(), hex"");// testing supplying assets to a market as the default actor (address(this))
        morpho_supplyCollateral(1e18, _getActor(), hex"");
    }
we see that it also succeeds, so we have confirmed that the fuzzer is also able to execute these basic user interactions.
Advanced Handler Patterns
At this point we know that we can get coverage over certain lines but we know that certain parameters still have a very large set of possible input values which may not allow them to be successfully covered by the fuzzer in a reasonable amount of time, so we can start to apply some simple clamping.
Clamped Handlers
We'll start with the morpho_supply function we tested above:
contract Morpho is IMorphoStaticTyping {

    function supply(
        MarketParams memory marketParams,
        uint256 assets,
        uint256 shares,
        address onBehalf,
        bytes calldata data
    ) external returns (uint256, uint256) {
        ...
    }

}
Since we only want one of our actors (see ActorManager for more details on the actor setup) in the system to receive shares and the data parameter can be any arbitrary bytes value we can clamp all the values except assets. We can follow a similar approach for the supplyCollateral function:
abstract contract MorphoTargets is
    BaseTargetFunctions,
    Properties
{
    function morpho_supply_clamped(uint256 assets) public {
        morpho_supply(assets, 0, _getActor(), hex"");
    }

    function morpho_supplyCollateral_clamped(uint256 assets) public {
        morpho_supplyCollateral(assets, _getActor(), hex"");
    }
}
Note that clamped handlers should always call the unclamped handlers; this ensures that you don't overly restrict the fuzzer from exploring all possible states because it can still explore unclamped values as well. Additionally, this ensures that when you add inlined tests or variable tracking to the unclamped handlers, the assertions are always checked and variable tracking is updated for either function call.
Now that we have clamped handlers, we can significantly increase the speed with which we can cover otherwise hard to reach lines.
We can then replace our existing calls in the test_crytic test with the clamped handlers and add an additional call to morpho_borrow to check if we can successfully borrow assets from the Morpho contract:
    function test_crytic() public {
        morpho_supply_clamped(1e18);
        morpho_supplyCollateral(1e18, _getActor(), hex"");

        morpho_borrow(1e18, 0, _getActor(), _getActor());
    }
Troubleshooting Coverage Issues
After running the test we see that the call to morpho_borrow fails because of insufficient collateral:
[FAIL: insufficient collateral] test_crytic() (gas: 215689)
Suite result: FAILED. 0 passed; 1 failed; 0 skipped; finished in 6.57ms (761.17µs CPU time)
Looking at the Morpho implementation we see this error originates in the _isHealthy check in Morpho:
    function _isHealthy(MarketParams memory marketParams, Id id, address borrower, uint256 collateralPrice)
        internal
        view
        returns (bool)
    {
        uint256 borrowed = uint256(position[id][borrower].borrowShares).toAssetsUp(
            market[id].totalBorrowAssets, market[id].totalBorrowShares
        );
        uint256 maxBorrow = uint256(position[id][borrower].collateral).mulDivDown(collateralPrice, ORACLE_PRICE_SCALE)
            .wMulDown(marketParams.lltv);

        return maxBorrow >= borrowed;
    }
which causes the borrow function to revert with the INSUFFICIENT_COLLATERAL error at the following line:
    function borrow(
        MarketParams memory marketParams,
        uint256 assets,
        uint256 shares,
        address onBehalf,
        address receiver
    ) external returns (uint256, uint256) {
        ...

        require(_isHealthy(marketParams, id, onBehalf), ErrorsLib.INSUFFICIENT_COLLATERAL);
        ...
    }
We can infer that the _isHealthy check is always returning false because the collateralPrice is set to its default 0 value since we never call the setPrice function to set it in our OracleMock.
So we can add a target function to allow the fuzzer to set the collateralPrice:
abstract contract TargetFunctions is
    AdminTargets,
    DoomsdayTargets,
    ManagersTargets,
    MorphoTargets
{
    function oracle_setPrice(uint256 price) public {
        oracle.setPrice(price);
    }
}
Note that since we only needed a single handler we just added it to the TargetFunctions contract directly but if you're adding more than one handler it's generally a good practice to create a separate contract to inherit into TargetFunctions to keep things cleaner.
Now we can add our oracle_setPrice function to our sanity test to confirm that it works correctly and resolves the previous revert due to insufficient collateral:
    function test_crytic() public {
        morpho_supply_clamped(1e18);
        morpho_supplyCollateral_clamped(1e18);

        oracle_setPrice(1e30);

        morpho_borrow(1e6, 0, _getActor(), _getActor());
    }
which successfully passes:
[PASS] test_crytic() (gas: 249766)
Suite result: ok. 1 passed; 0 failed; 0 skipped; finished in 1.54ms (142.25µs CPU time)
With this test passing we can confirm that we have coverage over the primary functions in the Morpho contract that will allow us to explore the contract's state. Writing the type of sanity test like we did in the test_crytic function allows us to quickly debug simple issues that will prevent the fuzzer from reaching coverage before running it so that we're not stuck in a constant cycle of running and debugging only using the coverage report.
Now with this simple clamping in place we can let the fuzzer run for anywhere from 15 minutes to 2 hours to start building up a corpus and determine if there are any functions where coverage is being blocked.
Conclusion and Next Steps
We've seen above how we can set up and ensure coverage in invariant testing. Coverage is key because without it we can run the fuzzer indefintely but won't necessarily be testing meaningful states so it's always the most vital step that needs to be completed before implementing and testing properties.
In part 2, we'll look at how we can get to full meaningful coverage and some techniques we can implement to ensure better logical coverage so that we have a higher likelihood of reaching all lines of interest more frequently.
If you have any questions feel free to reach out to us in the Recon Discord channel
Part 2 - Multidimensional Invariant Tests
Introduction and Goals
In part 1 we looked at how to setup Morpho with a Chimera invariant testing suite and get reasonable coverage over the lines of interest, in part 2 we'll look at how to achieve full line coverage over the remaining uncovered lines from the end of part 1.
You can follow along using the repo with the scaffolding created in part 1 here.
Our goals for this section are: to reach 100% line coverage on the Morpho repo and explore ways to make our test suite capable of testing more possible setup configurations.
For the recorded stream of this part of the bootcamp see here.
How to Evaluate Coverage Reports
From part 1 our MorphoTargets contract should have two clamped handlers (morpho_supply_clamped and morpho_supplyCollateral_clamped) and the remaining functions should be unclamped.
Having run Medusa with these functions implemented we should now see an increase in the coverage shown in our report:

We can see from the above that after adding our improved setup and clamped handlers our coverage on Morpho increased from 28% to 77%. Medusa will now have these coverage increasing calls saved to the corpus for reuse in future runs, increasing its efficiency by not causing it to explore paths that always revert.
As we mentioned in part 1, the coverage report simply shows us which lines were successfully reached by highlighting them in green and shows which lines weren't reached by highlighting them in red.
Our approach for fixing coverage using the report will therefore consist of tracing lines that are green until we find a red line. The red line will then be an indicator of where the fuzzer was reverting. Once we find where a line is reverting we can then follow the steps outlined in part 1 where we create a unit test in the CryticToFoundry contract to determine why a line may always be reverting and introduce clamping or changes to the setup to allow us to reach the given line.
Coverage Analysis - Initial Results
It's important to note that although we mentioned above that our goal is to reach 100% coverage, this doesn't mean we'll try to blindly reach 100% coverage over all of a contract's lines because there are almost always certain functions whose behavior won't be of interest in an invariant testing scenario, like the extSloads function from the latest run:

Since this is a view function which doesn't change state we can safely say that covering it is unnecessary for our case.
You should always use your knowledge of the system to make a judgement call about which functions in the system you can safely ignore coverage on. The functions that you choose to include should be those that test meaningful interactions including public/external functions, as well as the internal functions they call in their control flow.
In our case for Morpho we can say that for us to have 100% coverage we need to have covered the meaningful interactions a user could have with the contract which include borrowing, liquidating, etc..
When we look at coverage over the liquidate function, we can see that it appears to be reverting at the line that checks if the position is healthy:

Meaning we need to investigate this with a Foundry unit test to understand what's causing it to always revert.
We can also see that the repay function similarly has only red lines after line 288, indicating that something may be causing it to always underflow:

However, note that the return value isn't highlighted at all, potentially indicating that there might also be an issue with the coverage displaying mechanism, so our approach to debugging this will be different, using a canary property instead.
Debugging With Canaries
We'll start with debugging the repay function using a canary because it's relatively simple. To do so we can create a simple boolean variable hasRepaid which we add to our Setup contract and set in our morpho_repay handler function:
abstract contract MorphoTargets is
    BaseTargetFunctions,
    Properties
{
    function morpho_repay(uint256 assets, uint256 shares, address onBehalf, bytes memory data) public asActor {
        morpho.repay(marketParams, assets, shares, onBehalf, data);
        hasRepaid = true;
    }
}
which will only set hasRepaid to true if the call to Morpho::repay completes successfully.
Then we can define a simple canary property in our Properties contract:
abstract contract Properties is BeforeAfter, Asserts {

    function canary_hasRepaid() public returns (bool) {
        t(!hasRepaid, "hasRepaid");
    }

}
this uses the t (true) assertion wrapper from the Asserts contract to let us know if the call to morpho.repay successfully completes by forcing an assertion failure if hasRepaid == true (remember that only assertion failures are picked up by Echidna and Medusa).
See this section to better understand why we prefer to express properties using assertions rather than as boolean properties.
This function will randomly be called by the the fuzzer in the same way that the handler functions in TargetFunctions are called, allowing it to check if repay is called successfully after any of the state changing target function calls.
While you're implementing the canary above you can run the fuzzer in the background to confirm that we're not simply missing coverage because of a lack of sufficient tests. It's always beneficial to have the fuzzer running in the background because it will build up a corpus that will make subsequent runs more efficient.
As a general naming convention for functions in our suites we use an underscore as a prefix to define what the function does, such as canary_, invariant_, property_ or target contracts (morpho_ in our case) then use camel case for the function name itself.
We can now run Medusa in the background to determine if we're actually reaching coverage over the repay function using the canary we've implemented while implementing our Foundry test to investigate the coverage issue with the liquidate function.
Investigating Liquidation Handler with Foundry
Now we'll use Foundry to investigate why the liquidate function isn't being fully covered. We can do this by expanding upon the test_crytic function we used in part 1 for our sanity tests.
To test if we can liquidate a user we'll just expand the existing test by setting the price to a very low value that should make the user liquidatable:
    function test_crytic() public {
        morpho_supply_clamped(1e18);
        morpho_supplyCollateral_clamped(1e18);

        oracle_setPrice(1e30);

        morpho_borrow(1e6, 0, _getActor(), _getActor());

        oracle_setPrice(0);

        // Note: we liquidate ourselves and pass in the amount of assets borrowed as the seizedAssets and 0 for the repaidShares for simplicity
        morpho_liquidate(_getActor(), 1e6, 0, "");
    }
After running the test we get the following output:
    ├─ [22995] Morpho::liquidate(MarketParams({ loanToken: 0xc7183455a4C133Ae270771860664b6B7ec320bB1, collateralToken: 0x5991A2dF15A8F6A256D3Ec51E99254Cd3fb576A9, oracle: 0xF62849F9A0B5Bf2913b396098F7c7019b51A820a, irm: 0x2e234DAe75C793f67A35089C9d99245E1C58470b, lltv: 800000000000000000 [8e17] }), CryticToFoundry: [0x7FA9385bE102ac3EAc297483Dd6233D62b3e1496], 1000000 [1e6], 0, 0x)
    │   ├─ [330] Morpho::_accrueInterest(<unknown>, <unknown>)
    │   │   └─ ←
    │   ├─ [266] OracleMock::price() [staticcall]
    │   │   └─ ← [Return] 0
    │   ├─ [2585] Morpho::_isHealthy(<unknown>, <unknown>, 0x1B4D54357a97De46Aae0FBDfD649dD8190EF99Eb, 128)
    │   │   ├─ [356] SharesMathLib::toAssetsUp(1000000000000 [1e12], 1000000 [1e6], 1000000000000 [1e12])
    │   │   │   └─ ← 1000000 [1e6]
    │   │   ├─ [0] console::log("isHealthy", false) [staticcall]
    │   │   │   └─ ← [Stop]
    │   │   ├─ [0] console::log("collateralPrice", 0) [staticcall]
    │   │   │   └─ ← [Stop]
    │   │   └─ ← false
    │   ├─ [353] SharesMathLib::toSharesUp(1000000000000 [1e12], 1000000 [1e6], 0)
    │   │   └─ ← 0
    │   ├─ [356] SharesMathLib::toAssetsUp(1000000000000 [1e12], 1000000 [1e6], 0)
    │   │   └─ ← 0
    │   ├─ [198] UtilsLib::toUint128(0)
    │   │   └─ ← 0
    │   ├─ [198] UtilsLib::toUint128(0)
    │   │   └─ ← 0
    │   ├─ [198] UtilsLib::toUint128(1000000 [1e6])
    │   │   └─ ← 1000000 [1e6]
    │   ├─ [199] UtilsLib::toUint128(1000000 [1e6])
    │   │   └─ ← 1000000 [1e6]
    │   ├─ emit Liquidate(id: 0x5914fb876807b8cd7b8bc0c11b4d54357a97de46aae0fbdfd649dd8190ef99eb, caller: CryticToFoundry: [0x7FA9385bE102ac3EAc297483Dd6233D62b3e1496], borrower: CryticToFoundry: [0x7FA9385bE102ac3EAc297483Dd6233D62b3e1496], repaidAssets: 0, repaidShares: 0, seizedAssets: 1000000 [1e6], badDebtAssets: 0, badDebtShares: 0)
which indicates that we were able to successfully liquidate the user. This means that the fuzzer is theoretically able to achieve coverage over the entire liquidate function, it just hasn't yet because it hasn't found the right call sequence that allows it to pass the health check which verifies if a position is liquidatable which we saw from the coverage report above.
Tool Sophistication Limitations
After having run Medusa with the canary property created for the morpho_repay function we can see that it also doesn't break the property, confirming that the repay function is never fully covered:
⇾ [PASSED] Assertion Test: CryticTester.add_new_asset(uint8)
⇾ [PASSED] Assertion Test: CryticTester.asset_approve(address,uint128)
⇾ [PASSED] Assertion Test: CryticTester.asset_mint(address,uint128)
⇾ [PASSED] Assertion Test: CryticTester.canary_hasRepaid() /// @audit this should have failed
⇾ [PASSED] Assertion Test: CryticTester.morpho_accrueInterest()
⇾ [PASSED] Assertion Test: CryticTester.morpho_borrow(uint256,uint256,address,address)
⇾ [PASSED] Assertion Test: CryticTester.morpho_createMarket()
⇾ [PASSED] Assertion Test: CryticTester.morpho_enableIrm(address)
⇾ [PASSED] Assertion Test: CryticTester.morpho_enableLltv(uint256)
⇾ [PASSED] Assertion Test: CryticTester.morpho_flashLoan(address,uint256,bytes)
⇾ [PASSED] Assertion Test: CryticTester.morpho_liquidate(address,uint256,uint256,bytes)
⇾ [PASSED] Assertion Test: CryticTester.morpho_repay(uint256,uint256,address,bytes)
⇾ [PASSED] Assertion Test: CryticTester.morpho_setAuthorization(address,bool)
⇾ [PASSED] Assertion Test: CryticTester.morpho_setAuthorizationWithSig((address,address,bool,uint256,uint256),(uint8,bytes32,bytes32))
⇾ [PASSED] Assertion Test: CryticTester.morpho_setFee(uint256)
⇾ [PASSED] Assertion Test: CryticTester.morpho_setFeeRecipient(address)
⇾ [PASSED] Assertion Test: CryticTester.morpho_setOwner(address)
⇾ [PASSED] Assertion Test: CryticTester.morpho_supply(uint256,uint256,address,bytes)
⇾ [PASSED] Assertion Test: CryticTester.morpho_supply_clamped(uint256)
⇾ [PASSED] Assertion Test: CryticTester.morpho_supplyCollateral(uint256,address,bytes)
⇾ [PASSED] Assertion Test: CryticTester.morpho_supplyCollateral_clamped(uint256)
⇾ [PASSED] Assertion Test: CryticTester.morpho_withdraw(uint256,uint256,address,address)
⇾ [PASSED] Assertion Test: CryticTester.morpho_withdrawCollateral(uint256,address,address)
⇾ [PASSED] Assertion Test: CryticTester.oracle_setPrice(uint256)
⇾ [PASSED] Assertion Test: CryticTester.switch_asset(uint256)
⇾ [PASSED] Assertion Test: CryticTester.switchActor(uint256)
⇾ Test summary: 26 test(s) passed, 0 test(s) failed
⇾ html report(s) saved to: medusa/coverage/coverage_report.html
⇾ lcov report(s) saved to: medusa/coverage/lcov.info
The coverage report indicated this to us but sometimes the coverage report may show red lines followed by sequential green lines indicating there is an issue with the coverage report display so in those cases it's best to implement a canary property to determine if the fuzzer ever actually reaches the end of the function call.
We can then similarly test this with our sanity test to see if the fuzzer can ever theoretically reach this state:
    function test_crytic() public {
        morpho_supply_clamped(1e18);
        morpho_supplyCollateral_clamped(1e18);

        oracle_setPrice(1e30);

        morpho_borrow(1e6, 0, _getActor(), _getActor());

        morpho_repay(1e6, 0, _getActor(), "");
    }
When we run the above test we see that this also passes:
[PASS] test_crytic() (gas: 261997)
Suite result: ok. 1 passed; 0 failed; 0 skipped; finished in 7.43ms (1.18ms CPU time)

Ran 1 test suite in 149.79ms (7.43ms CPU time): 1 tests passed, 0 failed, 0 skipped (1 total tests)
which again indicates that the fuzzer just hasn't run sufficiently long to find the right call sequence to allow the function to be fully covered.
The issue we're experiencing with missing coverage for short duration runs is because the fuzzer is fairly unsophisticated in its approach to finding the needed paths to reach the lines we're interested in so it often requires a significant amount of run time to achieve what to a human may be trivial to solve.
At this point we have two options since we know that these two functions can theoretically be covered with our current setup: we can either let the fuzzer run for an extended period of time and hope that it's long enough to reach these lines, or we can create clamped handlers which increase the likelihood that the fuzzer will cover these functions, we'll do the latter.
Creating Clamped Handlers
As noted above, for Medusa to reach full coverage on these functions it will just take an extended period of time (perhaps 12-24 or more hours of continuously running). But often if you're just trying to get full coverage and don't want to have to worry about needing a large corpus to ensure you're always effectively testing, introducing clamped handlers can be a simple way to speed up the time to reach full coverage while ensuring the test suite still explores all possible states.
So using the approach from part 1 we can create simple clamped handlers for the liquidate and repay functions:
abstract contract MorphoTargets is
    BaseTargetFunctions,
    Properties
{
    function morpho_liquidate_clamped(uint256 seizedAssets, bytes memory data) public {
        morpho_liquidate(_getActor(), seizedAssets, 0, data);
    }

    function morpho_repay_clamped(uint256 assets) public {
        morpho_repay(assets, 0, _getActor(), hex"");
    }
}
this again ensures that the clamped handler always calls the unclamped handler, simplifying things when we add tracking variables to our unclamped handler and also still allowing the unclamped handler to explore states not reachable by the clamped handler.
The utility _getActor() function lets us pass its return value directly to our clamped handler to restrict it to be called for actors in the set managed by ActorManager. Calls for addresses other than these are not interesting to us because they wouldn't have been able to successfully deposit into the system since only the actors in the ActorManager are minted tokens in our setup.
Clamping using the
_getActor()function above in the call tomorpho_liquidatewould only result in self liquidations because theasActormodifier on themorpho_liquidatefunction would be called by the same actor. To allow liquidations by a different actor than the one being liquidated you could simply pass an entropy value to the clamped handler and use it to grab an actor from the actor array like:otherActor = _getActors()[entropy % _getActors().length].
Echidna Results
We can now add an additional canary to the morpho_liquidate function and run the fuzzer (Echidna this time to make sure it's not dependent on the existing Medusa corpus and to get accustomed to a different log output format). Pretty quickly our canaries break due to the clamping we added above, but our output is in the form of an unshrunken call sequence:
[2025-07-31 14:58:51.13] [Worker 6] Test canary_hasRepaid() falsified!
  Call sequence:
0x7FA9385bE102ac3EAc297483Dd6233D62b3e1496.morpho_withdrawCollateral(139165349852439003938912609244,0xffffffff,0x20000) from: 0x0000000000000000000000000000000000010000 Time delay: 166184 seconds Block delay: 31232
0x7FA9385bE102ac3EAc297483Dd6233D62b3e1496.switch_asset(52340330059596290653834913136081606912886606264842484079177445013009074303725) from: 0x0000000000000000000000000000000000020000 Time delay: 4177 seconds Block delay: 11942
0x7FA9385bE102ac3EAc297483Dd6233D62b3e1496.morpho_setAuthorizationWithSig((0x1fffffffe, 0x2fffffffd, true, 2775883296381999636091875822520187953009296316518444142656228595165590339200, 84482743146605699262959509108986712558496212374847359617652247712552817589506),(151, "`k\151:qC\129FT\EOT\186\172\193\140\216\DC2\167\138\ESCJk\247\237\ESC\242u\NAK\142\141\FS\188\156", "P]\SOW\n\243zE_Z\EOT\254q8\161\165X9vs\157;}Q\231\156\134{\166\EM\166\185")) from: 0x0000000000000000000000000000000000010000 Time delay: 338920 seconds Block delay: 5237
0x7FA9385bE102ac3EAc297483Dd6233D62b3e1496.morpho_createMarket_clamped(84,115792089237316195423570985008687907853269984665640564039457584007913129639931) from: 0x0000000000000000000000000000000000030000 Time delay: 379552 seconds Block delay: 9920
0x7FA9385bE102ac3EAc297483Dd6233D62b3e1496.oracle_setPrice(40643094521925341163734482709707831340694913045806747257803475845392378675425) from: 0x0000000000000000000000000000000000030000 Time delay: 169776 seconds Block delay: 23978
0x7FA9385bE102ac3EAc297483Dd6233D62b3e1496.morpho_accrueInterest() from: 0x0000000000000000000000000000000000010000 Time delay: 400981 seconds Block delay: 36859
0x7FA9385bE102ac3EAc297483Dd6233D62b3e1496.morpho_borrow(4717137,1524785992,0x1fffffffe,0xd6bbde9174b1cdaa358d2cf4d57d1a9f7178fbff) from: 0x0000000000000000000000000000000000030000 Time delay: 112444 seconds Block delay: 59981
0x7FA9385bE102ac3EAc297483Dd6233D62b3e1496.morpho_withdraw(1524785993,4370000,0x1fffffffe,0xd6bbde9174b1cdaa358d2cf4d57d1a9f7178fbff) from: 0x0000000000000000000000000000000000030000 Time delay: 24867 seconds Block delay: 36065
0x7FA9385bE102ac3EAc297483Dd6233D62b3e1496.morpho_createMarket((0x20000, 0x1fffffffe, 0x0, 0x5615deb798bb3e4dfa0139dfa1b3d433cc23b72f, 2433501840534670638401877306933677925857482666649888441902487977779561405338)) from: 0x0000000000000000000000000000000000030000 Time delay: 569114 seconds Block delay: 22909
0x7FA9385bE102ac3EAc297483Dd6233D62b3e1496.morpho_enableIrm(0x2e234dae75c793f67a35089c9d99245e1c58470b) from: 0x0000000000000000000000000000000000010000 Time delay: 419861 seconds Block delay: 53451
0x7FA9385bE102ac3EAc297483Dd6233D62b3e1496.morpho_supply_clamped(1356) from: 0x0000000000000000000000000000000000010000 Time delay: 31594 seconds Block delay: 2761
0x7FA9385bE102ac3EAc297483Dd6233D62b3e1496.morpho_createMarket_clamped(255,20056265597397357382471408076278377684564781686653282536887372269507121043006) from: 0x0000000000000000000000000000000000010000 Time delay: 322247 seconds Block delay: 2497
0x7FA9385bE102ac3EAc297483Dd6233D62b3e1496.switch_asset(4369999) from: 0x0000000000000000000000000000000000030000 Time delay: 127 seconds Block delay: 23275
0x7FA9385bE102ac3EAc297483Dd6233D62b3e1496.morpho_setFeeRecipient(0x20000) from: 0x0000000000000000000000000000000000030000 Time delay: 447588 seconds Block delay: 2497
0x7FA9385bE102ac3EAc297483Dd6233D62b3e1496.switchActor(72588008080124735701161091986774009961001474157663624256168037189703653544743) from: 0x0000000000000000000000000000000000020000 Time delay: 15393 seconds Block delay: 48339
0x7FA9385bE102ac3EAc297483Dd6233D62b3e1496.morpho_borrow(16613105090390601515239090669577198268868248614865818172825450329577079163584,21154678515745375889100650646505101526701555390905808907145126232472844598646,0x1fffffffe,0x1fffffffe) from: 0x0000000000000000000000000000000000020000 Time delay: 33605 seconds Block delay: 30042
0x7FA9385bE102ac3EAc297483Dd6233D62b3e1496.morpho_enableIrm(0x3a6a84cd762d9707a21605b548aaab891562aab) from: 0x0000000000000000000000000000000000020000 Time delay: 82671 seconds Block delay: 60248
0x7FA9385bE102ac3EAc297483Dd6233D62b3e1496.morpho_withdraw(62941804010087489725830203321595685812222552316557965638239257365793972413216,1524785991,0x1d1499e622d69689cdf9004d05ec547d650ff211,0xa0cb889707d426a7a386870a03bc70d1b0697598) from: 0x0000000000000000000000000000000000030000 Time delay: 276448 seconds Block delay: 2512
0x7FA9385bE102ac3EAc297483Dd6233D62b3e1496.morpho_borrow(4370000,2768573972053683659826,0xffffffff,0x2e234dae75c793f67a35089c9d99245e1c58470b) from: 0x0000000000000000000000000000000000020000 Time delay: 19029 seconds Block delay: 12338
0x7FA9385bE102ac3EAc297483Dd6233D62b3e1496.morpho_liquidate(0x2fffffffd,11460800875078169477147194839287647492117265203788714788708925236145309358714,10280738335691948395410926034882702684090815157987843691118830727301370669381,"\197c\216\197\&8\222\157\206\181u\205.\147\NUL\192&\191\252S\216fs\255\192bs~") from: 0x0000000000000000000000000000000000030000 Time delay: 490446 seconds Block delay: 35200
0x7FA9385bE102ac3EAc297483Dd6233D62b3e1496.morpho_enableIrm(0x1fffffffe) from: 0x0000000000000000000000000000000000020000 Time delay: 519847 seconds Block delay: 47075
0x7FA9385bE102ac3EAc297483Dd6233D62b3e1496.morpho_supplyCollateral_clamped(87429830717447434093546417163411461590066543115446751961992901672555285315214) from: 0x0000000000000000000000000000000000030000 Time delay: 127 seconds Block delay: 2497
0x7FA9385bE102ac3EAc297483Dd6233D62b3e1496.morpho_enableIrm(0xffffffff) from: 0x0000000000000000000000000000000000020000 Time delay: 112444 seconds Block delay: 53011
0x7FA9385bE102ac3EAc297483Dd6233D62b3e1496.morpho_withdraw(4370000,78334692598020393677652884085155006796119597581000791874351453802511462037487,0x1fffffffe,0xd16d567549a2a2a2005aeacf7fb193851603dd70) from: 0x0000000000000000000000000000000000020000 Time delay: 419834 seconds Block delay: 12493
0x7FA9385bE102ac3EAc297483Dd6233D62b3e1496.morpho_enableIrm(0xa4ad4f68d0b91cfd19687c881e50f3a00242828c) from: 0x0000000000000000000000000000000000010000 Time delay: 519847 seconds Block delay: 5237
0x7FA9385bE102ac3EAc297483Dd6233D62b3e1496.morpho_createMarket((0x2fffffffd, 0x2fffffffd, 0x2fffffffd, 0xffffffff, 4370000)) from: 0x0000000000000000000000000000000000030000 Time delay: 73040 seconds Block delay: 27404
0x7FA9385bE102ac3EAc297483Dd6233D62b3e1496.morpho_liquidate_clamped(1524785991,"\179t\219") from: 0x0000000000000000000000000000000000010000 Time delay: 24867 seconds Block delay: 59981
0x7FA9385bE102ac3EAc297483Dd6233D62b3e1496.morpho_setAuthorizationWithSig((0xc7183455a4c133ae270771860664b6b7ec320bb1, 0x3d7ebc40af7092e3f1c81f2e996cba5cae2090d7, false, 115792089237316195423570985008687907853269984665640564039457584007913129639931, 19328226267572242688271507287095356322934312678548014606211592404247528008431),(5, "\168\SI}\v\232_\164N\130hM\246\249\171#\SO\207C\182\201\145rI\213\173\"\169X&\213B\148", "\170\STXV2\236\159\nBZ\248\a\208\145\156\225\213&\184c0\NUL\164\239\215\131\215\176\236\222\206\241\167")) from: 0x0000000000000000000000000000000000010000 Time delay: 16802 seconds Block delay: 12338
0x7FA9385bE102ac3EAc297483Dd6233D62b3e1496.morpho_setAuthorizationWithSig((0xffffffff, 0xffffffff, false, 1524785991, 4370001),(132, "\196l\165gv\f#>\216GU\226<;o\190\172\164\159O\160\RS\RSq\230Q\233\&7~\DC4\129.", "(F,I\141\"\161\151V*\ETB\220\US\188\147D\145\SYN\197\DC1\228\222E<\255\190\183\199\166\196!\182")) from: 0x0000000000000000000000000000000000030000 Time delay: 492067 seconds Block delay: 58783
0x7FA9385bE102ac3EAc297483Dd6233D62b3e1496.switchActor(19649199686366011062803512568976588619112314940412432458583120627149961520044) from: 0x0000000000000000000000000000000000010000 Time delay: 31594 seconds Block delay: 24311
0x7FA9385bE102ac3EAc297483Dd6233D62b3e1496.morpho_setOwner(0x2fffffffd) from: 0x0000000000000000000000000000000000020000 Time delay: 156190 seconds Block delay: 30042
0x7FA9385bE102ac3EAc297483Dd6233D62b3e1496.morpho_supplyCollateral_clamped(4370000) from: 0x0000000000000000000000000000000000030000 Time delay: 434894 seconds Block delay: 38350
0x7FA9385bE102ac3EAc297483Dd6233D62b3e1496.morpho_setFeeRecipient(0x2fffffffd) from: 0x0000000000000000000000000000000000030000 Time delay: 487078 seconds Block delay: 45852
0x7FA9385bE102ac3EAc297483Dd6233D62b3e1496.morpho_borrow(1524785993,0,0x7fa9385be102ac3eac297483dd6233d62b3e1496,0x2fffffffd) from: 0x0000000000000000000000000000000000030000 Time delay: 45142 seconds Block delay: 30042
0x7FA9385bE102ac3EAc297483Dd6233D62b3e1496.morpho_setAuthorization(0xffffffff,false) from: 0x0000000000000000000000000000000000020000 Time delay: 127251 seconds Block delay: 30784
0x7FA9385bE102ac3EAc297483Dd6233D62b3e1496.morpho_setOwner(0x2fffffffd) from: 0x0000000000000000000000000000000000030000 Time delay: 419861 seconds Block delay: 6116
0x7FA9385bE102ac3EAc297483Dd6233D62b3e1496.morpho_setAuthorizationWithSig((0xffffffff, 0xffffffff, true, 98023560194378278901182335731286893845369649171257963920947453536020479832694, 42531487871708039434445226744859689838438112427986407282965960331800976935919),(255, "\139\152E\251\a\132\163\176\161\GS\FSU_\SUB\141f\131\136\131\252$ $\CAN\213&y\187G]q\142", "\129\141!\r<\255e\166\ENQ\174\194\184\171K\txo\160\245\183\165\150\245\164u\186!\231\248d@g")) from: 0x0000000000000000000000000000000000010000 Time delay: 275394 seconds Block delay: 54155
0x7FA9385bE102ac3EAc297483Dd6233D62b3e1496.morpho_supply(78340293067286351700421412032466036153505569321862356155104413012425925305892,64900388158780783892669244892148232949424203977197049790349739320541455404460,0xc7183455a4c133ae270771860664b6b7ec320bb1,"\203\158s95") from: 0x0000000000000000000000000000000000030000 Time delay: 588255 seconds Block delay: 30304
0x7FA9385bE102ac3EAc297483Dd6233D62b3e1496.asset_mint(0x2fffffffd,164863398856115715657560275188347377652) from: 0x0000000000000000000000000000000000020000 Time delay: 49735 seconds Block delay: 255
0x7FA9385bE102ac3EAc297483Dd6233D62b3e1496.morpho_withdrawCollateral(1524785992,0xd16d567549a2a2a2005aeacf7fb193851603dd70,0x1fffffffe) from: 0x0000000000000000000000000000000000030000 Time delay: 289607 seconds Block delay: 22699
0x7FA9385bE102ac3EAc297483Dd6233D62b3e1496.morpho_setFee(30060947926930881215955423309556356762383357789761387983137622815863096422900) from: 0x0000000000000000000000000000000000010000 Time delay: 322374 seconds Block delay: 35200
0x7FA9385bE102ac3EAc297483Dd6233D62b3e1496.asset_mint(0x1fffffffe,201575724203951298497109500251262201924) from: 0x0000000000000000000000000000000000010000 Time delay: 172101 seconds Block delay: 24987
0x7FA9385bE102ac3EAc297483Dd6233D62b3e1496.morpho_setFeeRecipient(0x5615deb798bb3e4dfa0139dfa1b3d433cc23b72f) from: 0x0000000000000000000000000000000000020000 Time delay: 434894 seconds Block delay: 38350
0x7FA9385bE102ac3EAc297483Dd6233D62b3e1496.morpho_supplyCollateral(95655969517338079568542754796826555155765084030581389603695924810962017720490,0x2fffffffd,"\221e") from: 0x0000000000000000000000000000000000010000 Time delay: 32767 seconds Block delay: 43261
0x7FA9385bE102ac3EAc297483Dd6233D62b3e1496.morpho_withdraw(1524785992,1524785993,0x2fffffffd,0x10000) from: 0x0000000000000000000000000000000000010000 Time delay: 135921 seconds Block delay: 19933
0x7FA9385bE102ac3EAc297483Dd6233D62b3e1496.morpho_enableLltv(63072166978742494423739555210865834901378841244451337092582777021427807180364) from: 0x0000000000000000000000000000000000020000 Time delay: 379552 seconds Block delay: 35393
0x7FA9385bE102ac3EAc297483Dd6233D62b3e1496.morpho_supply_clamped(1524785993) from: 0x0000000000000000000000000000000000030000 Time delay: 191165 seconds Block delay: 3661
0x7FA9385bE102ac3EAc297483Dd6233D62b3e1496.morpho_setFeeRecipient(0x2fffffffd) from: 0x0000000000000000000000000000000000010000 Time delay: 198598 seconds Block delay: 35727
0x7FA9385bE102ac3EAc297483Dd6233D62b3e1496.add_new_asset(255) from: 0x0000000000000000000000000000000000010000 Time delay: 521319 seconds Block delay: 561
0x7FA9385bE102ac3EAc297483Dd6233D62b3e1496.morpho_createMarket_clamped(114,14732638537083624345289335954617015250112438091124267754753001504400952630840) from: 0x0000000000000000000000000000000000030000 Time delay: 127251 seconds Block delay: 4223
0x7FA9385bE102ac3EAc297483Dd6233D62b3e1496.morpho_setAuthorizationWithSig((0x3a6a84cd762d9707a21605b548aaab891562aab, 0x2fffffffd, false, 0, 494),(107, "s\STXO\170Wa\165\178}\222\174\244\253\SUB,;\DLE\239\254_\\\203\233\136\176\t\150\236\152\223R\DC3", "i\217Q\199\247]V\217\218\STXnH\188\175\DC2S\212n6\138\208\SOH(\170\136NA\132\ACK\135YX")) from: 0x0000000000000000000000000000000000030000 Time delay: 379552 seconds Block delay: 260
0x7FA9385bE102ac3EAc297483Dd6233D62b3e1496.morpho_borrow(1524785993,0,0x7fa9385be102ac3eac297483dd6233d62b3e1496,0x2fffffffd) from: 0x0000000000000000000000000000000000010000 Time delay: 100835 seconds Block delay: 42101
0x7FA9385bE102ac3EAc297483Dd6233D62b3e1496.morpho_setAuthorization(0x30000,false) from: 0x0000000000000000000000000000000000020000 Time delay: 136392 seconds Block delay: 2526
0x7FA9385bE102ac3EAc297483Dd6233D62b3e1496.morpho_liquidate(0x1fffffffe,42,115792089237316195423570985008687907853269984665640564039457584007913129639935,"\SI \205\221\&8\\\233\131B\\\170\154\139\194\SUB\176\242\219V\NUL\246\189:*") from: 0x0000000000000000000000000000000000010000 Time delay: 401699 seconds Block delay: 5140
0x7FA9385bE102ac3EAc297483Dd6233D62b3e1496.morpho_setAuthorizationWithSig((0x2fffffffd, 0x2fffffffd, true, 98718112542795174780222117041749633036515850812239078969752153088362960804452, 59082813273560708554252437649099167166514405373127152335401515528348149263322),(14, "^#\246)^\130\DC1\167\t\231\221\142\SO\a#;\EOTh)\188\209\US5\244go\243]\198w\136\&4", ")\229\171\174\252\207\168\ESC\b\148ZR\250S\190\209\&5q\238\198zz\205\230\132\182\CAN\248\131<t\209")) from: 0x0000000000000000000000000000000000020000 Time delay: 332369 seconds Block delay: 12338
0x7FA9385bE102ac3EAc297483Dd6233D62b3e1496.morpho_supplyCollateral_clamped(393) from: 0x0000000000000000000000000000000000020000 Time delay: 136392 seconds Block delay: 23275
0x7FA9385bE102ac3EAc297483Dd6233D62b3e1496.morpho_withdraw(4370000,88168885110079523116729640532378128948455763074151442754201129142029243467873,0x3d7ebc40af7092e3f1c81f2e996cba5cae2090d7,0x2fffffffd) from: 0x0000000000000000000000000000000000030000 Time delay: 554465 seconds Block delay: 30784
0x7FA9385bE102ac3EAc297483Dd6233D62b3e1496.canary_hasLiquidated() from: 0x0000000000000000000000000000000000030000 Time delay: 136394 seconds Block delay: 53349
0x7FA9385bE102ac3EAc297483Dd6233D62b3e1496.switch_asset(6972644) from: 0x0000000000000000000000000000000000020000 Time delay: 440097 seconds Block delay: 11942
0x7FA9385bE102ac3EAc297483Dd6233D62b3e1496.asset_mint(0x1fffffffe,288045975658121479244861835043592183055) from: 0x0000000000000000000000000000000000010000 Time delay: 4177 seconds Block delay: 12053
0x7FA9385bE102ac3EAc297483Dd6233D62b3e1496.asset_mint(0xd6bbde9174b1cdaa358d2cf4d57d1a9f7178fbff,41711746708650170008808164710389318524) from: 0x0000000000000000000000000000000000030000 Time delay: 209930 seconds Block delay: 12155
0x7FA9385bE102ac3EAc297483Dd6233D62b3e1496.morpho_createMarket((0xffffffff, 0x1fffffffe, 0x0, 0xa0cb889707d426a7a386870a03bc70d1b0697598, 4370000)) from: 0x0000000000000000000000000000000000010000 Time delay: 344203 seconds Block delay: 54809
0x7FA9385bE102ac3EAc297483Dd6233D62b3e1496.morpho_liquidate(0x1fffffffe,40373840526740839050196801193704937073898266292205731546154565460803927995135,29217591463335546937800419633742115545267222565624375091055595586860275593735,"O\137\149\134vK\137\249e\212\&0v\248\NULh\162\154'") from: 0x0000000000000000000000000000000000010000 Time delay: 111322 seconds Block delay: 59552
0x7FA9385bE102ac3EAc297483Dd6233D62b3e1496.morpho_supply(18004158537693769052070926907116349022576345496000691176340467249201776730440,4369999,0x1fffffffe,"\222L\213\f\235\138\189\193\r\215\152$l\225\165\&3\RSl\NUL7\198iQ\201\154\217O\DC2\170\243") from: 0x0000000000000000000000000000000000020000 Time delay: 275394 seconds Block delay: 19933
0x7FA9385bE102ac3EAc297483Dd6233D62b3e1496.add_new_asset(241) from: 0x0000000000000000000000000000000000030000 Time delay: 82672 seconds Block delay: 11826
0x7FA9385bE102ac3EAc297483Dd6233D62b3e1496.morpho_enableLltv(43156194238538479672366816039426317203377470164620094413833090790105307961583) from: 0x0000000000000000000000000000000000010000 Time delay: 289103 seconds Block delay: 34720
0x7FA9385bE102ac3EAc297483Dd6233D62b3e1496.morpho_supply_clamped(27974427792546532164293415827895807259179813205875291961017560107983336431691) from: 0x0000000000000000000000000000000000030000 Time delay: 487078 seconds Block delay: 32737
0x7FA9385bE102ac3EAc297483Dd6233D62b3e1496.morpho_setFeeRecipient(0x2fffffffd) from: 0x0000000000000000000000000000000000010000 Time delay: 116188 seconds Block delay: 59998
0x7FA9385bE102ac3EAc297483Dd6233D62b3e1496.morpho_setOwner(0xf62849f9a0b5bf2913b396098f7c7019b51a820a) from: 0x0000000000000000000000000000000000010000 Time delay: 305572 seconds Block delay: 42229
0x7FA9385bE102ac3EAc297483Dd6233D62b3e1496.morpho_setAuthorizationWithSig((0x7fa9385be102ac3eac297483dd6233d62b3e1496, 0x1fffffffe, false, 4370000, 113694143080975084215547446605886497531912965399599328542643253627763968653096),(103, "(\a\f\201\&1f\150\226\229\167\216f5d\t\236\161\DC21%C\NAK\195A\SYN\205\146\&5\151\253\197\t", "\v\145\149O\195\251\232\242\133\173\174\254\&5\155\136\224\245DGZ\ESC\166\192\183\235\RS\147&q\194n\235")) from: 0x0000000000000000000000000000000000030000 Time delay: 457169 seconds Block delay: 55538
0x7FA9385bE102ac3EAc297483Dd6233D62b3e1496.morpho_repay_clamped(4369999) from: 0x0000000000000000000000000000000000030000 Time delay: 437838 seconds Block delay: 45819
0x7FA9385bE102ac3EAc297483Dd6233D62b3e1496.morpho_liquidate(0x2fffffffd,52810212339586943686099208591755771434427525861105501860251480674091378931250,4370001,"\157Q\219\ENQu\160\133U\240,D\145\&8\148\164\215}\186\&0H\SOH\SOH\SOH\SOH\SOH\SOH\SOH\SOH\SOH\SOH\SOH\SOH\SOH\188\240\190\183") from: 0x0000000000000000000000000000000000010000 Time delay: 38059 seconds Block delay: 34272
0x7FA9385bE102ac3EAc297483Dd6233D62b3e1496.morpho_setOwner(0x30000) from: 0x0000000000000000000000000000000000010000 Time delay: 49735 seconds Block delay: 11826
0x7FA9385bE102ac3EAc297483Dd6233D62b3e1496.morpho_setFeeRecipient(0xffffffff) from: 0x0000000000000000000000000000000000010000 Time delay: 322374 seconds Block delay: 15368
0x7FA9385bE102ac3EAc297483Dd6233D62b3e1496.morpho_supplyCollateral(4370001,0x1fffffffe,"\218\196\228\148") from: 0x0000000000000000000000000000000000030000 Time delay: 127 seconds Block delay: 4896
0x7FA9385bE102ac3EAc297483Dd6233D62b3e1496.morpho_createMarket((0x0, 0xffffffff, 0x1fffffffe, 0x2fffffffd, 115792089237316195423570985008687907853269984665640564039457584007913129639935)) from: 0x0000000000000000000000000000000000030000 Time delay: 444463 seconds Block delay: 30011
0x7FA9385bE102ac3EAc297483Dd6233D62b3e1496.morpho_supply(4370001,66832979790404067201096805386866048905938793568907012611547785706362720135665,0xf62849f9a0b5bf2913b396098f7c7019b51a820a,"\254\&6\139\220\201\241\DLE83\248I\207\146") from: 0x0000000000000000000000000000000000020000 Time delay: 275394 seconds Block delay: 5053
0x7FA9385bE102ac3EAc297483Dd6233D62b3e1496.canary_hasRepaid() from: 0x0000000000000000000000000000000000030000 Time delay: 225906 seconds Block delay: 11349
0x7FA9385bE102ac3EAc297483Dd6233D62b3e1496.asset_approve(0x10000,165609190392559895484641210287838517044) from: 0x0000000000000000000000000000000000030000 Time delay: 512439 seconds Block delay: 1362
0x7FA9385bE102ac3EAc297483Dd6233D62b3e1496.morpho_repay_clamped(549254506228571780288208426538792742354690905907861302415970) from: 0x0000000000000000000000000000000000030000 Time delay: 112444 seconds Block delay: 12493
0x7FA9385bE102ac3EAc297483Dd6233D62b3e1496.morpho_setFee(113292422491629932223284832244308444917199192552263071449283252831384077866244) from: 0x0000000000000000000000000000000000020000 Time delay: 437838 seconds Block delay: 50499
0x7FA9385bE102ac3EAc297483Dd6233D62b3e1496.oracle_setPrice(1859232730291432912269385173227438938201779297) from: 0x0000000000000000000000000000000000030000 Time delay: 82671 seconds Block delay: 23275
0x7FA9385bE102ac3EAc297483Dd6233D62b3e1496.morpho_liquidate_clamped(10538888047983539263476186051641774148106703093301357864018304851672623648122,"r\218\241\RS") from: 0x0000000000000000000000000000000000010000 Time delay: 519847 seconds Block delay: 30304
0x7FA9385bE102ac3EAc297483Dd6233D62b3e1496.morpho_setOwner(0x10000) from: 0x0000000000000000000000000000000000030000 Time delay: 318197 seconds Block delay: 42595
0x7FA9385bE102ac3EAc297483Dd6233D62b3e1496.morpho_supplyCollateral(30251439192409875694466764232152102179766724355170846072199950999652926314734,0x1fffffffe,"\201I\133\ESC~\148\174\235\187\196\141\182\232\GS") from: 0x0000000000000000000000000000000000010000 Time delay: 24867 seconds Block delay: 22909
0x7FA9385bE102ac3EAc297483Dd6233D62b3e1496.asset_mint(0xf62849f9a0b5bf2913b396098f7c7019b51a820a,1524785991) from: 0x0000000000000000000000000000000000030000 Time delay: 444463 seconds Block delay: 45852
0x7FA9385bE102ac3EAc297483Dd6233D62b3e1496.morpho_createMarket_clamped(80,4787415) from: 0x0000000000000000000000000000000000030000 Time delay: 521319 seconds Block delay: 23978
0x7FA9385bE102ac3EAc297483Dd6233D62b3e1496.morpho_repay_clamped(1524785993) from: 0x0000000000000000000000000000000000020000 Time delay: 82671 seconds Block delay: 49415
0x7FA9385bE102ac3EAc297483Dd6233D62b3e1496.morpho_withdrawCollateral(17148736191729336842538147244438636401501412136166720330790724316212534695961,0xd6bbde9174b1cdaa358d2cf4d57d1a9f7178fbff,0xf62849f9a0b5bf2913b396098f7c7019b51a820a) from: 0x0000000000000000000000000000000000010000 Time delay: 437838 seconds Block delay: 800
0x7FA9385bE102ac3EAc297483Dd6233D62b3e1496.asset_approve(0x2e234dae75c793f67a35089c9d99245e1c58470b,227828102580336275648345108956335259984) from: 0x0000000000000000000000000000000000010000 Time delay: 275394 seconds Block delay: 53678
0x7FA9385bE102ac3EAc297483Dd6233D62b3e1496.morpho_repay(4370001,1524785993,0x2fffffffd,"ou(.s\207h\ETBE\141\221:\169SAl\155j\ESC\"R\US") from: 0x0000000000000000000000000000000000020000 Time delay: 289607 seconds Block delay: 2497
0x7FA9385bE102ac3EAc297483Dd6233D62b3e1496.morpho_supplyCollateral(4369999,0x212224d2f2d262cd093ee13240ca4873fccbba3c,"PL\174\131\216|\174") from: 0x0000000000000000000000000000000000020000 Time delay: 437838 seconds Block delay: 23885
0x7FA9385bE102ac3EAc297483Dd6233D62b3e1496.morpho_withdraw(181,115792089237316195423570985008687907853269984665640564039457584007913129639934,0x1fffffffe,0xffffffff) from: 0x0000000000000000000000000000000000020000 Time delay: 407328 seconds Block delay: 12053
0x7FA9385bE102ac3EAc297483Dd6233D62b3e1496.asset_approve(0x1d1499e622d69689cdf9004d05ec547d650ff211,1524785992) from: 0x0000000000000000000000000000000000010000 Time delay: 478623 seconds Block delay: 23885
0x7FA9385bE102ac3EAc297483Dd6233D62b3e1496.morpho_borrow(1524785993,0,0x7fa9385be102ac3eac297483dd6233d62b3e1496,0x2fffffffd) from: 0x0000000000000000000000000000000000010000 Time delay: 332369 seconds Block delay: 15367
0x7FA9385bE102ac3EAc297483Dd6233D62b3e1496.morpho_repay_clamped(4370000) from: 0x0000000000000000000000000000000000010000 Time delay: 136393 seconds Block delay: 55538
0x7FA9385bE102ac3EAc297483Dd6233D62b3e1496.oracle_setPrice(314193065261808602749399333593851483) from: 0x0000000000000000000000000000000000010000 Time delay: 525476 seconds Block delay: 23978
0x7FA9385bE102ac3EAc297483Dd6233D62b3e1496.morpho_createMarket_clamped(94,4370000) from: 0x0000000000000000000000000000000000030000 Time delay: 322374 seconds Block delay: 52262
0x7FA9385bE102ac3EAc297483Dd6233D62b3e1496.morpho_setAuthorization(0x3a6a84cd762d9707a21605b548aaab891562aab,false) from: 0x0000000000000000000000000000000000030000 Time delay: 166184 seconds Block delay: 59982
0x7FA9385bE102ac3EAc297483Dd6233D62b3e1496.canary_hasRepaid() from: 0x0000000000000000000000000000000000030000 Time delay: 588255 seconds Block delay: 4223
which is almost entirely unintelligible and impossible to use for debugging.
Thankfully when we have the breaking call sequences in hand we can stop the fuzzer (cancel button in the Recon extension or crtl + c using the CLI) which will allow Echidna to take the very large and indecipherable call sequences and reduce them to the minimum calls required to break the property using shrinking:
...
canary_hasLiquidated(): failed!💥
  Call sequence:
    0x7FA9385bE102ac3EAc297483Dd6233D62b3e1496.oracle_setPrice(2000260614577296095635199229595241992)
    0x7FA9385bE102ac3EAc297483Dd6233D62b3e1496.morpho_supplyCollateral_clamped(1)
    0x7FA9385bE102ac3EAc297483Dd6233D62b3e1496.morpho_borrow(0,1,0x7fa9385be102ac3eac297483dd6233d62b3e1496,0xdeadbeef)
    0x7FA9385bE102ac3EAc297483Dd6233D62b3e1496.oracle_setPrice(0)
    0x7FA9385bE102ac3EAc297483Dd6233D62b3e1496.morpho_liquidate_clamped(1,"")
    0x7FA9385bE102ac3EAc297483Dd6233D62b3e1496.canary_hasLiquidated()

Traces:
emit Log(«hasLiquidated»)

...

canary_hasRepaid(): failed!💥
  Call sequence:
    0x7FA9385bE102ac3EAc297483Dd6233D62b3e1496.morpho_supplyCollateral_clamped(1)
    0x7FA9385bE102ac3EAc297483Dd6233D62b3e1496.morpho_supply_clamped(1)
    0x7FA9385bE102ac3EAc297483Dd6233D62b3e1496.oracle_setPrice(2002586819475893397607592226441960698)
    0x7FA9385bE102ac3EAc297483Dd6233D62b3e1496.morpho_borrow(1,0,0x7fa9385be102ac3eac297483dd6233d62b3e1496,0xdeadbeef)
    0x7FA9385bE102ac3EAc297483Dd6233D62b3e1496.morpho_repay_clamped(1)
    0x7FA9385bE102ac3EAc297483Dd6233D62b3e1496.canary_hasRepaid()

Traces:
emit Log(«hasRepaid»)

...
And once again if we've run Echidna using the Recon extension it will automatically generate Foundry reproducer unit tests for the breaking call sequences which get added to the CryticToFoundry contract.
// forge test --match-test test_canary_hasLiquidated_0 -vvv
function test_canary_hasLiquidated_0() public {
    oracle_setPrice(2000260614577296095635199229595241992);
    morpho_supplyCollateral_clamped(1);
    morpho_borrow(0,1,0x7FA9385bE102ac3EAc297483Dd6233D62b3e1496,0x00000000000000000000000000000000DeaDBeef);
    oracle_setPrice(0);
    morpho_liquidate_clamped(1,hex"");
    canary_hasLiquidated();
}

// forge test --match-test test_canary_hasRepaid_1 -vvv
function test_canary_hasRepaid_1() public {
    morpho_supplyCollateral_clamped(1);
    morpho_supply_clamped(1);
    oracle_setPrice(2002586819475893397607592226441960698);
    morpho_borrow(1,0,0x7FA9385bE102ac3EAc297483Dd6233D62b3e1496,0x00000000000000000000000000000000DeaDBeef);
    morpho_repay_clamped(1);
    canary_hasRepaid();
}
Since these reproducers are for canary properties they just prove to us that using our clamped handlers the fuzzer has been able to find a call sequence that allows it to successfully call repay and liquidate.
Remaining Coverage Issues
Now that we've confirmed that we have coverage over the two functions of interest that weren't previously getting covered, we can check the coverage report to see what remains uncovered:

from which we can determine that the line that's not being covered is because our clamped handler is always passing in a nonzero value for the seizedAssets parameter.
This shows that even though we're getting coverage in the sense that we successfully call the function, we aren't getting full branch coverage for all the possible paths that can be taken within the functions themselves because certain lines are difficult for the fuzzer to reach with its standard approach.
We're again faced with the option to either let the fuzzer run for an extended period of time or add additional clamped handlers. We'll take the approach of adding additional clamped handlers in this case because the issue blocking coverage is relatively straightforward but when working with a more complex project it may make sense to just run a long duration job using something like the Recon Cloud Runner.
Creating Additional Clamped Handlers
We'll now add a clamped handler for liquidating shares which allows for 0 seizedAssets:
abstract contract MorphoTargets is
    BaseTargetFunctions,
    Properties
{
    ...

    function morpho_liquidate_assets(uint256 seizedAssets, bytes memory data) public {
        morpho_liquidate(_getActor(), seizedAssets, 0, data);
    }

    function morpho_liquidate_shares(uint256 shares, bytes memory data) public {
        morpho_liquidate(_getActor(), 0, shares, data);
    }
}
Which should give us coverage over the missing line highlighted above.
We can then run Echidna again for 5-10 minutes and see that we now cover the previously uncovered line.

Dynamic Market Creation
With full coverage achieved over the functions of interest in our target contract we can now further analyze our existing setup and see where it could be improved.
Note that our statically deployed market which we previously added in the setup function in part 1 only allowed us to test one market configuration which may prevent the fuzzer from finding interesting cases related to different market configurations:
abstract contract Setup is BaseSetup, ActorManager, AssetManager, Utils {
    ...

    /// === Setup === ///
    function setup() internal virtual override {
        ...

        address[] memory assets = _getAssets();
        marketParams = MarketParams({
            loanToken: assets[1],
            collateralToken: assets[0],
            oracle: address(oracle),
            irm: address(irm),
            lltv: 8e17
        });
        morpho.createMarket(marketParams);
    }
}
We can replace this with a dynamic function which instead takes fuzzed values and allows us to test the system with more possible configurations, adding a new dimensionality to our test suite. We'll add the following function to our TargetFunctions contract to allow us to do this:
    function morpho_createMarket_clamped(uint8 index, uint256 lltv) public {
        address loanToken = _getAssets()[index % _getAssets().length];
        address collateralToken = _getAsset();

        marketParams = MarketParams({
            loanToken: loanToken,
            collateralToken: collateralToken,
            oracle: address(oracle),
            irm: address(irm),
            lltv: lltv
        });

        morpho_createMarket(marketParams);
    }
which just requires that we modify the original morpho_createMarket target function to receive a _marketParams argument:
    function morpho_createMarket(MarketParams memory _marketParams) public asActor {
        morpho.createMarket(_marketParams);
    }
This allows us to introduce even more possible market configurations than just those using the tokens we deployed in the Setup because the fuzzer will also be able to call the add_new_asset function via the ManagersTargets:
    function add_new_asset(uint8 decimals) public returns (address) {
        address newAsset = _newAsset(decimals);
        return newAsset;
    }
which deploys an additional asset with a random number of decimals. This can be particularly useful for testing low or high decimal precision tokens which can often reveal edge cases related to how they're handled in math operations.
Conclusion and Next Steps
We've looked at how we can scaffold a contract and get to 100% meaningful coverage using Chimera and use the randomness of the fuzzer to test additional configuration parameters not possible with only a static setup.
In part 3 we'll look at how we can further use Chimera for its main purpose of writing and breaking properties with different tools.
If you'd like to see more examples of how to scaffold projects with Chimera checkout the following podcasts:
- Fuzzing MicroStable with Echidna | Alex & Shafu on Invariant Testing
- Using Recon Pro to test invariants in the cloud | Alex & Austin Griffith
If you have any questions feel free to reach out to the Recon team in the help channel of our discord.
Part 3 - Writing and Breaking Properties
Introduction and Goals
In this section we'll finally get to exploring the reason why invariant testing is valuable: breaking properties, but first we need to understand how to define and implement them.
For the recorded stream of this part of the bootcamp see here.
Additional points on Chimera architecture
In parts 1 and 2 we primarily looked at targets defined in the MorphoTargets contract, but when you scaffold with Chimera you also get the AdminTargets, DoomsdayTargets and ManagersTargets contracts generated automatically.
We'll look at each of these more in depth below but before doing so here's a brief overview of each:
AdminTargets- target functions that should only be called by a system admin (uses theasAdminmodifier to call as our admin actor)DoomsdayTargets- special tests with multiple state changing operations in which we add inlined assertions to test specific scenariosManagersTargets- target functions that allow us to interact with any manager used in our system (ActorManagerandAssetManagerare added by default)
The three types of properties
When discussing properties it's easy to get caught-up in the subtleties of the different types, but for this overview we'll just stick with three general ideas for properties that will serve you well.
If you want to learn more about the subtleties of different property types, see this section on implementing properties.
1. Global Properties
Global properties, as the name implies, make assertions on the global state of the system, which can be defined by reading values from state variables or by added tracking variables that define values not stored by state variables.
An example of a global property that can be defined in many system types is a solvency property. For a solvency property we effectively query the sum of balances of the token, then query the balance in the system and make an assertion:
    /// @dev simple solvency property that checks that a ERC4626 vault always has sufficient assets to exchange for shares
    function property_solvency() public {
        address[] memory actors = _getActors();

        // sums user shares of the vault token
        uint256 sumUserShares;
        for (uint256 i; i < actors.length; i++) {
            sumUserShares += vault.balanceOf(actors[i]);
        }
        // converts sum of user shares to vault's underlying assets
        uint256 sharesAsAssets = vault.convertToAssets(sumUserShares);

        // fetches underlying asset balance of vault
        uint256 vaultUnderlyingBalance = IERC20(vault.asset()).balanceOf(address(vault));

        // asserts that the vault must always have a sufficient amount of assets to repay the shares converted to assets
        gte(vaultUnderlyingBalance, sharesAsAssets, "vault is insolvent");
    }
In the above example, any time the system's balance is less than the sum of shares converted to the underlying asset, the system is insolvent because it would be unable to fulfill all repayments.
Interesting states that can be checked with global properties usually either take the form of one-to-one variable checks like checking a user balance versus balance tracked in the system or aggregated checks like the sum of all user balances versus sum of all internal balances.
2. State Changing Properties
State changing properties allow us to verify how the state of a system evolves over time with calls to state changing functions.
For example, we could verify that for a deposit into a vault, a user's balance of the share token is increased by the correct amount:
    /// @dev inline property to check that user isn't minted more shares than expected
    function vault_deposit(uint256 assets, address receiver) public {
        // fetch the amount of expected shares to be received for depositing a given amount of assets
        uint256 expectedShares = vault.previewDeposit(assets);
        // fetch user shares before deposit
        uint256 sharesBefore = vault.balanceOf(receiver);

        // make the deposit
        vault.deposit(assets, receiver);

        // fetch user shares after deposit
        uint256 sharesAfter = vault.balanceOf(receiver);

        // assert that user doesn't gain more shares than expected
        lte(sharesAfter, sharesBefore + expectedShares, "user receives more than expected shares");
    }
The check in the above goes a step beyond a simple equality check and confirms that the user doesn't gain more shares than expected. This is helpful for finding issues where the vault may round in favor of the user instead of the protocol, potentially leading to insolvency.
Although these types of checks may seem basic, you'd be surprised how many times they've led to uncovering edge cases in private audits for the Recon team.
Dealing with complex tests
Global and state changing properties allow making an assertion after an individual state change is made, but sometimes you'll want to check how multiple specific state changes affect the system.
For these checks you can use the stateless modifier which reverts all state changes after the function call:
    modifier stateless() {
        _;
        revert("stateless");
    }
This allows you to perform the specific check without maintaining state changes in the next target function call.
Adding the stateless modifier to functions defined in DoomsdayTargets therefore lets us test specific cases which make multiple state changes or modify the input to the target function in some way. For example, we can check if withdrawing a user's entire maxWithdraw amount from a vault sets the user's maxWithdraw to 0 after:
    function doomsday_maxWithdraw() public stateless {
        uint256 maxWithdrawBefore = vault.maxWithdraw(_getActor());

        vault.withdraw(amountToWithdraw, _getActor(), _getActor());

        uint256 maxWithdrawAfter = vault.maxWithdraw(_getActor);
        eq(maxWithdrawAfter, 0, "maxWithdraw after withdrawing all is nonzero");
    }
If the assertion above fails, we'll get a reproducer unit test in which the doomsday_maxWithdraw function is the last one called. If the assertion doesn't fail, the fuzzer will revert the state changes meaning it won't be included in the shrunken reproducer for any other broken properties. As a result, the function that's used for exploring state changes related to withdrawals will be the primary withdrawal handler function: vault_withdraw.
Using this technique ensures that the actual state exploration done by the fuzzer is handled only by the target functions which call one state changing function at a time and have descriptive names. This approach keeps what we call the "story" clean, where the story is the call sequence that's used to break a property in a reproducer unit test. Having each individual handler responsible for one state changing call makes it easier to understand how the state evolves when looking at the test.
Practical exercise: RewardsManager
For our example we'll be looking at the RewardsManager contract, in this repo.
First we'll use the Recon extension to add a Chimera scaffolding to the project like we did in part 1, then focus on how we can get full coverage and finally implement the properties.
This is typically how we structure our engagements at Recon, as we outlined in this section of the intro as these steps need to preceed one another to be maximally effective and reduce the amount of time spent debugging issues.
Scaffolding
We can use the same process for scaffolding as we did in part 1. After scaffolding the RewardsManager, we should have the following target functions:
abstract contract RewardsManagerTargets is
    BaseTargetFunctions,
    Properties
{

    function rewardsManager_accrueUser(uint256 epochId, address vault, address user) public asActor {
        rewardsManager.accrueUser(epochId, vault, user);
    }

    function rewardsManager_accrueVault(uint256 epochId, address vault) public asActor {
        rewardsManager.accrueVault(epochId, vault);
    }

    function rewardsManager_addBulkRewards(uint256 epochStart, uint256 epochEnd, address vault, address token, uint256[] memory amounts) public asActor {
        rewardsManager.addBulkRewards(epochStart, epochEnd, vault, token, amounts);
    }

    function rewardsManager_addBulkRewardsLinearly(uint256 epochStart, uint256 epochEnd, address vault, address token, uint256 total) public asActor {
        rewardsManager.addBulkRewardsLinearly(epochStart, epochEnd, vault, token, total);
    }

    function rewardsManager_addReward(uint256 epochId, address vault, address token, uint256 amount) public asActor {
        rewardsManager.addReward(epochId, vault, token, amount);
    }

    function rewardsManager_claimBulkTokensOverMultipleEpochs(
        uint256 epochStart,
        uint256 epochEnd,
        address vault,
        address[] memory tokens,
        address user
    ) public asActor {
        rewardsManager.claimBulkTokensOverMultipleEpochs(epochStart, epochEnd, vault, tokens, user);
    }

    function rewardsManager_claimReward(uint256 epochId, address vault, address token, address user) public asActor {
        rewardsManager.claimReward(epochId, vault, token, user);
    }

    function rewardsManager_claimRewardEmitting(uint256 epochId, address vault, address token, address user) public asActor {
        rewardsManager.claimRewardEmitting(epochId, vault, token, user);
    }

    function rewardsManager_claimRewardReferenceEmitting(uint256 epochId, address vault, address token, address user) public asActor {
        rewardsManager.claimRewardReferenceEmitting(epochId, vault, token, user);
    }

    function rewardsManager_claimRewards(
        uint256[] memory epochsToClaim,
        address[] memory vaults,
        address[] memory tokens,
        address[] memory users
    ) public asActor {
        rewardsManager.claimRewards(epochsToClaim, vaults, tokens, users);
    }

    function rewardsManager_notifyTransfer(address from, address to, uint256 amount) public asActor {
        rewardsManager.notifyTransfer(from, to, amount);
    }

    function rewardsManager_reap(RewardsManager.OptimizedClaimParams memory params) public asActor {
        rewardsManager.reap(params);
    }

    function rewardsManager_tear(RewardsManager.OptimizedClaimParams memory params) public asActor {
        rewardsManager.tear(params);
    }
}
Since the RewardsManager has no constructor arguments, we can see that the project immediately compiles without needing to modify our setup function:
forge build
[⠊] Compiling...
[⠑] Compiling 56 files with Solc 0.8.24
[⠘] Solc 0.8.24 finished in 702.49ms
Compiler run successful!
letting us move onto the next step of expanding our setup to improve our line and logical coverage.
Setting up actors and assets
The first step for improving our test setup will be adding three additional actors and token deployments of varying decimal values to the setup function:
    function setup() internal virtual override {
        rewardsManager = new RewardsManager();

        // Add 3 additional actors (default actor is address(this))
        _addActor(address(0x411c3));
        _addActor(address(0xb0b));
        _addActor(address(0xc0ff3));

        // Deploy MockERC20 assets
        _newAsset(18);
        _newAsset(8);
        _newAsset(6);

        // Mints to all actors and approves allowances to the counter
        address[] memory approvalArray = new address[](1);
        approvalArray[0] = address(rewardsManager);
        _finalizeAssetDeployment(_getActors(), approvalArray, type(uint88).max);
    }
Note that in the
ActorManager, the default actor isaddress(this)which also serves as the "admin" actor which we use to call privileged functions via theasAdminmodifier.
The RewardsManager doesn't implement access control mechanisms, but we can simulate privileged functions only being called by the admin actor using the CodeLense provided by the Recon extension to replace the asActor modifier with the asAdmin modifier on our functions of interest:

and subsequently relocating these functions to the AdminTargets contract. In a real-world setup this allows testing admin functions that would be called in regular operations by ensuring these target functions are always called with the correct actor so they don't needlessly revert.
We'll apply the above mentioned changes to the rewardsManager_addBulkRewards, rewardsManager_addBulkRewardsLinearly, rewardsManager_addReward and rewardsManager_notifyTransfer functions:
abstract contract AdminTargets is
    BaseTargetFunctions,
    Properties
{
    function rewardsManager_addBulkRewards(uint256 epochStart, uint256 epochEnd, address vault, address token, uint256[] memory amounts) public asAdmin {
        rewardsManager.addBulkRewards(epochStart, epochEnd, vault, token, amounts);
    }

    function rewardsManager_addBulkRewardsLinearly(uint256 epochStart, uint256 epochEnd, address vault, address token, uint256 total) public asAdmin {
        rewardsManager.addBulkRewardsLinearly(epochStart, epochEnd, vault, token, total);
    }

    function rewardsManager_addReward(uint256 epochId, address vault, address token, uint256 amount) public asAdmin {
        rewardsManager.addReward(epochId, vault, token, amount);
    }

    function rewardsManager_notifyTransfer(address from, address to, uint256 amount) public asAdmin {
        rewardsManager.notifyTransfer(from, to, amount);
    }
}
This leaves our RewardsManagerTargets cleaner and makes it easier to distinguish user actions from admin actions.
Creating clamped handlers
Looking at our target functions we can see there are 3 primary values that we'll need to clamp if we don't want the fuzzer to spend an inordinate amount of time exploring states that are irrelevant: address vault, address token and address user:
abstract contract RewardsManagerTargets is
    BaseTargetFunctions,
    Properties
{
    ...

    function rewardsManager_accrueUser(uint256 epochId, address vault, address user) public asActor {
        rewardsManager.accrueUser(epochId, vault, user);
    }

    ...

    function rewardsManager_claimRewardEmitting(uint256 epochId, address vault, address token, address user) public asActor {
        rewardsManager.claimRewardEmitting(epochId, vault, token, user);
    }

    ...
}
Thankfully our setup handles tracking for two of the values we need, so we can clamp token with the value returned by _getAsset() and the user with the value returned by _getActor(). For simplicity we'll clamp the vault using address(this), this saves us from having to implement a mock vault which we'd have to add to our actors to call the handlers with.
We'll start off by only clamping the claimReward function because it should allow us to reach decent coverage after our first run of the fuzzer:
abstract contract RewardsManagerTargets is
    BaseTargetFunctions,
    Properties
{
    function rewardsManager_claimReward_clamped(uint256 epochId) public asActor {
        rewardsManager_claimReward(epochId, address(this), _getAsset(), _getActor());
    }
}
We can then run Echidna in exploration mode (which only tries to increase coverage without testing properties) for 10-20 minutes to see how many of the lines of interest get covered with this minimal clamping applied:

Coverage analysis
After stopping the fuzzer, we can see from the coverage report that all the major functions of interest: notifyTransfer, _handleDeposit, _handleWithdrawal, _handleTransfer, and accrueVault are fully covered:

We can also see, however, that the claimReward function is only being partially covered:

specifically, the epoch for which a user is claiming rewards never has any points accumulated for it, so it never has anything to claim.
We can use this additional information to improve our rewardsManager_claimReward_clamped function further:
    function rewardsManager_claimReward_clamped(uint256 epochId) public asActor {
        uint256 maxEpoch = rewardsManager.currentEpoch();
        epochId = epochId % (maxEpoch + 1);

        rewardsManager_claimReward(epochId, address(this), _getAsset(), _getActor());
    }
which ensures that we only claim rewards for an epochId that has already passed, which makes it more likely that there will be points accumulated for it.
We can then start a new run of the fuzzer and confirm that this has improved coverage as expected:

Now with a setup that works and coverage over the functions of interest we can move on to the property writing phase.
About the RewardsManager contract
Before implementing the properties themselves we need to get a high-level understanding of how the system works. This is essential for effective invariant testing when you're unfamiliar with the codebase because it helps you define meaningful properties.
Typically if you designed/implemented the system yourself you'll already have a pretty good idea of what the properties you want to define are so you can skip this step and start defining properties right away.
The RewardsManager, as the name implies, is meant to handle the accumulation and distribution of reward tokens for depositors into a system. Since token rewards are often used as an incentive for providing liquidity to protocols, typically via vaults, this contract is meant to integrate with vaults via a notification system which is triggered by user deposits/withdrawals/transfers. This subsequently updates reward tracking for a user so any holder of the vault token can receive rewards proportional to the amount of time for which they're deposited.
The key function in the notification system that handles this is notifyTransfer:
    function notifyTransfer(address from, address to, uint256 amount) external {
        require(from != to, "Cannot transfer to yourself");

        if (from == address(0)) {
            _handleDeposit(msg.sender, to, amount);
        } else if (to == address(0)) {
            _handleWithdrawal(msg.sender, from, amount);
        } else {
            _handleTransfer(msg.sender, from, to, amount);
        }

        emit Transfer(msg.sender, from, to, amount);
    }
which decrements or increments the reward tracking for a given user based on the action taken.
Looking at the _handleDeposit function more closely:
    function _handleDeposit(address vault, address to, uint256 amount) internal {
        uint256 cachedCurrentEpoch = currentEpoch();
        accrueUser(cachedCurrentEpoch, vault, to);
        // We have to accrue vault as totalSupply is gonna change
        accrueVault(cachedCurrentEpoch, vault);

        unchecked {
            // Add deposit data for user
            shares[cachedCurrentEpoch][vault][to] += amount;
        }
        // Add total shares for epoch // Remove unchecked per QSP-5
        totalSupply[cachedCurrentEpoch][vault] += amount;

    }
we can see that it accrues rewards to the user and the vault based on the time since the last accrual. It then increases the shares accounted to the user for the current epoch which determine a user's fraction of the total rewards as a fraction of the total shares for the epoch.
Initial property outline
Now that we have an understanding of how the system works, we can define our first properties.
From the above function we can define a solvency property as: "the totalSupply of tracked shares is the sum of user share balances":
totalSupply == SUM(shares[vault][users])
which ensures that we never have more shares accounted to users than the totalSupply we're tracking.
In addition to the solvency property, we can also define a property that states that: "the sum of accumulated rewards are less than or equal to the reward token balance of the RewardsManager":
SUM(rewardsInfo[epochId][vaultAddress][tokenAddress]) <= rewardToken.balanceOf(address(rewardsManager))
Implementing the first properties
Often it's good to write out properties as pseudo-code before implementing in Solidity because it allows us to understand which values we can read from state and which we'll need to add additional tracking for.
In our case we can use our property definitions:
- the
totalSupplyof shares tracked is the sum of user share balances - the sum of rewards are less than or equal to the reward token balance of the
RewardsManager
To outline the following pseudocode:
## Property 1
For each epoch, sum all user share balances (`sharesAtEpoch`) by looping through all actors (returned by `_getActors()`)

Assert that `totalSupply` for the given epoch is the same as the sum of shares `totalSupply == sharesAtEpoch`

## Property 2
For each epoch, sum all rewards for `address(this)` (our placeholder for the vault)

Using the sum of the above, assert that `total <= token.balanceOf(rewardsManager)`
Implementing the total supply solvency property
We can then use the pseudocode to guide the implementation of the first property in the Properties contract:
    function property_totalSupplySolvency() public {
        // fetch the current epoch up to which rewards have been accumulated
        uint256 currentEpoch = rewardsManager.currentEpoch();
        uint256 epoch;

        while(epoch < currentEpoch) {
            uint256 sharesAtEpoch;

            // sum over all users
            for (uint256 i = 0; i < _getActors().length; i++) {
                uint256 shares = rewardsManager.shares(epoch, address(this), _getActors()[i]);
                sharesAtEpoch += shares;
            }

            // check that sum of user shares for an epoch is the same as the totalSupply for that epoch
            eq(sharesAtEpoch, rewardsManager.totalSupply(epoch, address(this)), "Sum of user shares should equal total supply");

            epoch++;
        }

    }
In the above since the RewardsManager contract checkpoints the totalSupply for each epoch and also tracks user shares for each epoch, the only additional tracking we need to add is an accumulator for the sum of user shares which we use to make our assertion against the totalSupply.
We can then start a new run of the fuzzer with our implemented property to see if it breaks. Ideally you should always run the fuzzer for around 5 minutes after implementing a property (or a few) because it allows you to quickly determine whether your property is correct or whether it breaks as a false positive (most false positives can be triggered with a relatively short run because they're either due to missing preconditions or a misunderstanding of how the system actually works in the property implementation).
Implementing many properties without running the fuzzer could result in many false positives that all need to be debugged separately and rerun to confirm they're resolved which ultimately slows down your implementation cycle.
Property refinement process
Very shortly after we start running the fuzzer it breaks the property, so we can stop the fuzzer and generate a reproducer using the Recon extension automatically (or use the Recon log scraper tool to generate one):
    function test_property_totalSupplySolvency_0() public {
        vm.warp(block.timestamp + 157880);
        vm.roll(block.number + 1);
        rewardsManager_notifyTransfer(0x0000000000000000000000000000000000000000,0x00000000000000000000000000000000DeaDBeef,1);

        vm.warp(block.timestamp + 446939);
        vm.roll(block.number + 1);
        property_totalSupplySolvency();
    }
We can see from this that the only state-changing call that was made in the sequence was to rewardsManager_notifyTransfer, which indicates that this is most likely a false positive, which we can confirm by checking the handler function implementation in AdminTargets:
abstract contract AdminTargets is
    BaseTargetFunctions,
    Properties
{
    ...

    function rewardsManager_notifyTransfer(address from, address to, uint256 amount) public asAdmin {
        rewardsManager.notifyTransfer(from, to, amount);
    }
}
From the handler it becomes clear that the notifyTransfer function results in a call to the internal _handleDeposit function since the from address in the test is address(0):
    function notifyTransfer(address from, address to, uint256 amount) external {
        ...

        if (from == address(0)) {
            /// @audit this line gets hit
            _handleDeposit(msg.sender, to, amount);
        } else if (to == address(0)) {
            _handleWithdrawal(msg.sender, from, amount);
        } else {
            _handleTransfer(msg.sender, from, to, amount);
        }

        ...
    }
This results in deposited shares being accounted for the 0x00000000000000000000000000000000DeaDBeef address. Since we only sum over the share balance of all actors tracked in ActorManager in the property, it doesn't account for other addresses (such as 0x00000000000000000000000000000000DeaDBeef) having received shares, and so we get a 0 value for the sum in sharesAtEpoch and a value of 1 wei for the totalSupply at the current epoch.
To ensure we're only allowing transfers to actors tracked by our ActorManager we can clamp the to address to the currently set actor using _getActor():
    function rewardsManager_notifyTransfer(address from, uint256 amount) public asAdmin {
        rewardsManager.notifyTransfer(from, _getActor(), amount);
    }
This type of clamping is often essential to prevent these types of false positives, so we don't implement them in a separate clamped handler (as this would still allow the fuzzer to call the unclamped handler with other addresses).
Clamping these values also doesn't overly restrict the search space because having random values passed in for users or tokens doesn't provide any benefit as they won't actually allow the fuzzer to reach additional states.
Any time there are addresses representing users or addresses representing tokens in handler function calls we can clamp using the
_getActor()and_getAsset()return values, respectively.
We can then run Echidna again to confirm whether this resolved our broken property as expected. After which we see that it still fails with the following reproducer:
    function test_property_totalSupplySolvency_1() public {
        rewardsManager_notifyTransfer(0x0000000000000000000000000000000000000000,1);

        vm.warp(block.timestamp + 701427);
        vm.roll(block.number + 1);
        rewardsManager_notifyTransfer(0x00000000000000000000000000000000DeaDBeef,0);

        vm.warp(block.timestamp + 512482);
        vm.roll(block.number + 1);
        property_totalSupplySolvency();
    }
This should be an indicator to us that our initial understanding of how the system works was incorrect and we now need to look at the notifyDeposit implementation again more in depth to determine why the property still breaks.
We can see from the reproducer test that in the calls to rewardsManager_notifyTransfer, the first call calls the internal _handleDeposit function and the second call calls _handleTransfer:
 function notifyTransfer(address from, address to, uint256 amount) external {
        ...

        if (from == address(0)) {
            /// @audit this is called first with 1 amount
            _handleDeposit(msg.sender, to, amount);
        } else if (to == address(0)) {
            _handleWithdrawal(msg.sender, from, amount);
        } else {
            /// @audit this is called second with 0 amount
            _handleTransfer(msg.sender, from, to, amount);
        }

        ...
 }
We can note that the first call is essentially registering a 1 wei deposit for the currently set actor (returned by _getActor()) and the second call is registering a transfer of 0 from the 0x00000000000000000000000000000000DeaDBeef address to the currently set actor.
Since the rewardsManager_notifyTransfer(0x00000000000000000000000000000000DeaDBeef,0) call is the last one, we know that something in the _handleTransfer call changes state in an unexpected way, which leads our property to break. Looking at the implementation of _handleTransfer, we see that since we're passing in a 0 value, the only state-changing calls it makes are to accrueUser:
    function _handleTransfer(address vault, address from, address to, uint256 amount) internal {
        uint256 cachedCurrentEpoch = currentEpoch();
        // Accrue points for from, so they get rewards
        accrueUser(cachedCurrentEpoch, vault, from);
        // Accrue points for to, so they don't get too many rewards
        accrueUser(cachedCurrentEpoch, vault, to);

        /// @audit anything below these lines don't change state
        unchecked {
            // Add deposit data for to
            shares[cachedCurrentEpoch][vault][to] += amount;
        }

        // Delete deposit data for from
        shares[cachedCurrentEpoch][vault][from] -= amount;
    }
This indicates to us that we are accruing shares for the user if time has passed since the last update:
    function accrueUser(uint256 epochId, address vault, address user) public {
        require(epochId <= currentEpoch(), "only ended epochs");

        (uint256 currentBalance, bool shouldUpdate) = _getBalanceAtEpoch(epochId, vault, user);

        if(shouldUpdate) {
            shares[epochId][vault][user] = currentBalance;
        }

        ...
    }
Notably, however, there is no call to accrueVault in this transfer (unlike in the _handleDeposit and _handleWithdrawal functions), indicating that the user balances increase but the vault's totalSupply for the current epoch remains the same. We can then test whether this is the source of the issue by making a call to the accrueVault target handler:
    function test_property_totalSupplySolvency_1() public {
        rewardsManager_notifyTransfer(0x0000000000000000000000000000000000000000,1);

        vm.warp(block.timestamp + 701427);
        vm.roll(block.number + 1);
        rewardsManager_notifyTransfer(0x00000000000000000000000000000000DeaDBeef,0);

        rewardsManager_accrueVault(rewardsManager.currentEpoch(), address(this));

        vm.warp(block.timestamp + 512482);
        vm.roll(block.number + 1);
        property_totalSupplySolvency();
    }
which then allows the test to pass:
[PASS] test_property_totalSupplySolvency_1() (gas: 391567)
Suite result: ok. 1 passed; 0 failed; 0 skipped; finished in 7.33ms (2.83ms CPU time)
Looking at the accrueVault function, we see this is because it sets a new value for the totalSupply if the _getTotalSupplyAtEpoch function determines that it hasn't updated since the last epoch:
  function accrueVault(uint256 epochId, address vault) public {
        require(epochId <= currentEpoch(), "Cannot see the future");

        (uint256 supply, bool shouldUpdate) = _getTotalSupplyAtEpoch(epochId, vault);

        if(shouldUpdate) {
            // Because we didn't return early, to make it cheaper for future lookbacks, let's store the lastKnownBalance
            totalSupply[epochId][vault] = supply;
        }

        ...
  }
In our case, since there is no call to accrueVault in _handleTransfer but there is a call to accrueUser, the user is accounted shares for the epoch, but the vault isn't.
We can say that this is a real bug because it causes users to have claimable shares in an epoch in which there are no claimable shares tracked by the total supply. This would cause the following logic in the claimReward function to behave incorrectly due to a 0 return value from _getTotalSupplyAtEpoch, making a user unable to claim in an epoch for which they've accrued rewards:
    function claimReward(uint256 epochId, address vault, address token, address user) public {
        require(epochId < currentEpoch(), "only ended epochs");

        // Get balance for this epoch
        (uint256 userBalanceAtEpochId, ) = _getBalanceAtEpoch(epochId, vault, user);

        // Get user info for this epoch
        UserInfo memory userInfo = _getUserNextEpochInfo(epochId, vault, user, userBalanceAtEpochId);

        // If userPoints are zero, go next fast
        if (userInfo.userEpochTotalPoints == 0) {
            return; // Nothing to claim
        }

        /// @audit this would return 0 incorrectly
        (uint256 vaultSupplyAtEpochId, ) = _getTotalSupplyAtEpoch(epochId, vault);

        VaultInfo memory vaultInfo = _getVaultNextEpochInfo(epochId, vault, vaultSupplyAtEpochId);

        // To be able to use the same ratio for all tokens, we need the pointsWithdrawn to all be 0
        require(pointsWithdrawn[epochId][vault][user][token] == 0, "already claimed");

        // We got some stuff left // Use ratio to calculate what we got left
        uint256 totalAdditionalReward = rewards[epochId][vault][token];

        // Calculate tokens for user
        // @audit this would use the wrong value
        uint256 tokensForUser = totalAdditionalReward * userInfo.userEpochTotalPoints / vaultInfo.vaultEpochTotalPoints;

        ...
    }
Now that we've identified the source of the issue, we can add the additional call to the accrueVault function in _handleTransfer:
    function _handleTransfer(address vault, address from, address to, uint256 amount) internal {
        uint256 cachedCurrentEpoch = currentEpoch();
        // Accrue points for from, so they get rewards
        accrueUser(cachedCurrentEpoch, vault, from);
        // Accrue points for to, so they don't get too many rewards
        accrueUser(cachedCurrentEpoch, vault, to);
        // @audit added accrual to vault so tracking is correct
        accrueVault(cachedCurrentEpoch, vault);

        ...
    }
We can then run the fuzzer again to confirm that our property now passes. After doing so, however, we see that it once again fails with the following reproducer:
// forge test --match-test test_property_totalSupplySolvency -vvv
function test_property_totalSupplySolvency() public {

    vm.warp(block.timestamp + 56523);
    vm.roll(block.number + 1);
    rewardsManager_notifyTransfer(0x0000000000000000000000000000000000000000,1);

    switchActor(25183731206506529133541749133319);

    vm.warp(block.timestamp + 947833);
    vm.roll(block.number + 1);
    rewardsManager_notifyTransfer(0x0000000000000000000000000000000000000000,0);

    vm.warp(block.timestamp + 206328);
    vm.roll(block.number + 1);
    property_totalSupplySolvency();
}
which upon further investigation reveals that the call from notifyTransfer to _handleDeposit with a 0 value for amount causes the totalSupply to accrue for the vault but not the user since they have no value deposited:
    function _handleDeposit(address vault, address to, uint256 amount) internal {
        uint256 cachedCurrentEpoch = currentEpoch();
        // @audit this accrues nothing since the actor that's switched to has no deposits
        accrueUser(cachedCurrentEpoch, vault, to);
        // @audit this accrues totalSupply with the amount deposited by the first actor
        accrueVault(cachedCurrentEpoch, vault);

        ...
    }
This should then cause us to reason that if we have a totalSupply greater than or equal to the shares accounted to users, then the system is solvent and able to repay all depositors, but if we have less than this amount, the system would be unable to repay all depositors. Which means that our property broke when it shouldn't have and so we can refactor it accordingly:
    function property_totalSupplySolvency() public {
        uint256 currentEpoch = rewardsManager.currentEpoch();
        uint256 epoch;

        while(epoch < currentEpoch) {
            uint256 sharesAtEpoch;

            // sum over all users
            for (uint256 i = 0; i < _getActors().length; i++) {
                uint256 shares = rewardsManager.shares(epoch, address(this), _getActors()[i]);
                sharesAtEpoch += shares;
            }

            // check if solvency is met
            lte(sharesAtEpoch, rewardsManager.totalSupply(epoch, address(this)), "Sum of user shares should equal total supply");

            epoch++;
        }

    }
where our property now uses a less than or equal assertion (lte) instead of strict equality (eq), allowing the sum of user shares for an epoch to be less than the totalSupply for that epoch.
After running the fuzzer with this new property implementation for 5-10 minutes, it holds, confirming that it's now properly implemented.
The implementation property of the second property is left as an exercise to the reader, you can use the pseudocode to guide you and it should follow a similar implementation pattern as the first.
Conclusion
We've seen how invariant testing can often highlight misunderstandings of a system by giving you ways to easily test assumptions that are difficult to test with unit tests or stateless fuzzing. When these assumptions fail, it's either due to a false positive or a misunderstanding of how the system works, or both, as we saw above.
When you're forced to refactor your code to resolve an issue identified by a broken property, you can then run the fuzzer to confirm whether you resolved the issue for all cases. As we saw above this allowed us to see that our property implementation was overly strict and could be modified to be less strict.
One of the other key benefits of invariant testing besides explicitly identifying exploits is that it allows you to ask and answer questions about whether it's possible to get the system into a specific state. If the answer is yes and the state is unexpected, this can often be used as a precondition that can lead to an exploit of the system.
In part 4, we'll look at how a precondition was able to identify a multi-million dollar bug in a real-world codebase before it was pushed to production.
As always, if you have any questions reach out to the Recon team in the help channel of our discord.
Part 4 - Liquity Governance Case Study
In part 4 we'll see how everything we've covered up to this point in the bootcamp was used to find a real-world vulnerability in Liquity's governance system in an engagement performed by Alex The Entreprenerd. We'll also see how to use Echidna's optimization mode to increase the severity of a vulnerability.
This issue was found in this commit of the Liquity V2 codebase which was under review which you can clone if you'd like to follow along and reproduce the test results locally as it already contains all the scaffolding and property implementations.
For the recorded stream of this part of the bootcamp see here starting at 49:40.
Background on Liquity Governance V2
The Liquity V2 Governance system is a modular initiative-based governance mechanism where users stake LQTY tokens to earn voting power that accrues linearly over time, where the longer the user is staked, the greater their voting power. Users then allocate this voting power to fund various "initiatives" (any smart contract implementing IInitiative interface) that compete for a share of protocol revenues (25% of Liquity's income) distributed weekly through 7-day epochs.
Calculate average timestamp
A key aspect of accruing voting power to a user is the mechanism that was chosen to determine the amount of time which a user had their LQTY allocated. In this case this was handled by the _calculateAverageTimestamp function:
    function _calculateAverageTimestamp(
        uint120 _prevOuterAverageTimestamp,
        uint120 _newInnerAverageTimestamp,
        uint88 _prevLQTYBalance,
        uint88 _newLQTYBalance
    ) internal view returns (uint120) {
        if (_newLQTYBalance == 0) return 0;

        uint120 currentTime = uint120(uint32(block.timestamp)) * uint120(TIMESTAMP_PRECISION);

        uint120 prevOuterAverageAge = _averageAge(currentTime, _prevOuterAverageTimestamp);
        uint120 newInnerAverageAge = _averageAge(currentTime, _newInnerAverageTimestamp);

        uint208 newOuterAverageAge;
        if (_prevLQTYBalance <= _newLQTYBalance) {
            uint88 deltaLQTY = _newLQTYBalance - _prevLQTYBalance;
            uint208 prevVotes = uint208(_prevLQTYBalance) * uint208(prevOuterAverageAge);
            uint208 newVotes = uint208(deltaLQTY) * uint208(newInnerAverageAge);
            uint208 votes = prevVotes + newVotes;
            // @audit truncation happens here
            newOuterAverageAge = votes / _newLQTYBalance;
        } else {
            uint88 deltaLQTY = _prevLQTYBalance - _newLQTYBalance;
            uint208 prevVotes = uint208(_prevLQTYBalance) * uint208(prevOuterAverageAge);
            uint208 newVotes = uint208(deltaLQTY) * uint208(newInnerAverageAge);
            uint208 votes = (prevVotes >= newVotes) ? prevVotes - newVotes : 0;
            // @audit truncation happens here
            newOuterAverageAge = votes / _newLQTYBalance;
        }

        if (newOuterAverageAge > currentTime) return 0;
        return uint120(currentTime - newOuterAverageAge);
    }
The intention of all this added complexity was to prevent flashloans from manipulating voting power by using the average amount of time for which a user was deposited to calculate voting power. In the case of a flashloan since the user has to deposit and withdraw within the same transaction their average deposited time would be 0 resulting in the lqtyToVotes calculation, used to calculate voting power, also returning 0:
    function lqtyToVotes(uint88 _lqtyAmount, uint120 _currentTimestamp, uint120 _averageTimestamp)
        public
        pure
        returns (uint208)
    {
        return uint208(_lqtyAmount) * uint208(_averageAge(_currentTimestamp, _averageTimestamp));
    }
The key thing to note for our case is that the newOuterAverageAge calculation is subject to truncation because of the division operation that it performs. This had been highlighted in a previous review and it had been thought that the maximum value lost to truncation would be 1 second, since the newOuterAverageAge represents time in seconds and the truncation would essentially act as a rounding down, eliminating the trailing digit. Since the maximum lost value was 1 second, the impact of this finding was judged as low severity because it would only minimally affect voting power by undervaluing the time for which users were deposited.
More specifically, if we look at the _allocateLQTY function, which makes the call to _calculateAverageTimestamp and actually handles user vote allocation using the LQTY token, we see the following:
    function _allocateLQTY(
        address[] memory _initiatives,
        int88[] memory _deltaLQTYVotes,
        int88[] memory _deltaLQTYVetos
    ) internal {
        ...

            // update the average staking timestamp for the initiative based on the user's average staking timestamp
            initiativeState.averageStakingTimestampVoteLQTY = _calculateAverageTimestamp(
                initiativeState.averageStakingTimestampVoteLQTY,
                userState.averageStakingTimestamp,
                initiativeState.voteLQTY,
                add(initiativeState.voteLQTY, deltaLQTYVotes) // @audit modifies LQTY allocation for user
            );
            initiativeState.averageStakingTimestampVetoLQTY = _calculateAverageTimestamp(
                initiativeState.averageStakingTimestampVetoLQTY,
                userState.averageStakingTimestamp,
                initiativeState.vetoLQTY,
                add(initiativeState.vetoLQTY, deltaLQTYVetos) // @audit modifies LQTY allocation for user
            );
    }
So the user's LQTY allocation directly impacts the averageStakingTimestamp and the votes associated with each user.
In the case where _prevLQTYBalance > _newLQTYBalance, indicating a user was decreasing their allocation:
    function _calculateAverageTimestamp(
        uint120 _prevOuterAverageTimestamp,
        uint120 _newInnerAverageTimestamp,
        uint88 _prevLQTYBalance,
        uint88 _newLQTYBalance
    ) internal view returns (uint120) {
        ...

        uint208 newOuterAverageAge;
        if (_prevLQTYBalance <= _newLQTYBalance) {
            ...
        } else {
            uint88 deltaLQTY = _prevLQTYBalance - _newLQTYBalance;
            uint208 prevVotes = uint208(_prevLQTYBalance) * uint208(prevOuterAverageAge);
            uint208 newVotes = uint208(deltaLQTY) * uint208(newInnerAverageAge);
            uint208 votes = (prevVotes >= newVotes) ? prevVotes - newVotes : 0;
            // @audit truncation up to 1 second occurs here
            newOuterAverageAge = votes / _newLQTYBalance;
        }

        if (newOuterAverageAge > currentTime) return 0;
        return uint120(currentTime - newOuterAverageAge);
    }
and with the recognition of the 1 second truncation, an attacker could grief an initiative by removing an amount of allocated LQTY, which would cause their newOuterAverageAge to decrease by less than it should. As a result the attacker maintains more voting power than they should, subsequently diluting the voting power of other voters.
The property that revealed the truth
To fully explore this and determine whether the maximum severity of the issue was in fact only minimal griefing with a max difference of 1 second, the following property was implemented:
    function property_sum_of_initatives_matches_total_votes_strict() public {
        // Sum up all initiatives
        // Compare to total votes
        (uint256 allocatedLQTYSum, uint256 totalCountedLQTY, uint256 votedPowerSum, uint256 govPower) = _getInitiativeStateAndGlobalState();

        eq(allocatedLQTYSum, totalCountedLQTY, "LQTY Sum of Initiative State matches Global State at all times");
        eq(votedPowerSum, govPower, "Voting Power Sum of Initiative State matches Global State at all times");
    }
which simply checked that the sum of allocated LQTY for all initiatives is equivalent to the total allocated LQTY in the system and that the sum of voting power for all initiatives is equivalent to the total voting power in the system.
The following helper function was used to help with this comparison:
    function _getInitiativeStateAndGlobalState() internal returns (uint256, uint256, uint256, uint256) {
        (
            uint88 totalCountedLQTY,
            uint120 global_countedVoteLQTYAverageTimestamp
        ) = governance.globalState();

        // Global Acc
        // Initiative Acc
        uint256 allocatedLQTYSum;
        uint256 votedPowerSum;
        for (uint256 i; i < deployedInitiatives.length; i++) {
            (
                uint88 voteLQTY,
                uint88 vetoLQTY,
                uint120 averageStakingTimestampVoteLQTY,
                uint120 averageStakingTimestampVetoLQTY,

            ) = governance.initiativeStates(deployedInitiatives[i]);

            // Conditional, only if not DISABLED
            (Governance.InitiativeStatus status,,) = governance.getInitiativeState(deployedInitiatives[i]);
            // Conditionally add based on state
            if (status != Governance.InitiativeStatus.DISABLED) {
                allocatedLQTYSum += voteLQTY;
                // Sum via projection
                votedPowerSum += governance.lqtyToVotes(voteLQTY, uint120(block.timestamp) * uint120(governance.TIMESTAMP_PRECISION()), averageStakingTimestampVoteLQTY);
            }

        }

        uint256 govPower = governance.lqtyToVotes(totalCountedLQTY, uint120(block.timestamp) * uint120(governance.TIMESTAMP_PRECISION()), global_countedVoteLQTYAverageTimestamp);

        return (allocatedLQTYSum, totalCountedLQTY, votedPowerSum, govPower);
    }
by performing the operation to sum the amount of allocated LQTY and voting power for all initiatives. This also provides the global state by fetching it directly from the governance contract.
Escalating from low to critical severity
After running the fuzzer on the property, it was found to break, which led to two possible paths for what to do next: identify exactly why the property breaks (this was already known so not necessarily beneficial in escalating the severity), or introduce a tolerance by which the strict equality in the two values being compared could differ.
Given that the _calculateAverageTimestamp function was expected to have a maximum of 1 second variation, the approach of allowing a tolerance in a separate property was used to determine whether the variation was ever greater than this:
    function property_sum_of_initatives_matches_total_votes_bounded() public {
        // Sum up all initiatives
        // Compare to total votes
        (uint256 allocatedLQTYSum, uint256 totalCountedLQTY, uint256 votedPowerSum, uint256 govPower) = _getInitiativeStateAndGlobalState();

        t(
            allocatedLQTYSum == totalCountedLQTY || (
                allocatedLQTYSum >= totalCountedLQTY - TOLERANCE &&
                allocatedLQTYSum <= totalCountedLQTY + TOLERANCE
            ),
        "Sum of Initiative LQTY And State matches within absolute tolerance");

        t(
            votedPowerSum == govPower || (
                votedPowerSum >= govPower - TOLERANCE &&
                votedPowerSum <= govPower + TOLERANCE
            ),
        "Sum of Initiative LQTY And State matches within absolute tolerance");
    }
where TOLERANCE is the voting power for 1 second, given by LQTY * 1 Second where LQTY is a value in with 18 decimal precision:
uint256 constant TOLERANCE = 1e19;
which meant that our TOLERANCE value would allow up to 10 seconds of lost allocated time in the average calculation, anything beyond this would again break the property. We use 10 seconds in this case because if we used 1 second as the tolerance the fuzzer would most likely break the property for values less than 10, still making this only a griefing issue, however if it breaks for more than 10 seconds we know we have something more interesting worth exploring further.
Surely enough, after running the fuzzer again with this tolerance added, it once again broke the property, indicating that the initial classification as a low severity issue that would only be restricted to a 1 second difference was incorrect and now this would require further investigation to understand the maximum possible impact. To find the maximum possible impact we could then create a test using Echidna's optimization mode.
Using optimization mode
Converting properties into an optimization mode test is usually just a matter of slight refactoring to the existing property to instead return some value rather than make an assertion:
    function optimize_property_sum_of_initatives_matches_total_votes_insolvency() public returns (int256) {
        int256 max = 0;

        (, , uint256 votedPowerSum, uint256 govPower) = _getInitiativeStateAndGlobalState();

        if(votedPowerSum > govPower) {
            max = int256(votedPowerSum) - int256(govPower);
        }

        return max;
    }
where we can see that we just return the maximum value as the difference of int256(votedPowerSum) - int256(govPower) if votedPowerSum > govPower. Echidna will then use all the existing target function handlers to manipulate state in an attempt to optimize the value returned by this function.
For more on how to define optimization properties, checkout this page.
This test could then be run using the echidna . --contract CryticTester --config echidna.yaml --format text --test-limit 10000000 --test-mode optimization command or by selecting optimization mode in the Recon cockpit.
The revelation and impact
After running the fuzzer for 100 million tests, we get the following unit test generated from the reproducer:
// forge test --match-test test_optimize_property_sum_of_initatives_matches_total_votes_insolvency_0 -vvv
function test_optimize_property_sum_of_initatives_matches_total_votes_insolvency_0() public {

    // Max value: 4152241824275924884020518;

    vm.prank(0x0000000000000000000000000000000000010000);
    property_sum_of_lqty_global_user_matches();

    vm.warp(block.timestamp + 4174);

    vm.roll(block.number + 788);

    vm.roll(block.number + 57);
    vm.warp(block.timestamp + 76299);
    vm.prank(0x0000000000000000000000000000000000010000);
    governance_withdrawLQTY_shouldRevertWhenClamped(15861774047245688283806176);

    vm.roll(block.number + 4288);
    vm.warp(block.timestamp + 419743);
    vm.prank(0x0000000000000000000000000000000000010000);
    governance_depositLQTY_2(2532881971795689134446062);

    vm.roll(block.number + 38154);
    vm.warp(block.timestamp + 307412);
    vm.prank(0x0000000000000000000000000000000000010000);
    governance_allocateLQTY_clamped_single_initiative_2nd_user(27,211955987,0);

    vm.prank(0x0000000000000000000000000000000000010000);
    property_shouldNeverRevertsecondsWithinEpoch();

    vm.warp(block.timestamp + 113902);

    vm.roll(block.number + 4968);

    vm.roll(block.number + 8343);
    vm.warp(block.timestamp + 83004);
    vm.prank(0x0000000000000000000000000000000000010000);
    governance_claimForInitiative(68);

    vm.prank(0x0000000000000000000000000000000000010000);
    check_realized_claiming_solvency();

    vm.roll(block.number + 2771);
    vm.warp(block.timestamp + 444463);
    vm.prank(0x0000000000000000000000000000000000010000);
    check_claim_soundness();

    vm.warp(block.timestamp + 643725);

    vm.roll(block.number + 17439);

    vm.prank(0x0000000000000000000000000000000000010000);
    property_shouldNeverRevertsnapshotVotesForInitiative(108);

    vm.roll(block.number + 21622);
    vm.warp(block.timestamp + 114917);
    vm.prank(0x0000000000000000000000000000000000010000);
    governance_depositLQTY(999999999999999999998);

    vm.roll(block.number + 1746);
    vm.warp(block.timestamp + 21);
    vm.prank(0x0000000000000000000000000000000000010000);
    governance_depositLQTY(12);

    vm.prank(0x0000000000000000000000000000000000010000);
    property_shouldNeverRevertepochStart(250);

    vm.roll(block.number + 49125);
    vm.warp(block.timestamp + 190642);
    vm.prank(0x0000000000000000000000000000000000010000);
    property_shouldNeverRevertSnapshotAndState(2);

    vm.prank(0x0000000000000000000000000000000000010000);
    property_shouldNeverRevertsecondsWithinEpoch();

    vm.prank(0x0000000000000000000000000000000000010000);
    property_shouldNeverRevertsecondsWithinEpoch();

    vm.roll(block.number + 18395);
    vm.warp(block.timestamp + 339084);
    vm.prank(0x0000000000000000000000000000000000010000);
    governance_allocateLQTY_clamped_single_initiative(81,797871,0);

    vm.prank(0x0000000000000000000000000000000000010000);
    property_initiative_ts_matches_user_when_non_zero();

    vm.warp(block.timestamp + 468186);

    vm.roll(block.number + 16926);

    vm.prank(0x0000000000000000000000000000000000010000);
    helper_deployInitiative();

    vm.prank(0x0000000000000000000000000000000000010000);
    property_BI05();

    vm.prank(0x0000000000000000000000000000000000010000);
    property_sum_of_user_voting_weights_strict();

    vm.roll(block.number + 60054);
    vm.warp(block.timestamp + 431471);
    vm.prank(0x0000000000000000000000000000000000010000);
    property_sum_of_user_voting_weights_strict();

    vm.warp(block.timestamp + 135332);

    vm.roll(block.number + 38421);

    vm.roll(block.number + 7278);
    vm.warp(block.timestamp + 455887);
    vm.prank(0x0000000000000000000000000000000000010000);
    property_allocations_are_never_dangerously_high();

    vm.roll(block.number + 54718);
    vm.warp(block.timestamp + 58);
    vm.prank(0x0000000000000000000000000000000000010000);
    property_shouldNeverRevertsecondsWithinEpoch();

    vm.prank(0x0000000000000000000000000000000000010000);
    governance_snapshotVotesForInitiative(0xE8E23e97Fa135823143d6b9Cba9c699040D51F70);

    vm.prank(0x0000000000000000000000000000000000010000);
    property_shouldGetTotalVotesAndState();

    vm.prank(0x0000000000000000000000000000000000010000);
    initiative_depositBribe(20,94877931099225030012957476263093446259,62786,38);

    vm.prank(0x0000000000000000000000000000000000010000);
    governance_withdrawLQTY_shouldRevertWhenClamped(72666608067123387567523936);

    vm.roll(block.number + 17603);
    vm.warp(block.timestamp + 437837);
    vm.prank(0x0000000000000000000000000000000000010000);
    helper_deployInitiative();

    vm.roll(block.number + 6457);
    vm.warp(block.timestamp + 349998);
    vm.prank(0x0000000000000000000000000000000000010000);
    property_allocations_are_never_dangerously_high();

    vm.roll(block.number + 49513);
    vm.warp(block.timestamp + 266623);
    vm.prank(0x0000000000000000000000000000000000010000);
    helper_accrueBold(29274205);

    vm.prank(0x0000000000000000000000000000000000010000);
    governance_registerInitiative(62);

    vm.prank(0x0000000000000000000000000000000000010000);
    governance_claimForInitiative(81);

    vm.prank(0x0000000000000000000000000000000000030000);
    property_shouldNeverRevertepochStart(128);

    vm.roll(block.number + 7303);
    vm.warp(block.timestamp + 255335);
    vm.prank(0x0000000000000000000000000000000000010000);
    governance_claimForInitiativeDoesntRevert(15);

    vm.prank(0x0000000000000000000000000000000000010000);
    initiative_depositBribe(216454974247908041355937489573535140507,24499346771823261073415684795094302253,10984,12);

    vm.prank(0x0000000000000000000000000000000000010000);
    governance_allocateLQTY_clamped_single_initiative(74,5077,0);

    vm.prank(0x0000000000000000000000000000000000010000);
    property_GV01();

    vm.warp(block.timestamp + 427178);

    vm.roll(block.number + 4947);

    vm.roll(block.number + 43433);
    vm.warp(block.timestamp + 59769);
    vm.prank(0x0000000000000000000000000000000000010000);
    governance_withdrawLQTY_shouldRevertWhenClamped(48);

 }
indicating that the initial insolvency was a severe underestimate, allowing a possible inflation in voting power of 4152241824275924884020518 / 1e18 = 4,152,241. When translated into the dollar equivalent of LQTY, this results in millions of dollars worth of possible inflation in voting power.
It's worth noting that if we let Echidna run for even longer, we would see that it subsequently inflates the voting power even further as was done in the engagement, which demonstrated an inflation in the range of hundreds of millions of dollars.
The dilemma of when to stop a test run is a common one when using optimization mode as it can often find continuously larger and larger values the longer you allow the fuzzer to run. Typically however there is a point of diminishing returns where the value is sufficiently maximized to prove a given severity. In this case, for example, maximizing any further wouldn't increase the severity as the value above already demonstrates a critical severity issue.
For more info about how to generate a shrunken reproducer with optimization mode see this section
So what was originally thought to just be a precision loss of 1 second really turned out to be one second for all stake for each initiative, meaning that this value is very large once you have a large amount of voting power and many seconds have passed. This could then be applied to every initiative, inflating voting power even further.
Conclusion
Fundamentally, a global property breaking should be a cause for pause, which you should use to reflect and consider further how the system works. Then you can determine the severity of the broken property using the three steps shown above: an exact check, an exact check with bounds, and optimization mode.
More generally, if you can't use an exact check to check your property and have to use greater than or less than instead, you can refactor the implementation into an optimization mode test to determine what the maximum possible difference is.
Next steps
This concludes the Recon bootcamp. You should now be ready to take everything you've learned here and apply it to real-world projects to find bugs with invariant testing.
To learn more about techniques for implementing properties, check out this section. For more on how to use optimization mode to determine the maximum severity of a broken property, check out this section.
For some real-world examples of how we used Chimera to set up invariant testing suites for some of our customers, check out the following repos from Recon engagements:
If you have any questions or feel that we've missed a topic to help you get started with invariant testing, please reach out to the Recon team in the help channel of our Discord.
Getting Started
Creating An Account
To get started using Recon's free tools, you don't need to create an account and can use any of the tools in the Free Recon Tools section.
To use more advanced features (running jobs in the cloud, alerts, etc.) you'll need to create an account using your GitHub account and sign up for Recon Pro.
Once you've created an account, you'll be redirected to the dashboard where you'll have access to all of the tools in the Recon suite.
Using Private Repositories
To use Recon with your private repositories, you need to install the Recon GitHub App:
- Go to Dashboard > Installs
- Click "Manage Recon Github App Installations"
- Select which repositories you want Recon to access
The Recon App only has read access to your code. It cannot modify your repositories (except for writing to Issues if you use Campaigns).
Once installed, your private repos will appear in the repository dropdown when creating jobs or using Recon Magic.
Upgrading to Pro
Recon Pro unlocks advanced features for professional smart contract security:
- Run Echidna, Medusa, Halmos, or Foundry in the cloud
- Automated runs on PR or commit
- Automated repro generation on broken properties
- Store recipes of your common jobs
- One-click shareable job reports
- Advanced functionality: Corpus Reuse, Dynamic Replacement, Live Monitoring, and Governance Fuzzing
- Exclusive access to Recon Magic AI workflows
How to Get Pro Access
Pro accounts can only be activated by the Recon team. There are two ways to get access:
Option 1: Create a Free Account First
- Sign in with your GitHub account
- Go to Dashboard > Onboard
- Click "Create a Free Account!"
- Contact us to upgrade your account to Pro
Option 2: Use an Invite Code
If you have an invite code from an existing Pro organization:
- Sign in with your GitHub account
- Go to Dashboard > Onboard
- Enter your invite code and click "I have an invite Code!"
This will add you to the Pro organization that generated the code.
Need Help?
For questions about Pro access, pricing, or any other inquiries, reach out to us on Discord.
Building Handlers
Video Tutorial: The Recon Sandbox (1min)
What Are Handlers?
Handlers are functions that help you test invariants by wrapping a call to a target contract with a function that allows you to add clamping (reduces the search space of the fuzzer) and properties all in the same execution.
For example, if we want to test the deposit function of an ERC4626 vault, we can build a handler that will call the deposit function and then assert some property about the state of the vault after the deposit is complete.
//This is the handler
function vault_deposit(uint256 assets, address receiver) public {
    //We can add clamping here to reduce the search space of the fuzzer
 assets = assets %  underlyingAsset.balanceOf(address(this));

    //This is the call to the target contract
 vault.deposit(assets, receiver);

    //We can add properties here to test the state of the vault after the deposit is complete
    eq(vault.balanceOf(receiver) == assets);
}
Generating Handlers In Recon
To generate handlers in Recon all you need to do is paste the abi of the contract you'd like to build handlers for into the the text box on the Build Handlers tab. To get the ABI of a contract in a foundry project just compile your project and look in the out directory for a file with the same name as your contract but with a .json extension.
After pasting the ABI into the text box, click the Build Handlers button and Recon will generate the handlers for you.
You'll then be shown a screen where you can select the specific functions you'd like to add handlers for. You can toggle which functions are selected using the buttons next to the function name.
Adding Handlers To Your Project
Once you've generated the handlers for the functions of interest, you can add them to your project by clicking the Download All Files button.
This will download a zip file containing the handlers and necessary supporting files.
You can then unzip these files and add the recon folder as a child of your test folder. Additionally, move the medusa.json and echidna.yaml config files into the same folder as your foundry.toml file.
Adding Dependencies To Your Project
Recon uses the Chimera and setup-helpers dependencies in the standard template that gets generated when you build handlers so you'll need to add these to your project.
Do this with the following command:
forge install Recon-Fuzz/chimera Recon-Fuzz/setup-helpers --no-commit
You'll then need to add chimera to your remappings. If your project does this in the foundry.toml file, you can just add the following to the remappings array:
remappings = [
 '@chimera/=lib/chimera/src/',
 '@recon/=lib/setup-helpers/src/'
]
If your project uses a remappings.txt file instead you can similarly add the following to the file:
@chimera/=lib/chimera/src/
@recon/=lib/setup-helpers/src/
Running The Project
Now you're almost ready to run the project, you just need to make sure the Setup.sol file is correctly set up to deploy your system contracts.
Once you've done this and can successfully compile using the foundry command:
forge build
You can then run the project using the following commands for fuzzing:
Echidna
echidna . --contract CryticTester --config echidna.yaml
Medusa
medusa fuzz
Running Jobs In The Cloud With Recon
The jobs page is where you can run new fuzzing jobs on Recon's cloud service and see existing jobs you've run.
Using Recon's Job running feature you can offload long-duration jobs to Recon's cloud service so you don't waste computational resources locally and can run long-term jobs without worrying about something failing at the last minute because of something you did on your local machine.
You can run jobs on both public and private repositories. For private repos, you'll need to install the Recon GitHub App first.
Access Recon Fuzzing Jobs at: getrecon.xyz/dashboard/jobs
Video Tutorial: Run Jobs with Recon Pro (5min)
How To Run A Fuzzing Job
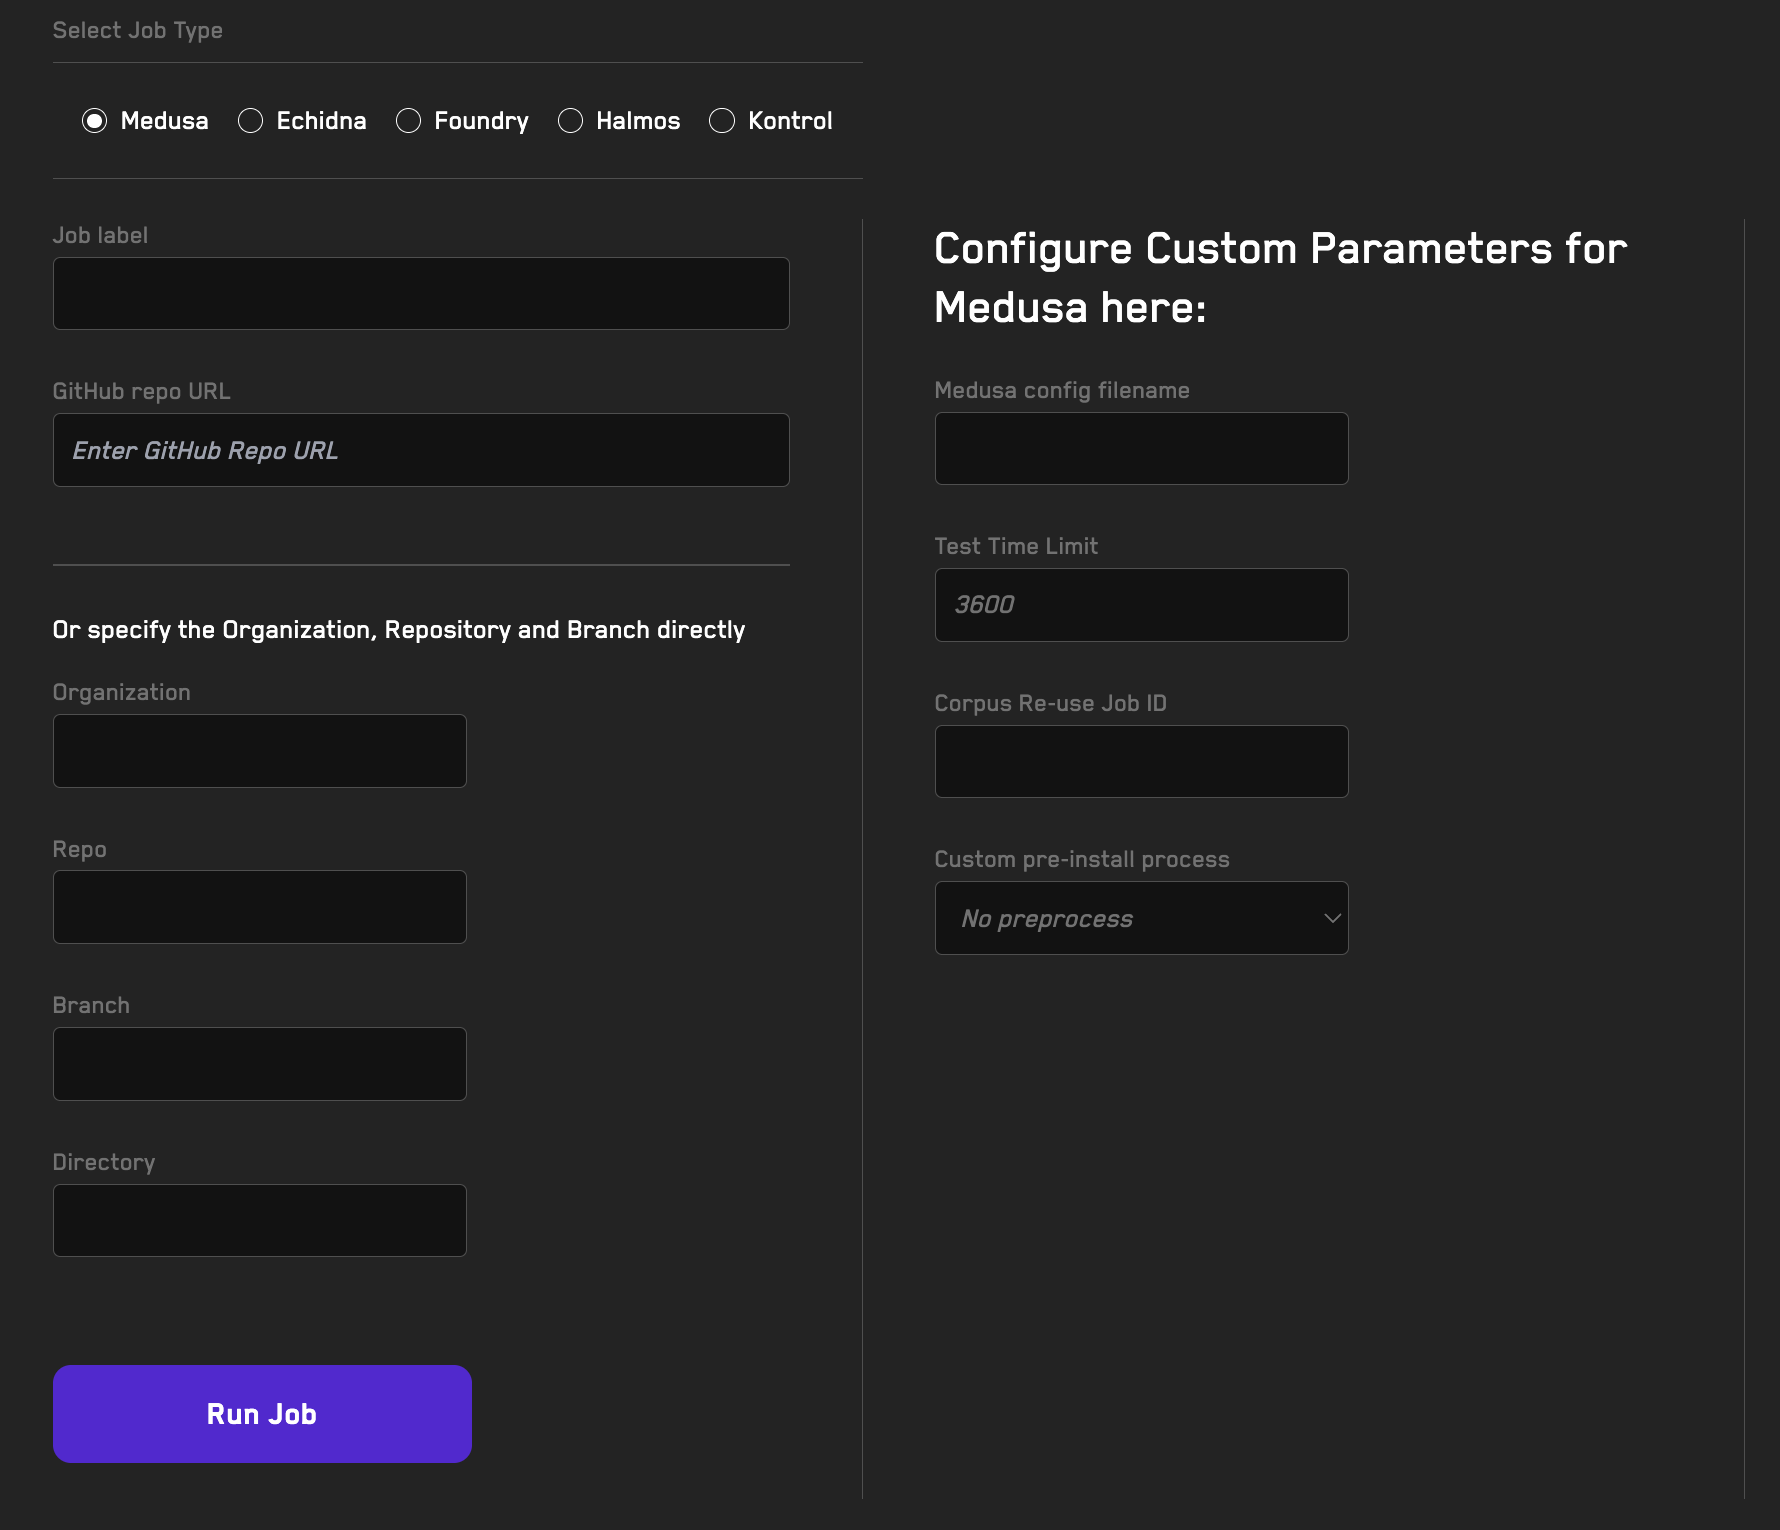
On the Jobs tab you'll see a form for running a job.
-
First select the tool you'd like to use to run your job. The Echidna, Medusa, and Foundry options use fuzzing. The Halmos and Kontrol options use formal verification.
-
Next add the repository you'd like to fuzz or verify in the GitHub Repo Url field. Additionally, you can specify a custom name for the job in the Job Name field. If you don't specify a custom name, Recon will generate one for you that is a hash with numbers and letters.
-
If you'd prefer to specify the organization, repo name, branch, and directory where the
foundry.tomlfile is located, you can do so in the Organization, Repo Name, Branch and Directory fields. -
Next you can specify the configuration parameters for the tool you selected in step 1 using a config file or by specifying values in the form fields directly (NOTE: these will override any parameters set in the config file if one is passed in).
-
If your project uses a dependency system in addition to foundry, you can select the custom preinstall process in the dropdown menu.
Tool-Specific Video Tutorials
- Echidna Jobs (5min)
- Foundry Jobs (2min)
- Medusa Jobs (1min)
- Halmos Jobs (1min)
Recon Magic
Recon Magic provides AI-powered automations for smart contract fuzzing. While Fuzzing Jobs let you run fuzzing tools in the cloud with extensive features and functionality, Recon Magic offers AI agents that automate the setup and optimization process.
Access Recon Magic at: getrecon.xyz/dashboard/magic
Works with both public and private repositories. For private repos, install the Recon GitHub App first.
Running Magic Jobs
This section covers how Magic Jobs work, regardless of which specific workflow you choose.
How It Works
When you start a Magic Job, the following happens:
- Repository Creation: A new GitHub repository is created for your job results (e.g.,
your-repo-processed-1734567890) - User Invitation: You (and any other GitHub users you specify) are automatically invited as collaborators to the new repository
- Initial Push: Your original code is pushed to the new repository as the initial commit
- Workflow Execution: The AI workflow runs, making changes and committing them step by step
- Results: View the diff, generated documentation, and any artifacts directly in the dashboard
Repository Access
Automatic Invitations
When you start a job, you are automatically invited to the results repository. The invitation is sent before the workflow begins, so you can follow along in real-time.
Inviting Additional Users
You can invite other GitHub users to the results repository at any time:
- Navigate to your job's detail page in the dashboard
- Find the "Invite GitHub user to repository" form
- Enter the GitHub username of the person you want to invite
- Click "Invite"
The invited user will receive a GitHub collaboration invite with push access to the repository.
Code Updates and Commits
Magic Jobs commit changes after each workflow step. This provides:
- Transparency: See exactly what the AI modified at each step
- Traceability: Each step has its own commit hash you can reference
- Real-time progress: Changes are pushed to GitHub as they happen
In the job detail page, you can:
- View the workflow progress with step-by-step completion status
- Click on commit hashes to view them directly on GitHub
- Expand each step to see which files were changed
- Click on file names to view them at that specific commit
Stopping a Job Early
If you need to stop a running job:
- Navigate to the job's detail page
- Click the "Stop Job" button (visible while the job is running)
- The job will gracefully stop after the current step completes
The "Stop requested" badge will appear once your request is received. The job will finish its current step, commit any changes, and then stop. You'll still have access to all the work completed up to that point.
Job Statuses
- Queued: Job is waiting to be processed
- WIP (Work in Progress): Job is currently running
- Done: Job completed successfully
- Stopped: Job was stopped early by user request
- Error: Job encountered an error during execution
See below for workflow-specific tutorials and details on each Magic Job type.
V2 Workflows
Scout + Setup + Properties + Coverage
The complete end-to-end workflow that takes you from raw code to a fully functional fuzzing suite with properties.
Requirements
None. Works with any Solidity repository.
What does it do?
- Analyzes your codebase to understand the system architecture
- Makes setup decisions including fuzzing suite architecture, what to test, and what to exclude
- Scaffolds the suite and creates the
Setup.solcontract - Generates target functions and creates foundry test wrappers
- Writes properties in
Properties.sol - Sorts sequences by coverage impact
What is the expected outcome?
- A complete fuzzing suite ready to run
FUZZING_SETUP_COMPLETE.mdexplaining what was doneProperties.solpopulated with properties ready to break the protocol- Recommendations on where to focus your fuzzing efforts
- Documentation in the
magicfolder including additional properties to consider
When to use it?
Use this when starting from scratch and want the AI to handle everything: setup, coverage, and property writing.
Scout + Setup + Coverage
A streamlined workflow that sets up your fuzzing suite optimized for coverage, without writing properties.
Requirements
None. Works with any Solidity repository.
What does it do?
- Analyzes your codebase and makes setup decisions
- Scaffolds the project and implements
Setup.sol - Identifies target functions and creates handlers
- Creates clamped handlers for better fuzzing
- Optimizes for coverage
What is the expected outcome?
- A working fuzzing suite targeted for coverage
Setup.solwith documented setup decisions- Handler functions ready for fuzzing
You do not get properties written. You'll need to write those yourself or run a properties workflow afterward.
When to use it?
Use this when you want AI help with setup and coverage but prefer to write your own properties, or when you plan to run a separate properties workflow later.
Setup + Properties + Coverage
A comprehensive workflow for scaffolded projects that handles setup, property writing, and coverage optimization.
Requirements
Requires a scaffolded project with valid compilation.
What does it do?
- Analyzes your codebase to understand the system architecture
- Creates a setup based on the code and populates
Setup.sol - Writes clamped handlers for coverage generation
- Creates target function wrappers in
CryticToFoundry.soland runs initial Echidna fuzzing campaign for corpus generation - Writes extensive properties that are expected to hold true in the system
What is the expected outcome?
- A populated
Setup.solwith setup decisions - Clamped handlers written to reach maximum coverage
- Properties written for stress testing the protocol
- Setup decision notes in the
magicfolder - Properties decisions documented in the
magicfolder
When to use it?
Use this when you have already scaffolded your project and want Magic to handle setup, write properties, and optimize coverage for you.
Setup + Coverage
A focused workflow for scaffolded projects that creates setup and optimizes coverage without writing properties.
Requirements
Requires a scaffolded project with valid compilation.
What does it do?
- Analyzes your contracts to understand the system
- Creates
Setup.solwith setup decisions - Documents decisions in
magic/setup-decisions.jsonandmagic/setup-notes.md - Creates comprehensive target functions including
AdminTargetsandManagerTargets - Populates
CryticToFoundry.solwith functions for validation
What is the expected outcome?
- A configured
Setup.solwith documented setup decisions - Comprehensive target functions for ensuring high coverage
- Setup notes and documentation in the
magicfolder
You do not get properties written. You'll need to write those yourself or run a properties workflow afterward.
When to use it?
Use this when you have a scaffolded project and want to create setup and achieve high coverage quickly, but prefer to write the properties yourself.
Coverage V2
Workflow name in the Magic dashboard: workflow-fuzzing-coverage
A coverage-focused workflow that creates extensive handlers to maximize fuzzing coverage.
Requirements
Requires a scaffolded project with valid compilation.
What does it do?
- Makes setup decisions and populates
Setup.sol - Creates comprehensive coverage with clamped handlers and shortcuts
- Generates
DoomsdayTargetsfor edge case testing - Generates
AdminTargetsfor privileged function testing - Iteratively improves handlers until coverage targets are met
What is the expected outcome?
- Extensive test coverage through well-crafted handlers
- Clamped handlers with meaningful values
- Shortcut handlers to help the fuzzer reach coverage faster
You get coverage optimization only. No properties are written.
When to use it?
Use this when you already have a scaffolded project and want to maximize coverage before writing properties.
Implement Properties from Setup
Workflow name: workflow-properties-full
A fast workflow that writes properties based on your existing setup.
Requirements
Requires an existing setup in place (Setup.sol must exist).
What does it do?
- Populates
Properties.solwith comprehensive properties for your system - Generates
BeforeAfter.solwith state tracking - Creates detailed documentation on properties organized by property classes
What is the expected outcome?
Properties.solpopulated with properties that should hold in your system- Populated
BeforeAfter.solfor state comparison - Documentation in the
magicfolder showing properties across different categories
When to use it?
Use this when you already have coverage in place and want help writing properties. This is faster than full workflows since it focuses solely on property generation.
Implement Properties from Setup (Opus)
Same as Implement Properties from Setup but uses the Claude Opus model for higher quality output.
Requirements
Requires an existing setup in place (Setup.sol must exist).
What does it do?
- Uses the most advanced Opus model to analyze your system
- Creates comprehensive properties with deeper analysis
- Generates extensive documentation on choices and reasoning
What is the expected outcome?
Properties.solwith high-quality properties generated by Opus- Populated
BeforeAfter.solfor state comparison - Extensive documentation in the
magicfolder explaining the AI's reasoning and property choices
When to use it?
Use this when you want the best possible help writing properties and are willing to wait a bit longer for higher quality output.
Identify Invariants (V1)
A lightweight analysis workflow that identifies invariants without modifying your codebase.
Requirements
None. Works with any Solidity repository.
What does it do?
- Analyzes your smart contracts for potential invariants
- Documents a comprehensive list of properties that could be tested
- Identifies contract dependencies
- Lists discarded properties with reasoning
This workflow does not scaffold, does not create Setup.sol, and does not write Properties.sol.
What is the expected outcome?
- Documentation in the
magicfolder containing:- A comprehensive list of invariants and properties to test
- Contract dependency analysis
- Discarded properties with explanations
When to use it?
Use this when you want to understand which invariants might be valuable for your system before committing to a full setup. Ideal if you prefer to write the properties yourself.
Find Bugs (V1)
Workflow name: AI Powered Audit
Experimental.
An AI-powered audit workflow that attempts to find bugs in your smart contracts.
Requirements
Any GitHub repository with Solidity smart contracts.
What does it do?
- Performs automated security analysis
- Attempts to identify vulnerabilities and bugs
What is the expected outcome?
- An audit report highlighting potential issues
When to use it?
Use this for a quick automated security check. Note that this is experimental and results may vary.
Choosing the Right Workflow
| Workflow | Setup | Coverage | Properties | Best For |
|---|---|---|---|---|
| Scout + Setup + Properties + Coverage | Yes | Yes | Yes | Starting from scratch, want everything automated |
| Scout + Setup + Coverage | Yes | Yes | No | Want AI setup but prefer writing own properties |
| Setup + Properties + Coverage | Yes | Yes | Yes | Have scaffolded project, want setup, coverage, and properties |
| Setup + Coverage | Yes | Yes | No | Have scaffolded project, want setup and coverage only |
| Coverage V2 | Partial | Yes | No | Already have setup, need better coverage |
| Implement Properties from Setup | No | No | Yes | Have coverage, need help with properties |
| Implement Properties (Opus) | No | No | Yes | Want highest quality property generation |
| Identify Invariants (V1) | No | No | Docs only | Research phase, want to understand invariants first |
| Find Bugs (V1) | No | No | No | Quick automated security audit (experimental) |
Recipes
Recipes allow you to save and reuse job configurations for your fuzzing and verification tests. Instead of manually configuring job settings each time you run a test, recipes store your preferred configurations for quick access and consistent testing across your projects.
Video Tutorial: Recipes (2min)
Access Recon Recipes at: getrecon.xyz/dashboard/recipes
Why Use Recipes
Recipes provide several benefits:
- Save time: Avoid repeatedly entering the same configuration parameters
- Ensure consistency: Use identical settings across multiple test runs
- Enable automation: Required for setting up campaigns that run automatically on CI/CD
- Share configurations: Team members can use the same testing configurations
- Quick iteration: Easily modify saved configurations without starting from scratch
Creating a Recipe
To create a recipe, navigate to the Recipes page.
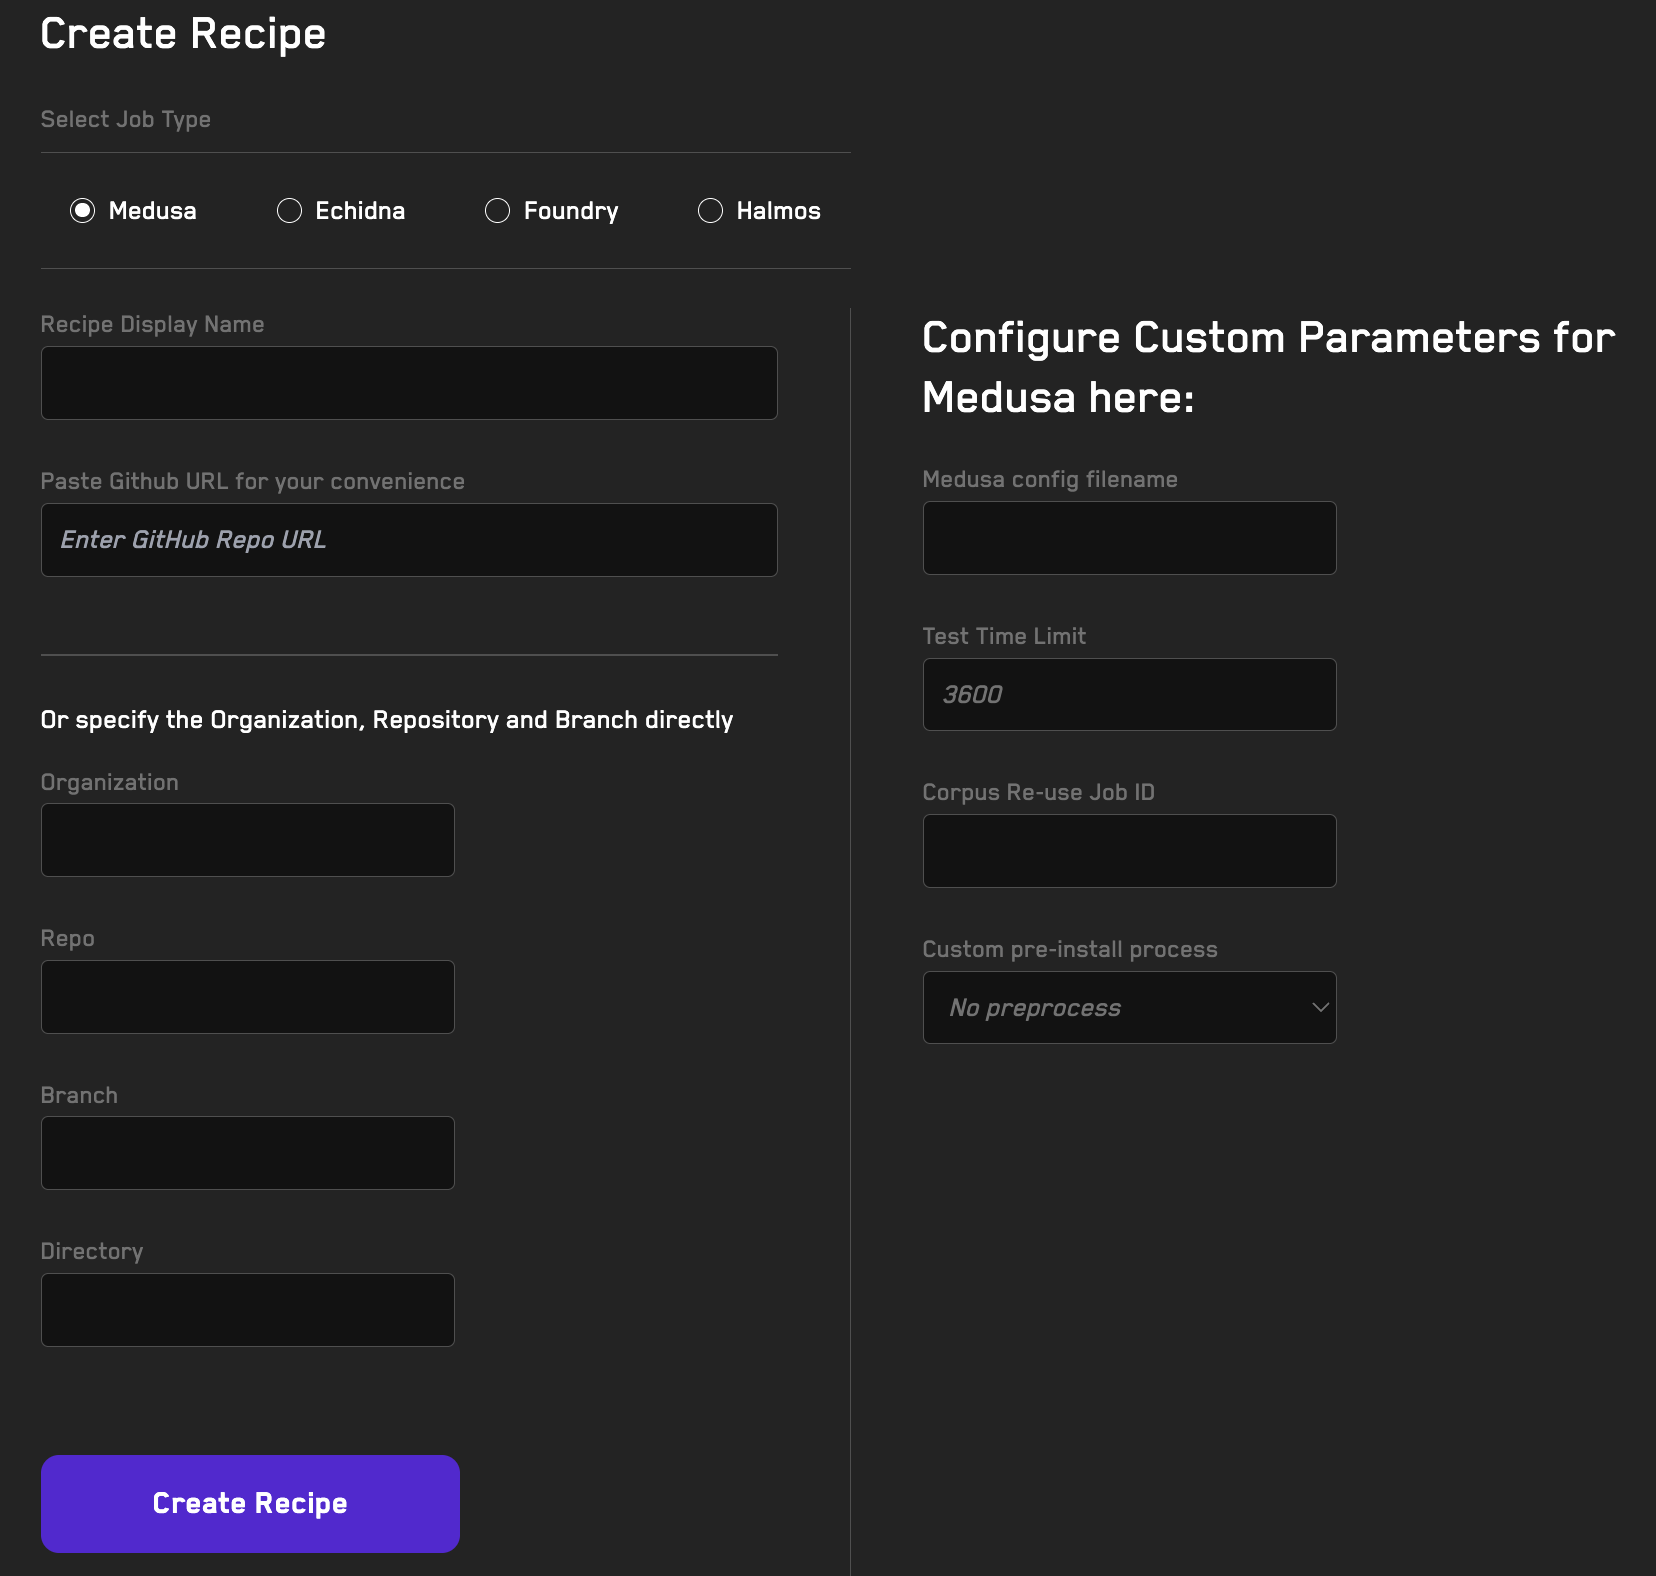
Follow these steps to configure your recipe:
-
Select the tool: Choose the fuzzing or verification tool for this recipe:
- Echidna: Property-based fuzzing tool
- Medusa: Go-based fuzzing framework
- Foundry: Solidity testing framework with fuzzing capabilities
- Halmos: Symbolic testing tool for formal verification
- Kontrol: Formal verification tool using K Framework
-
Name your recipe: Enter a descriptive name that indicates the purpose or configuration (e.g., "MainNet Fork Test" or "High-Depth Fuzzing")
-
Specify the repository: You have two options:
- GitHub Repo URL: Paste the full repository URL, which will automatically populate the Organization, Repo, and Branch fields
- Manual entry: Manually fill in the Organization, Repo, and Branch fields if you prefer
-
Configure tool settings (Optional): Add fuzzing or verification configuration parameters that will override the settings in your tool's config file:
- Test depth/duration
- Number of workers
- Corpus directory
- Custom test filters
- Any other tool-specific parameters
-
Set up dependencies (Optional): If your project uses a dependency system beyond Foundry (e.g., npm, yarn, or custom build scripts), select the appropriate preinstall process from the dropdown menu
-
Configure Dynamic Replacement (Optional): Use dynamic replacement to specify variables in your
Setup.solfile that should be replaced with different values -
Click Create Recipe: Save your configuration
Your recipe will appear in the list at the bottom of the page, where you can manage it using the available controls.
Managing Recipes
Once created, recipes appear in the list at the bottom of the Recipes page. Each recipe includes management options:
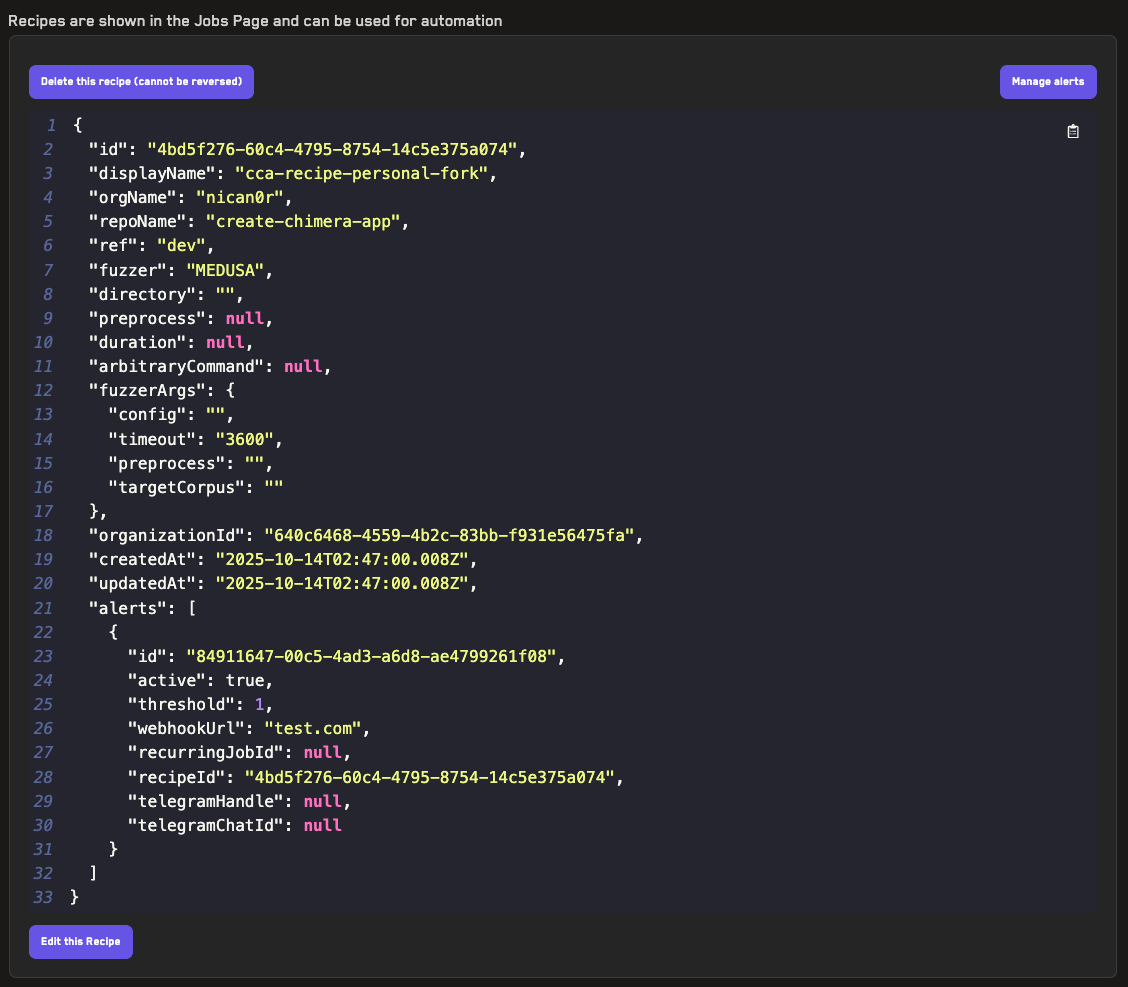
- Edit this Recipe: Modify any of the recipe's settings, including tool configuration, repository details, or dynamic replacements
- Delete this Recipe: Permanently remove the recipe (Note: this will also delete any campaigns using this recipe)
- Manage Alerts: Set up alerts to receive notifications when properties break during fuzzing runs
Using a Recipe
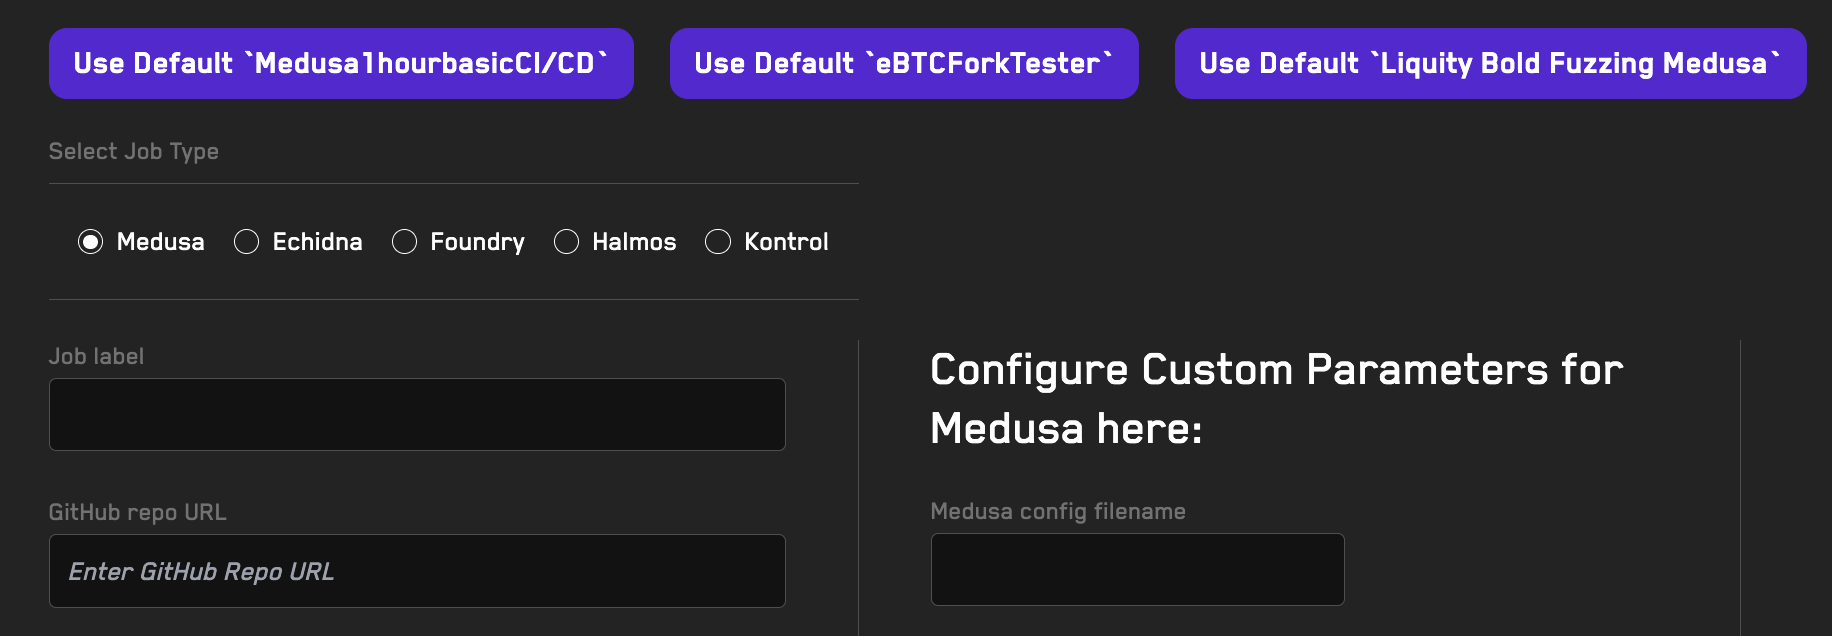
To use a saved recipe when running a job:
- Navigate to the Jobs page
- Click the Select Recipe dropdown at the top of the job configuration form
- Choose your desired recipe from the list
- The form fields will automatically populate with the recipe's configuration
- (Optional) Modify any values as needed for this specific run
- Click Run Job to start the fuzzing or verification test
Note: Changes made to field values when running a job do not affect the saved recipe. To permanently update a recipe's configuration, use the Edit this Recipe button on the Recipes page.
Recipe Configuration in Campaigns
Recipes are essential for campaigns, which automatically run fuzzing jobs on commits. When a campaign triggers:
- The campaign uses the recipe's tool and configuration settings
- The Organization, Repo, and Branch values from the commit override the recipe's values
- All other settings (tool parameters, dynamic replacements, alerts) remain as configured in the recipe
This allows you to maintain consistent fuzzing configurations across your CI/CD pipeline while testing different branches and repositories.
Alerts
Alerts allow you to receive notifications when properties break during one of your runs to allow you to quickly take action. They can be added to any recipe and specify whether an alert should trigger a Webhook or send a message on Telegram.
Video Tutorial: Alerts (2min)
Access Recon Alerts at: getrecon.xyz/dashboard/recipes
Note: Needs a Recipe first to be created. The alerts are created in the same page.
Creating, Updating, and Viewing Alerts
Navigate to a Recipe
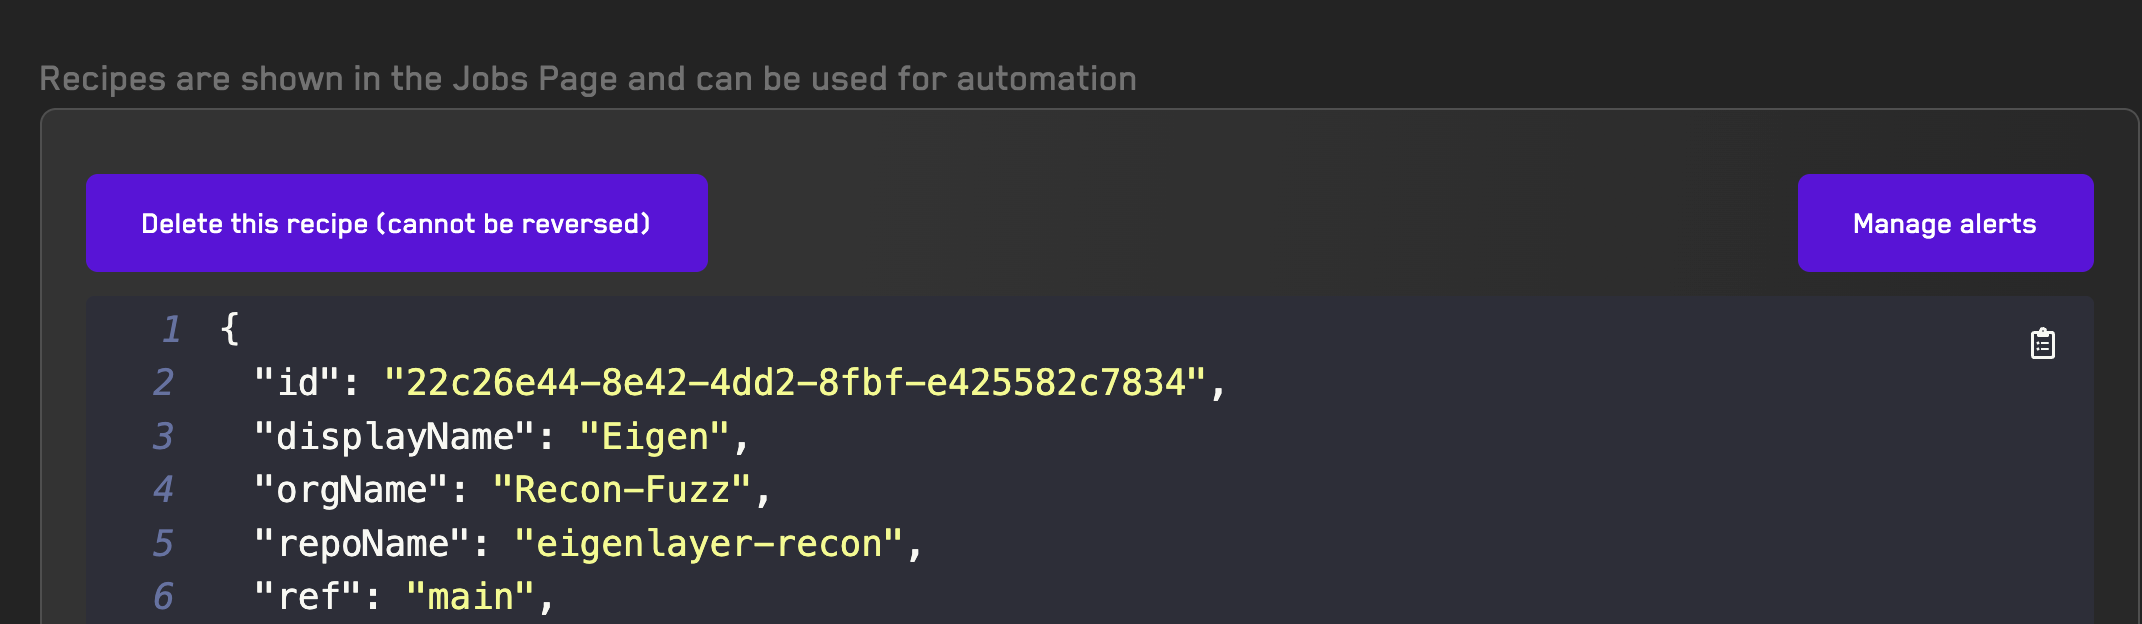 Click the Manage Alerts button on the top right which will redirected you to a page that allows you to create and modify alerts for a given recipe.
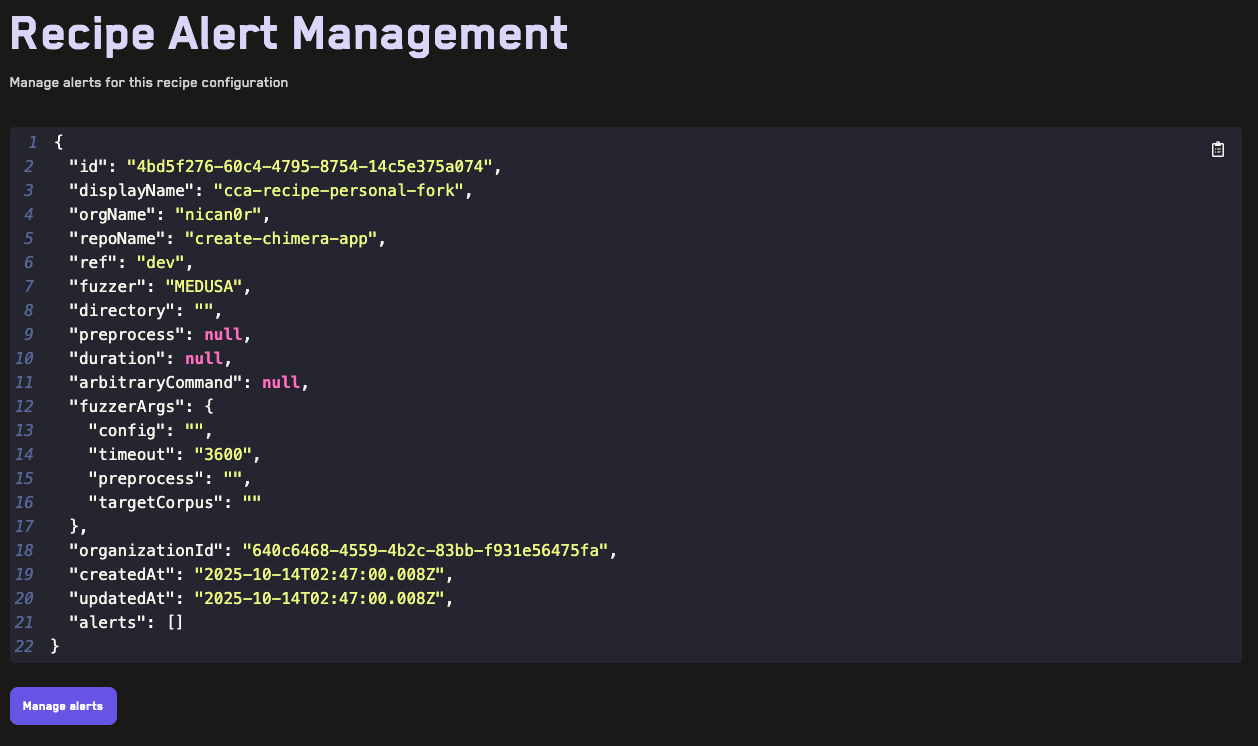
Scrolling down and clicking the Manage Alerts button displays all existing alerts attached to this Recipe and allows creating new alerts.

Each alert requires specifying a threshold which is the number of properties that will trigger the alert.
Telegram Alerts
For Telegram alerts, you simply have to specify your Telegram username in the form field.
Before creating a Telegram alert you must click the Test Connection button which will send a message to our Telegram Bot: @GetRecon_bot. Always confirm the ID of the bot and message us on discord if you have any questions.
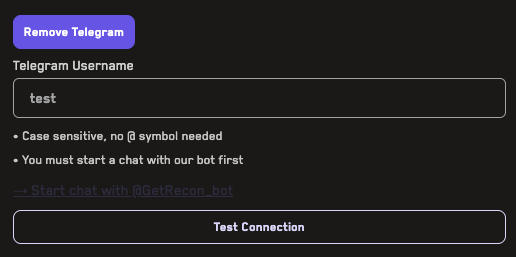
Webhook Alerts
For webhooks, you can provide any URL:
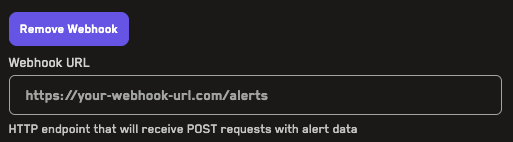
Which will be sent the following payload to it once an alert is triggered:
{
  alerted: string,
  jobId: string,
  broken property: string,
  sequence: string
}
Modifying Alerts
Once you have an existing alert you can delete, disable, or edit it on the right hand side:
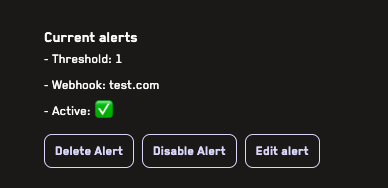
Campaigns
Campaigns are CI/CD automations that automatically run cloud fuzzing jobs when commits are pushed to a specified branch. They integrate directly into your development workflow by running fuzzing tests on pull requests and providing immediate feedback through PR comments.
Video Tutorial: Campaigns (3min)
Access Recon Campaigns at: getrecon.xyz/dashboard/campaigns
How Campaigns Work
Campaigns connect a specific branch in your repository to a recipe that defines the fuzzing configuration. When you push code to the monitored branch, Recon automatically:
- Triggers a fuzzing job using the configured campaign
- Runs the job with your recipe's fuzzing settings
- Posts results directly to the pull request as comments
If you've configured alerts for the recipe, they will also be triggered when their criteria are met during campaign runs.
Creating a Campaign
Before creating a campaign, you must first create a recipe that defines your fuzzing configuration.
To create a campaign:
- Navigate to the Campaigns page
- Fill in the campaign configuration form:
- Recipe: Select the recipe to use for this campaign
- Organization (optional): Your GitHub organization or username, if you are using a different organization than the one in your recipe
- Repository (optional): The name of your repository, if you are using a different repository than the one in your recipe
- Branch (optional): The branch you'll be pushing from (e.g.,
devif you're creating PRs fromdevtomain), if you are using a different branch than the one in your recipe
- Click the Create Campaign button to activate the campaign

Once created, your campaign will automatically trigger fuzzing jobs whenever new commits are pushed to the specified branch.
Managing Campaigns
After creating a campaign, you can modify it by scrolling to the campaign in the list and using the control buttons:
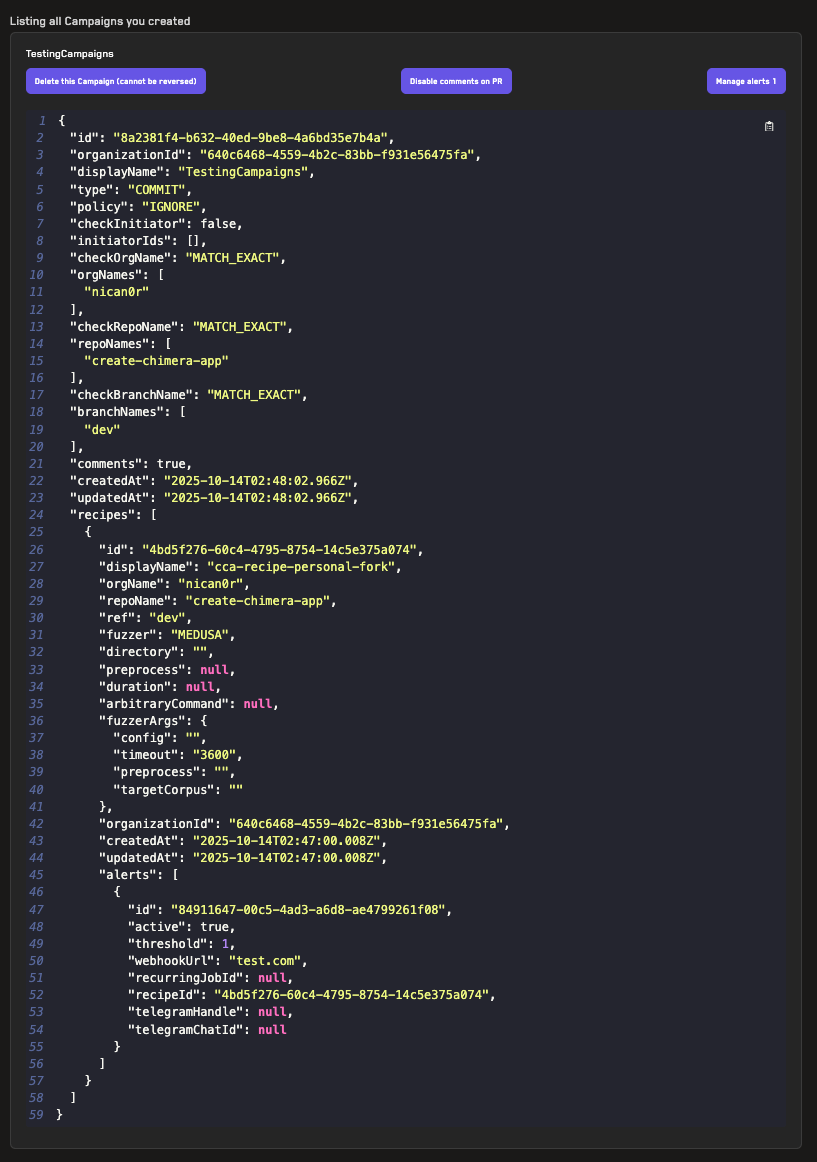
Available management options include:
- Pause Campaign: Temporarily stop the campaign from triggering new jobs without deleting it
- Delete Campaign: Permanently remove the campaign
- Manage Alerts: Add, edit, or remove alerts associated with the campaign's recipe
Note: Campaigns cannot be directly edited. However, any changes made to the underlying recipe will automatically be reflected in the campaign's behavior. To modify a campaign's configuration, update the associated recipe instead.
Pull Request Integration
By default, campaigns will leave a comment on the PR when a fuzzing job starts:

Once the job completes, campaigns post a detailed summary that includes a table with all the tested properties and Foundry unit test reproducers for each broken property:

dynamic replacement
dynamic replacement allows you to test multiple configuration variations of your contracts without managing separate branches or config files. By replacing variable values in your Setup.sol file before fuzzing runs, you can quickly test different scenarios with the same codebase.
Video Tutorial: dynamic replacement (1min)
Try it out: See an interactive demo or use dynamic replacement with your Recon Pro account.
How It Works
dynamic replacement enables you to change the value of any variable in your Setup.sol file before running a fuzzing job. Instead of creating multiple branches or config files to test different scenarios, you can:
- Identify the variables you want to modify.
- Specify replacement values in the Recon interface.
- Run multiple jobs with different configurations from the same branch.
The chosen variables are replaced before the fuzzer runs, while everything else in your setup remains identical. This allows you to fine-tune your testing approach for different scenarios efficiently.
When to Use dynamic replacement
Toggle Behavior with Boolean Flags
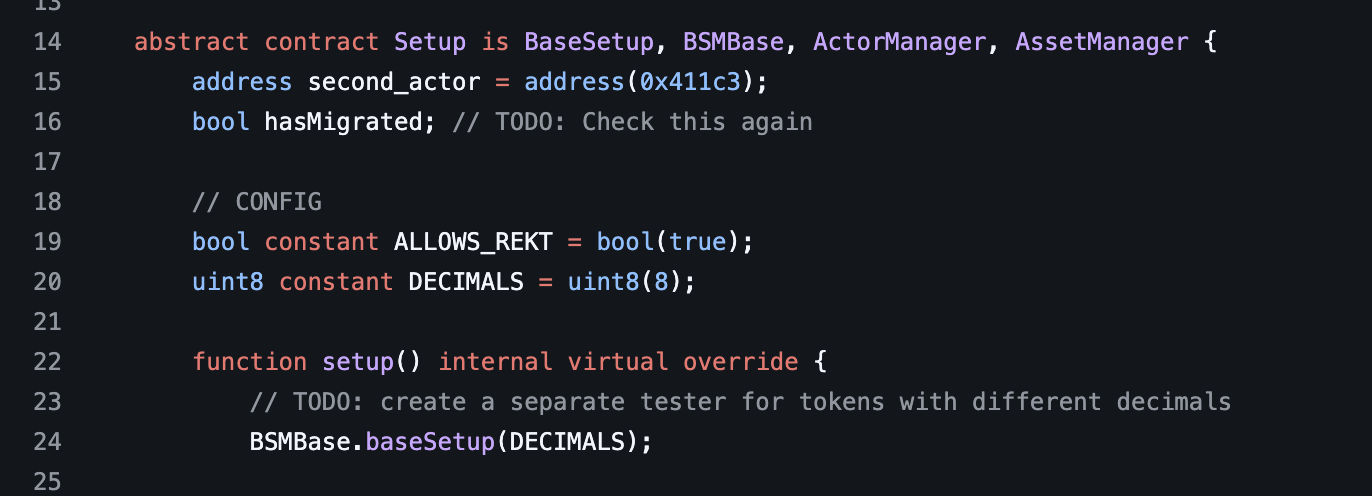
You can use dynamic replacement to toggle feature flags or behavior switches without maintaining separate branches. In the example above, the ALLOWS_REKT constant controls whether certain unsafe ERC4626 operations are permitted. By using dynamic replacement to toggle this boolean between true and false, you can test both scenarios without duplicating code.
Common use cases:
- Enabling/disabling specific protocol features
- Testing with and without safety checks
- Toggling between different execution modes
Test Different Precision and Decimal Configurations
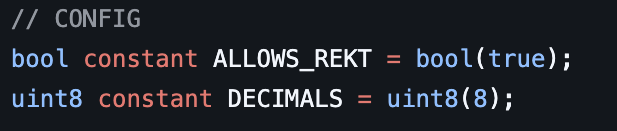
When testing contracts that interact with tokens or handle numerical precision, dynamic replacement allows you to reuse test suites across different configurations. In the example above, the suite was originally written for an 18-decimal token. Using dynamic replacement, you can test the same suite with 6-decimal or 8-decimal tokens without rewriting your tests.
Common use cases:
- Testing different token decimal values (6, 8, 18)
- Adjusting precision loss thresholds
- Modifying numerical constants like maximum slippage or fees
Fork Testing with Different Addresses
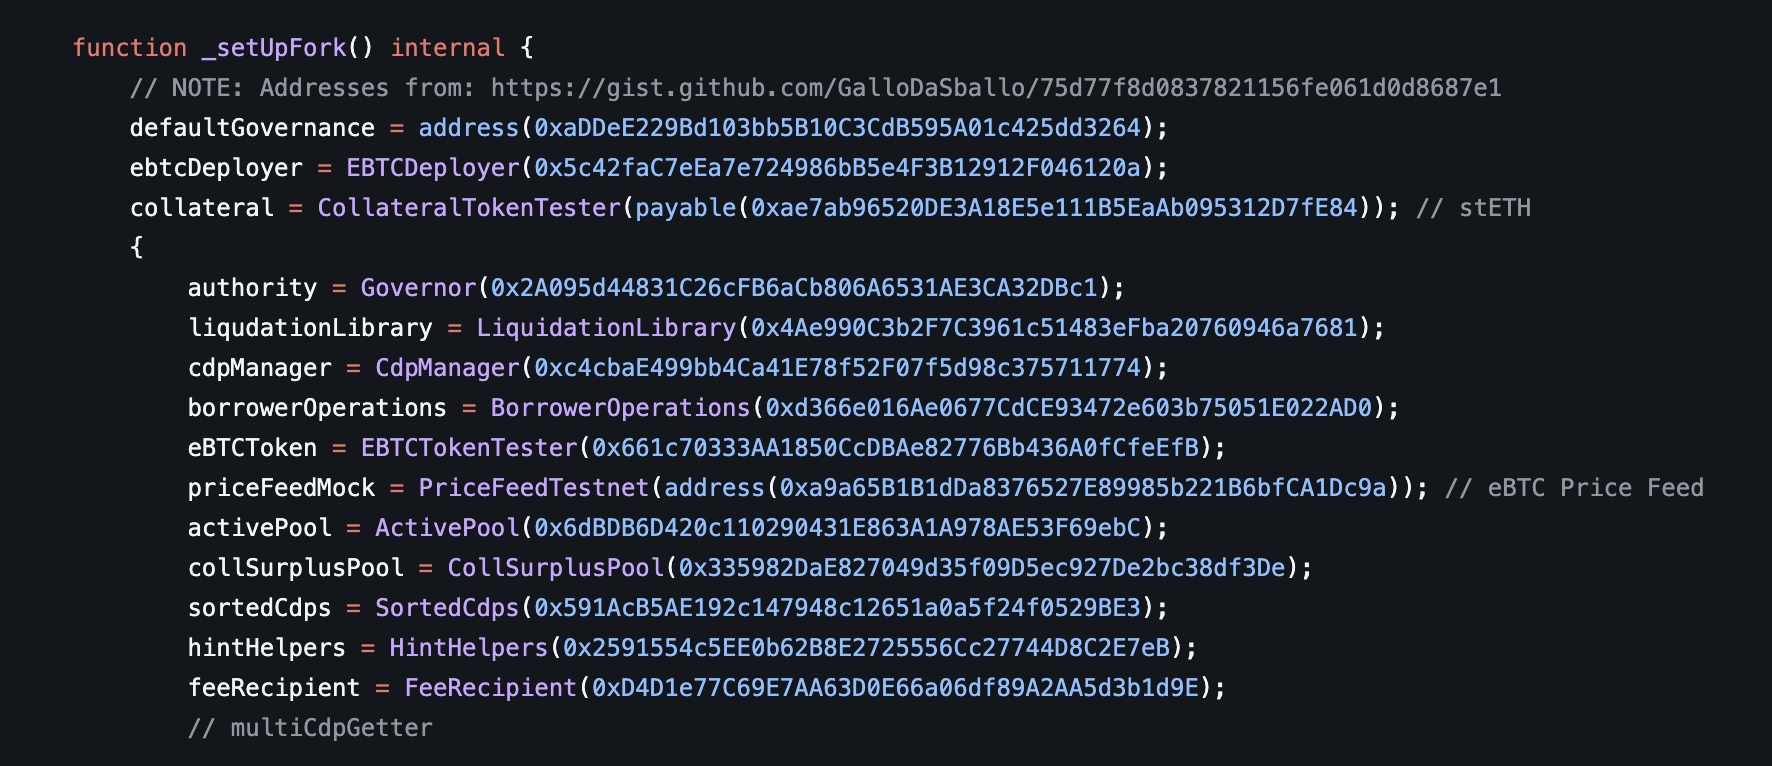
Fork tests often require hardcoded addresses for contracts deployed on specific chains. dynamic replacement enables you to swap these addresses to test against different protocols, chains, or deployment versions without modifying your codebase.
Common use cases:
- Testing the same protocol on different chains (Ethereum, Arbitrum, Optimism)
- Comparing behavior across protocol versions
- Testing against different token addresses or pool configurations
Using Dynamic Replacement
Dynamic replacement applies only to variables defined in your Setup.sol file.
To use dynamic replacement:
- Navigate to the Fuzzing Jobs or Recipes page and toggle the Enable Dynamic Replacement switch
- For each variable you want to replace, provide:
- Variable Name: The exact name of the variable in your
Setup.solfile - Type: The variable's type/interface (e.g.,
bool,uint256,address) - Value: The new value to replace the existing value with
- Variable Name: The exact name of the variable in your
- (Optional) Click Add More Variables to specify additional replacement values for testing multiple configurations
- Run your job or save the recipe with the dynamic replacements configured
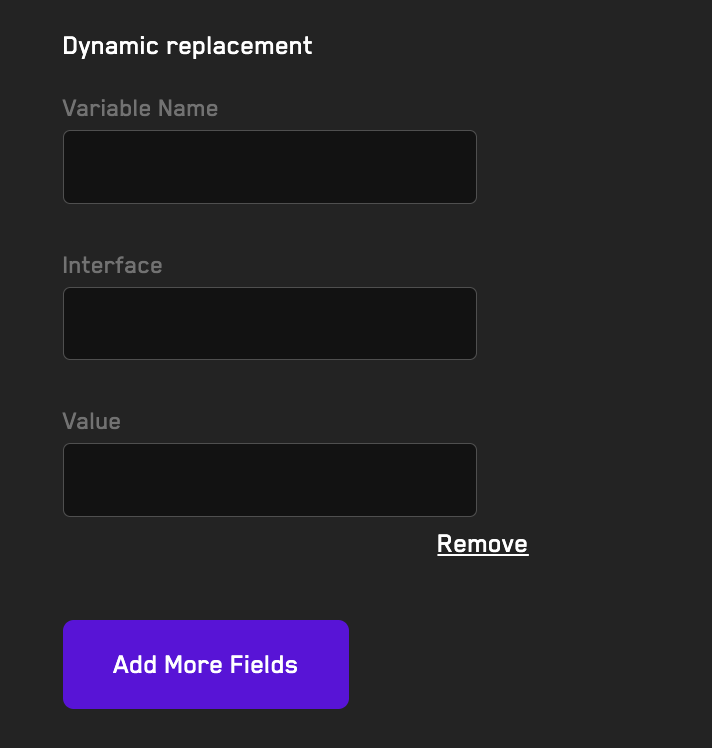
Each replacement configuration will run as a separate job, allowing you to compare results across different variable values in parallel.
Best Practices
- Use descriptive variable names: Make it clear what each variable controls to avoid confusion when setting up replacements
- Document your configurations: Keep track of which replacement values represent which scenarios for easier analysis
- Combine with recipes: Save frequently used replacement configurations as recipes for quick reuse
Governance Fuzzing
Governance fuzzing allows you to automatically trigger fuzzing jobs in response to on-chain events. This is particularly useful for testing how governance proposals or system configuration changes affect your invariants before they are executed on-chain.
Video Tutorial: Governance Fuzzing (2min)
Access Recon Governance Fuzzing at: getrecon.xyz/dashboard/governance-fuzzing
What is Governance Fuzzing?
Governance fuzzing monitors on-chain events from a specific contract address and automatically runs a fuzzing job when that event is emitted. The event parameters can be used to dynamically replace values in your Setup.sol file, allowing you to test how different configurations affect your invariants.
Common use cases include:
- Testing governance proposals before they are executed
- Validating parameter changes suggested by governance
- Monitoring system configuration updates
- Testing emergency actions or admin changes
How It Works
Governance fuzzing works in three main steps:
- Event Monitoring: Recon listens for specific events on a contract address you specify
- Dynamic Replacement: When the event is detected, parameters from the event are injected into your
Setup.solfile using dynamic replacement - Automatic Job Execution: A fuzzing job is automatically triggered using a pre-configured recipe
Setting Up Governance Fuzzing
Prerequisites
Before setting up governance fuzzing, you need:
- A recipe configured for your project with fork testing enabled
- A fork testing setup that achieves full coverage over the contracts of interest
- The contract address that emits the events you want to monitor
- The event definition you want to listen for
Important: Your fork setup must include calls to
vm.rollandvm.warpcheatcodes because Echidna does not automatically warp to the timestamp at the block it's forking from.
Configuration Steps
- Navigate to the Governance Fuzzing page in the Recon dashboard
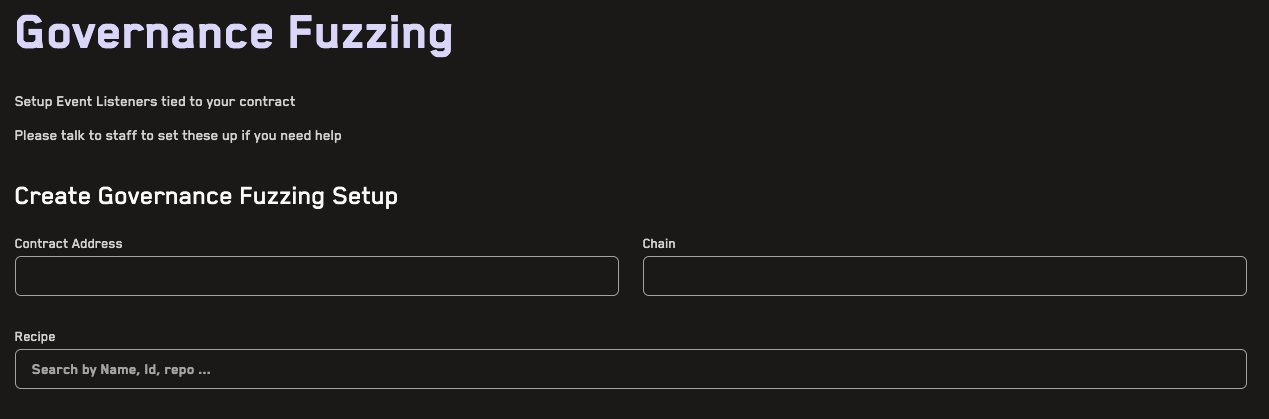
-
Enter the contract address you want to monitor for events
-
Select the chain where the contract is deployed
-
Choose a recipe that will be used to run the fuzzing job when the event is detected
-
Define the event you want to monitor by either pasting the full event definition (e.g.,
event ProposalCreated(uint256 indexed proposalId, address proposer, string description))

- Configure parameter replacements: Click Parse Event Definition to automatically extract the event name and parameters for each event, specifying how it should be injected into your
Setup.solfile:- Type: The Solidity type of the parameter
- Indexed: Whether the parameter is indexed in the event (automatically detected)
- Replacement: The variable in your
Setup.solfile to replace, usingXXas a placeholder for the event value - Unused: Toggle this if you want to ignore this parameter

Example: Monitoring Governance Proposals
Let's say you have a governance contract that emits:
event ProposalCreated(
    uint256 indexed proposalId,
    address proposer,
    uint256 newParameter
);
And you have a constant in your Setup.sol:
uint256 constant TARGET_PARAMETER = 100;
In the governance fuzzing setup:
- Enter your governance contract address
- Select the appropriate chain
- Choose your recipe
- Paste the event definition and click "Parse Event Definition"
- For the
newParameterfield, set the replacement to:
uint256 constant TARGET_PARAMETER = uint256(XX);
When a ProposalCreated event is emitted, Recon will:
- Detect the event on-chain
- Extract the
newParametervalue from the event - Replace
XXin your Setup.sol with the actual value - Run a fuzzing job to test if the new parameter breaks any invariants
Verifying Your Setup
After configuring your governance fuzzing setup, verify:
- Topic: The event topic hash is displayed - make sure this matches the actual event
- Event Definition: The reconstructed event definition should match your contract
- Replacements: Review that the
XXplaceholders are in the correct positions

Warning: An incorrect topic will cause Recon to miss events on-chain. Always double-check the generated topic before submitting.
Managing Governance Fuzzing Setups
Once created, you can:
- Edit existing setups to modify event parameters or replacements
- Toggle setups on/off to pause/resume monitoring
- Delete setups you no longer need
All automatically triggered jobs will appear on your regular Jobs page with links to the triggering event.
Advanced Features
Multiple Parameter Replacements
You can configure multiple parameters from a single event to replace different values in your Setup.sol. For example, if an event emits both a new fee percentage and a new admin address, you can replace both values in your test setup.
Unused Parameters
Mark parameters as "unused" if you want to monitor an event but don't need all of its parameters for your fuzzing setup. This is useful when events contain data that isn't relevant to your test configuration.
Testing Before On-Chain Execution
The most powerful use case is testing proposals during the governance voting period, before they are executed. This gives you time to identify potential issues and raise them with the community before changes go live.
Recon Tricks
We've been using Recon for over a year to run all of our cloud runs.
Here's some tips and tricks:
Video Tutorial: Recon Magic Workflow (8min)
Run in exploration mode for an excessive amount of tests
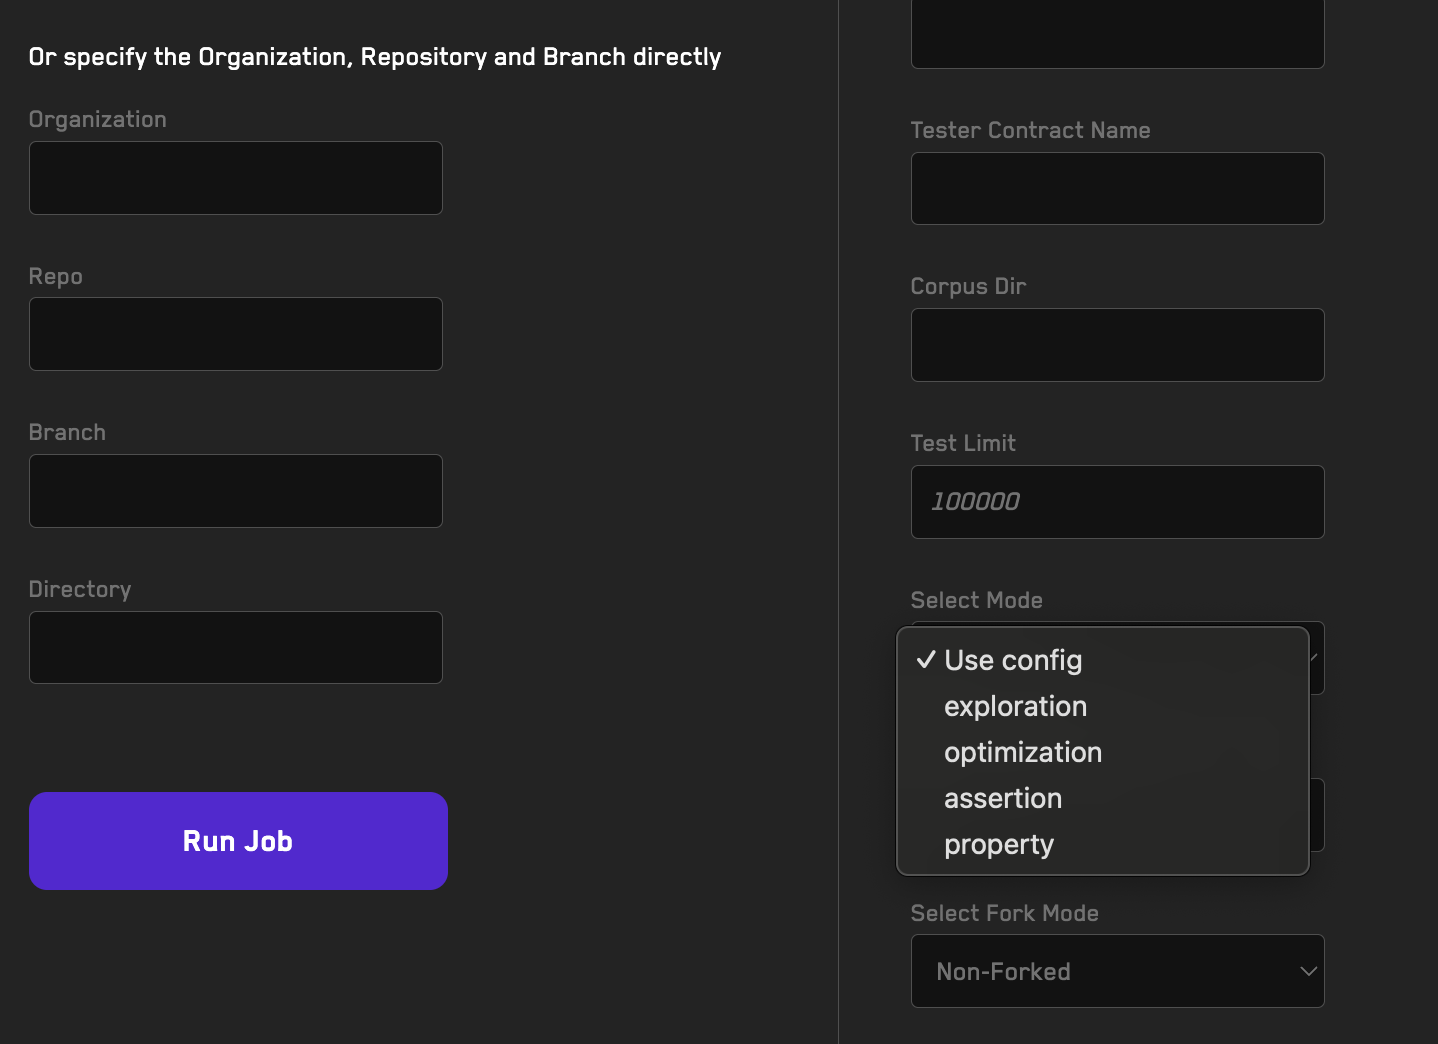
Exploration mode is faster and builds a corpus faster.
While building your suite, make use of this mode.
Think about Corpus Reuse
Video Tutorial: Corpus Reuse (2min)
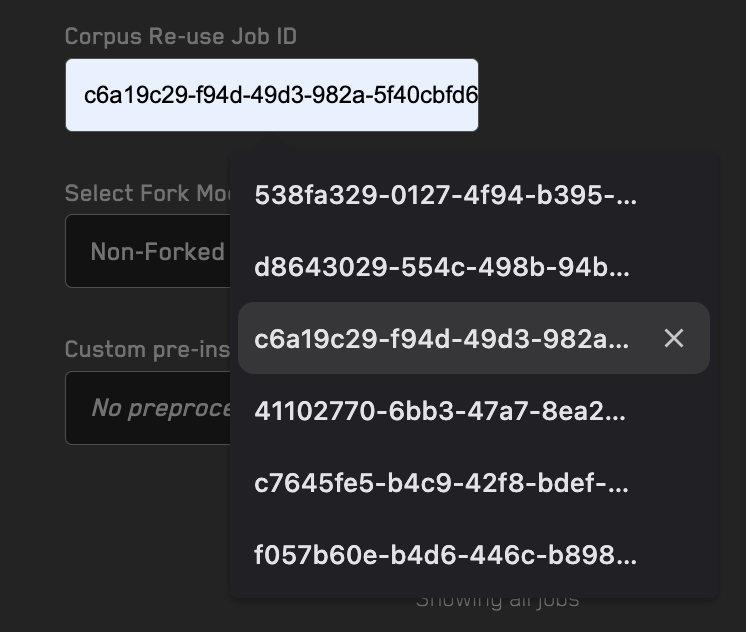
Some runs can take days to explore all states.
If you reuse corpus, these days' worth of data can be replied to within minutes.
Always use corpus re-use.
There's a reason why we prominently allow you to download corpus and paste it into any job, it's because we know it works.
Don't acknowledge small precision losses before using Optimization Mode
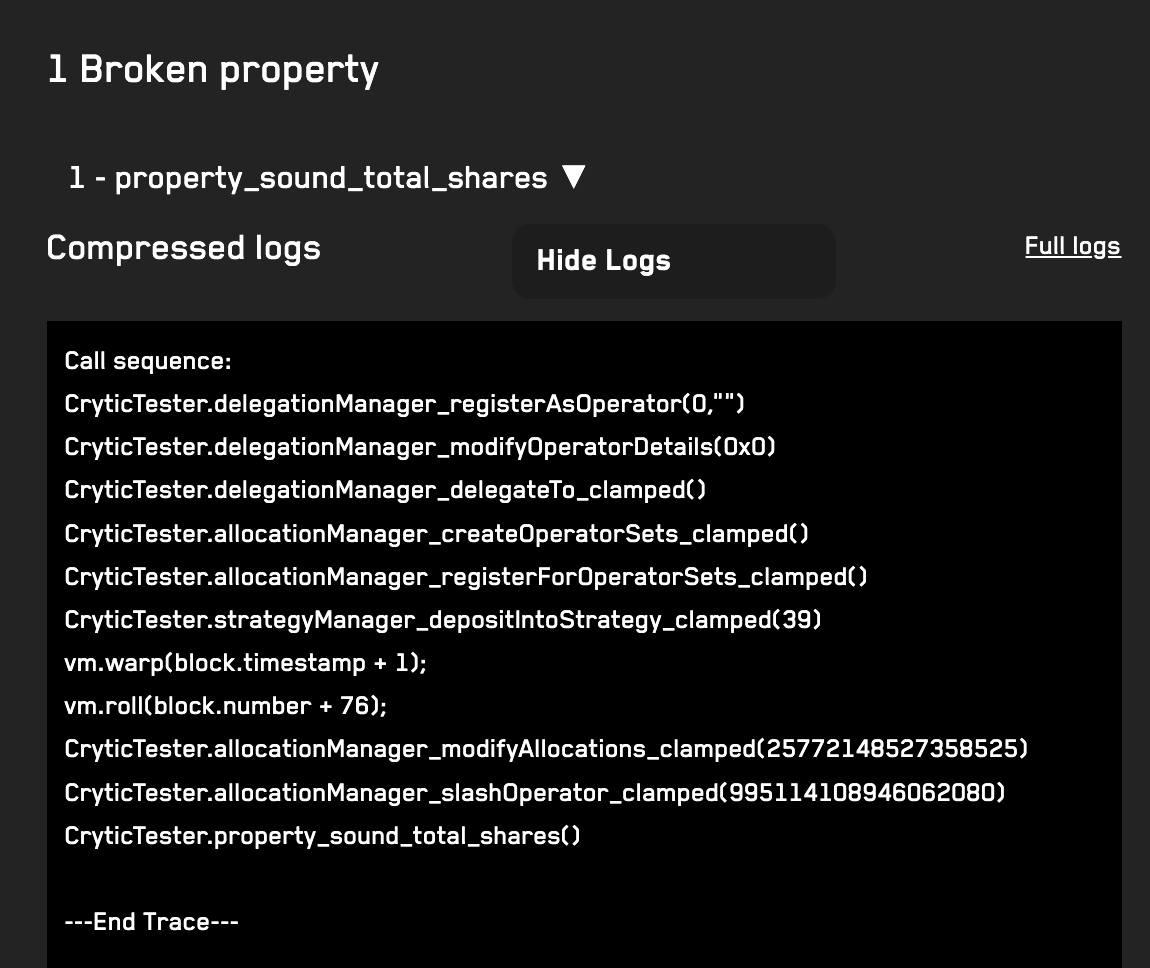
Sometimes you'll break a property with a small precision threshold and think you're done.
From our experience, you should run some Optimization Tests.
The way the corpus for Optimization is built is a bit different, so running Optimization tests can lead you to different results.
Share your Jobs as soon as they start

You can save a lot of back and forth by creating a share and sending it to your team or auditors.
Recon jobs update automatically every minute, so once you know the job will work you can share it and go afk
Use Dynamic Replacement for Config
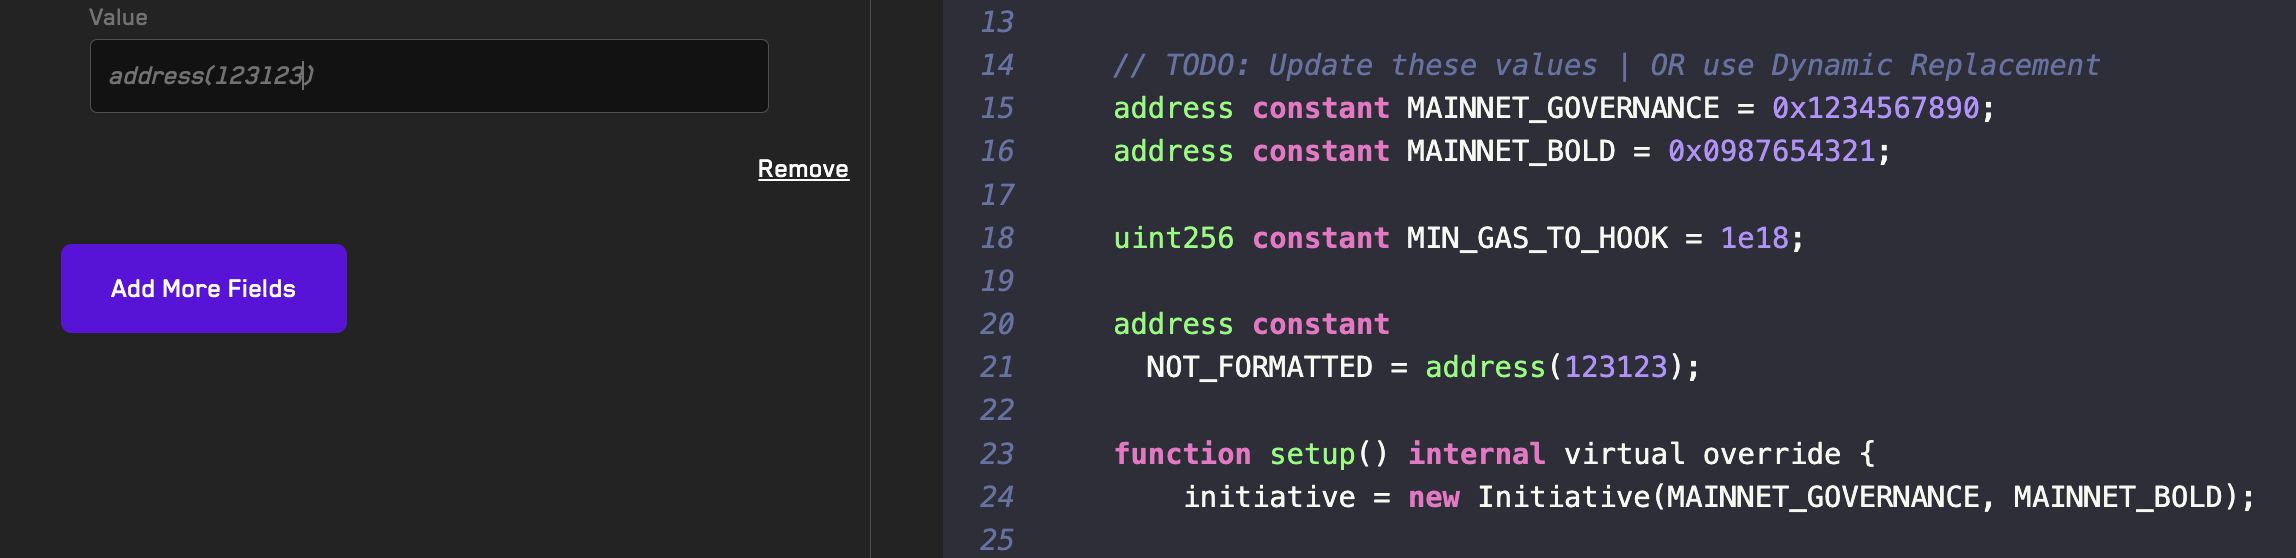
Thinking about multi-deployment tests? Admin Mistakes? Hardcoded Precision Tolerance?
Just set these as constants in your Setup file and then use Dynamic Replacement.
You already paid for the cloud service, save time and run a few extra runs to help you test all edge cases.
Reuse your suite for Monitoring
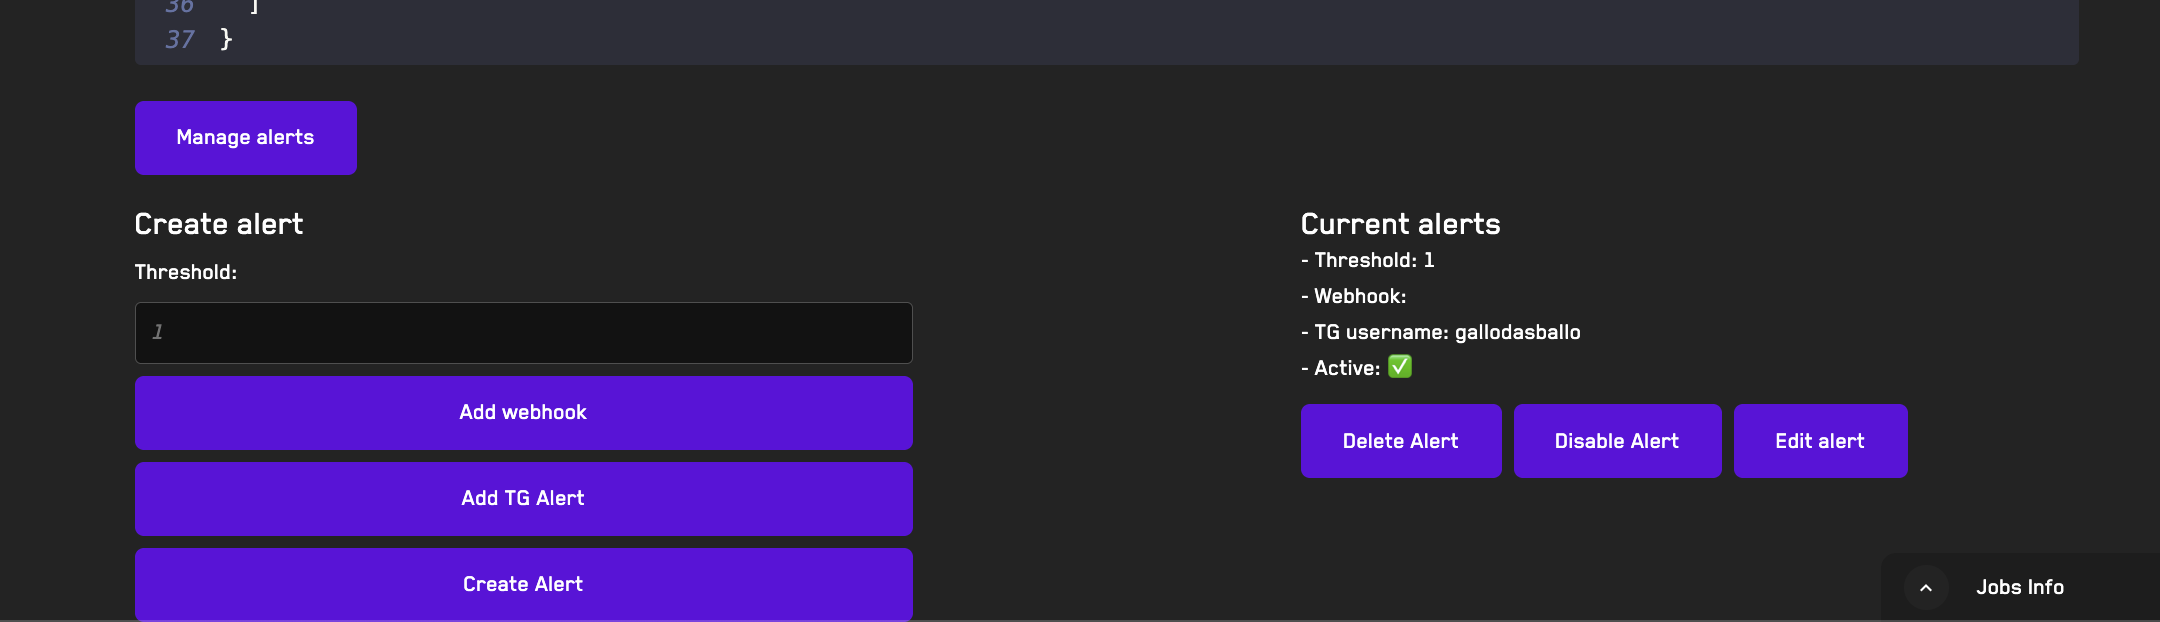
Some invariant testing suites end up having hundreds of thousands of dollars worth of effort put into them.
Echidna, Medusa, and Foundry all support fuzzing on Forked tests
Repurposing a Chimera suite to work with forking takes just a couple of hours, and Recon supports API jobs with Dynamic Replacement.
We've demoed using Invariant Testing as the best monitoring at Fuzz Fest
Recon Extension
The Recon extension is a Visual Studio Code extension that allows you to use Recon's suite of tools directly in your code editor. It requires a Foundry project to be open in your workspace to use.
Video Tutorial: The Recon Extension (5min)
Installation
Install the extension from the Visual Studio Marketplace: https://marketplace.visualstudio.com/items?itemName=Recon-Fuzz.recon
Install the extension from the Open VSX Marketplace (Cursor): https://open-vsx.org/extension/Recon-Fuzz/recon
Alternatively build from source and install the vsix: https://github.com/Recon-Fuzz/recon-extension
Getting Started
After installing the extension, your project will automatically be compiled when you open a new window in your code editor.
If your foundry.toml file is located in a directory other than the root of your project, your project will not be compiled automatically. You can select the location in the sidebar under the RECON COCKPIT section:

which will allow you to build your project from the directory containing the foundry.toml file.
Scaffold Your Target Functions
After building your project, you can choose which of your contract functions you want to add target functions for using the CONTRACTS section in the sidebar.
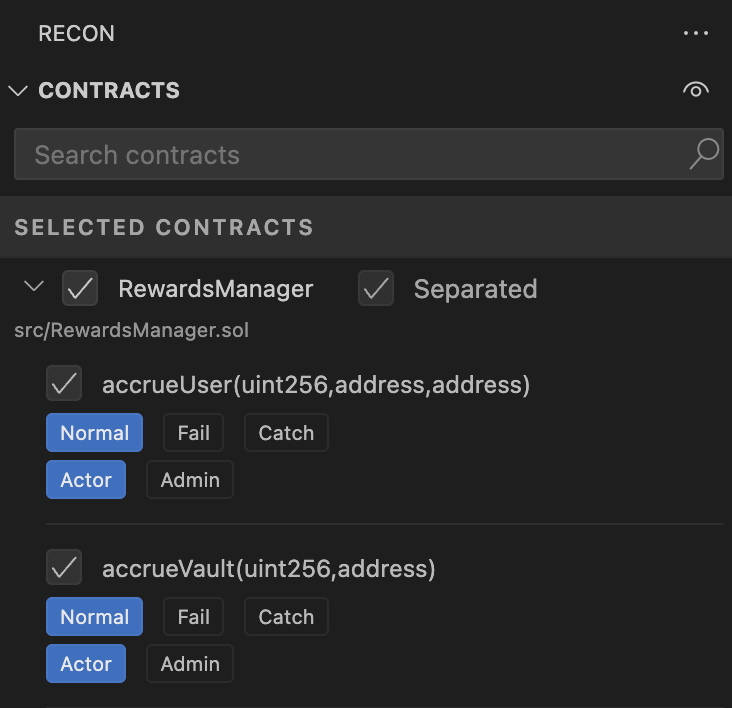
Once you've selected the contract functions you'd like to scaffold, you can generate a Chimera Framework template for your project using the Scaffold button in the sidebar under the RECON COCKPIT section:

This will install the Chimera dependency, generate the necessary fuzzer config files, and generate all the necessary test files for your project using the Create Chimera App template.
Your scaffolded target functions will be added to the recon/targets directory as ContractName + TargetFunctions.sol (e.g. Counter.sol's target functions will be called CounterTargetFunctions.sol).
Note: You can change settings for the project build configurations by clicking the gear icon next to the Generate Chimera Template button. This allows you to change the Echidna and Medusa configuration files as well as the project settings.
For more on how to use the Chimera Framework, check out the Chimera Framework section.
Function Handlers
Testing Modes
When selecting which contract functions you'd like to target, you can select from three testing modes to help define how you'd like to test your target functions:
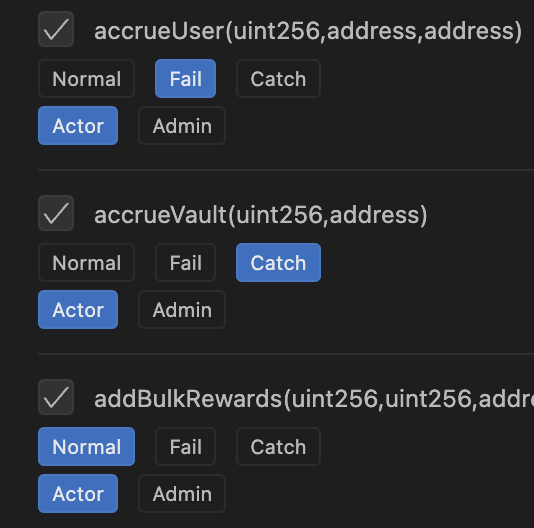
- Normal Mode - This just adds a handler function as a wrapper around the underlying target function.
- Fail Mode - This will add a handler function that includes an assertion at the end of the call to the target function. You can replace this assertion with any other assertion you'd like to test.
- Catch Mode - This will add a handler function that includes a try catch block around the call to the target function. You can add any custom logic to the catch block such as an assertion about when a function should or shouldn't revert.
The testing mode for each target function can later be changed in the generated target function contract above each function using the codelense buttons:
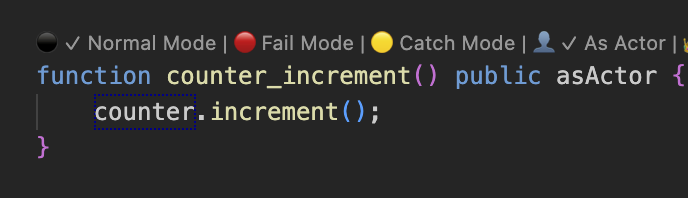
Actor Mode
Actor modes allow you to specify which actor should be calling the target function:
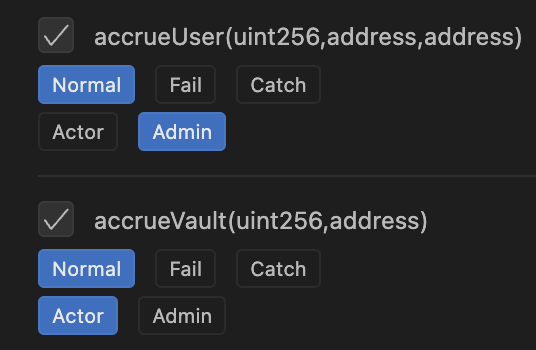
- Actor - This uses the currently set actor returned by
_getActor()to prank and call the target function. - Admin - This uses the admin role to call the target function (this is defaulted to
address(this)).
The actor mode for each target function can later be changed in the generated target function contract above each function using the codelense buttons:
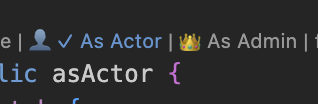
Auto Mocking
The Recon extension allows you to auto-mock specific contracts needed for your setup using the ABI to Mock tool. This tool will generate a mock of system contracts based on the contract's parameters and return values. This is useful for quickly getting coverage on the core contracts of your project that you target with your target functions while simulating functionality of periphery contracts whose behavior is unimportants.
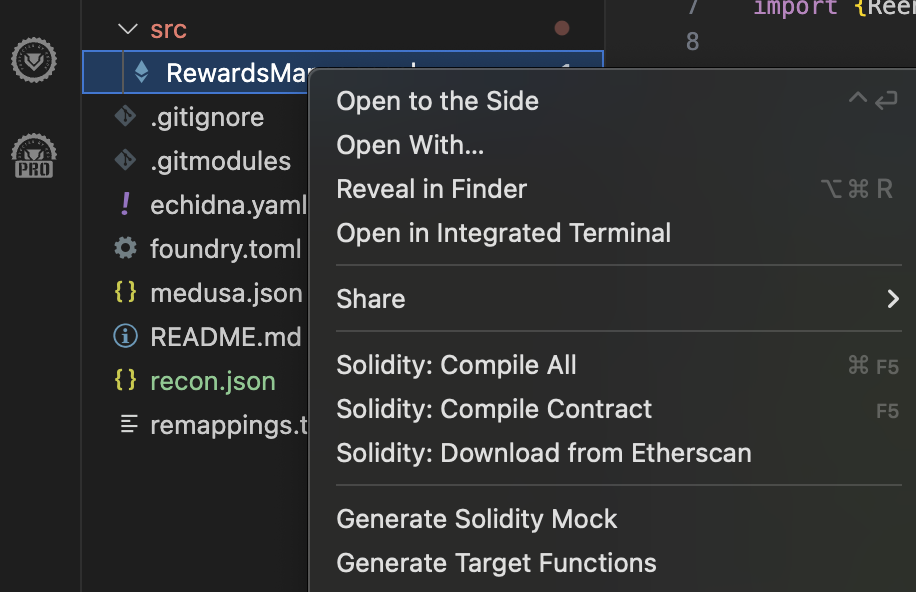
Auto Mocking is triggered by right clicking on a contract's ABI file in the out directory or directly via the Contract file of the contract you'd like to mock and selecting Generate Solidity Mock. This will generate a mock of the contract in the path specified in the RECON COCKPIT settings in the Mocks Folder Path field as ContractName + Mocks.sol (e.g. Counter.sol's mocks will be called CounterMocks.sol).
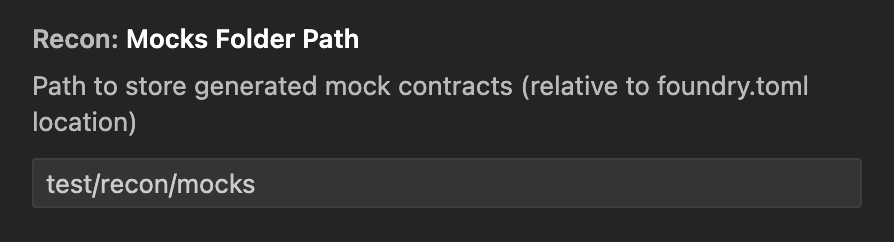
Run with Echidna and Medusa
After generating a Chimera template for your project you can use the Run Echidna and Run Medusa buttons in the bar at the bottom of your code editor to run your suite with Echidna and Medusa.
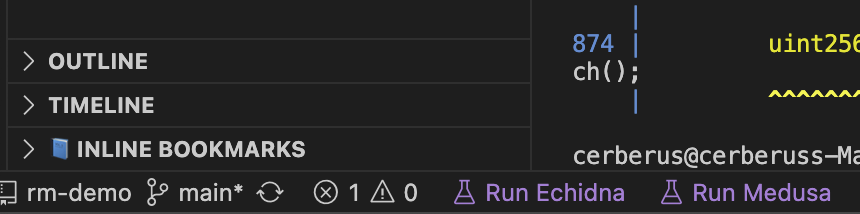
Report Generation
After running your suite with Echidna or Medusa a report is automatically generated which you can see in the COVERAGE REPORT section in the sidebar.

This provides an markdown report of all the properties that were tested and the results.
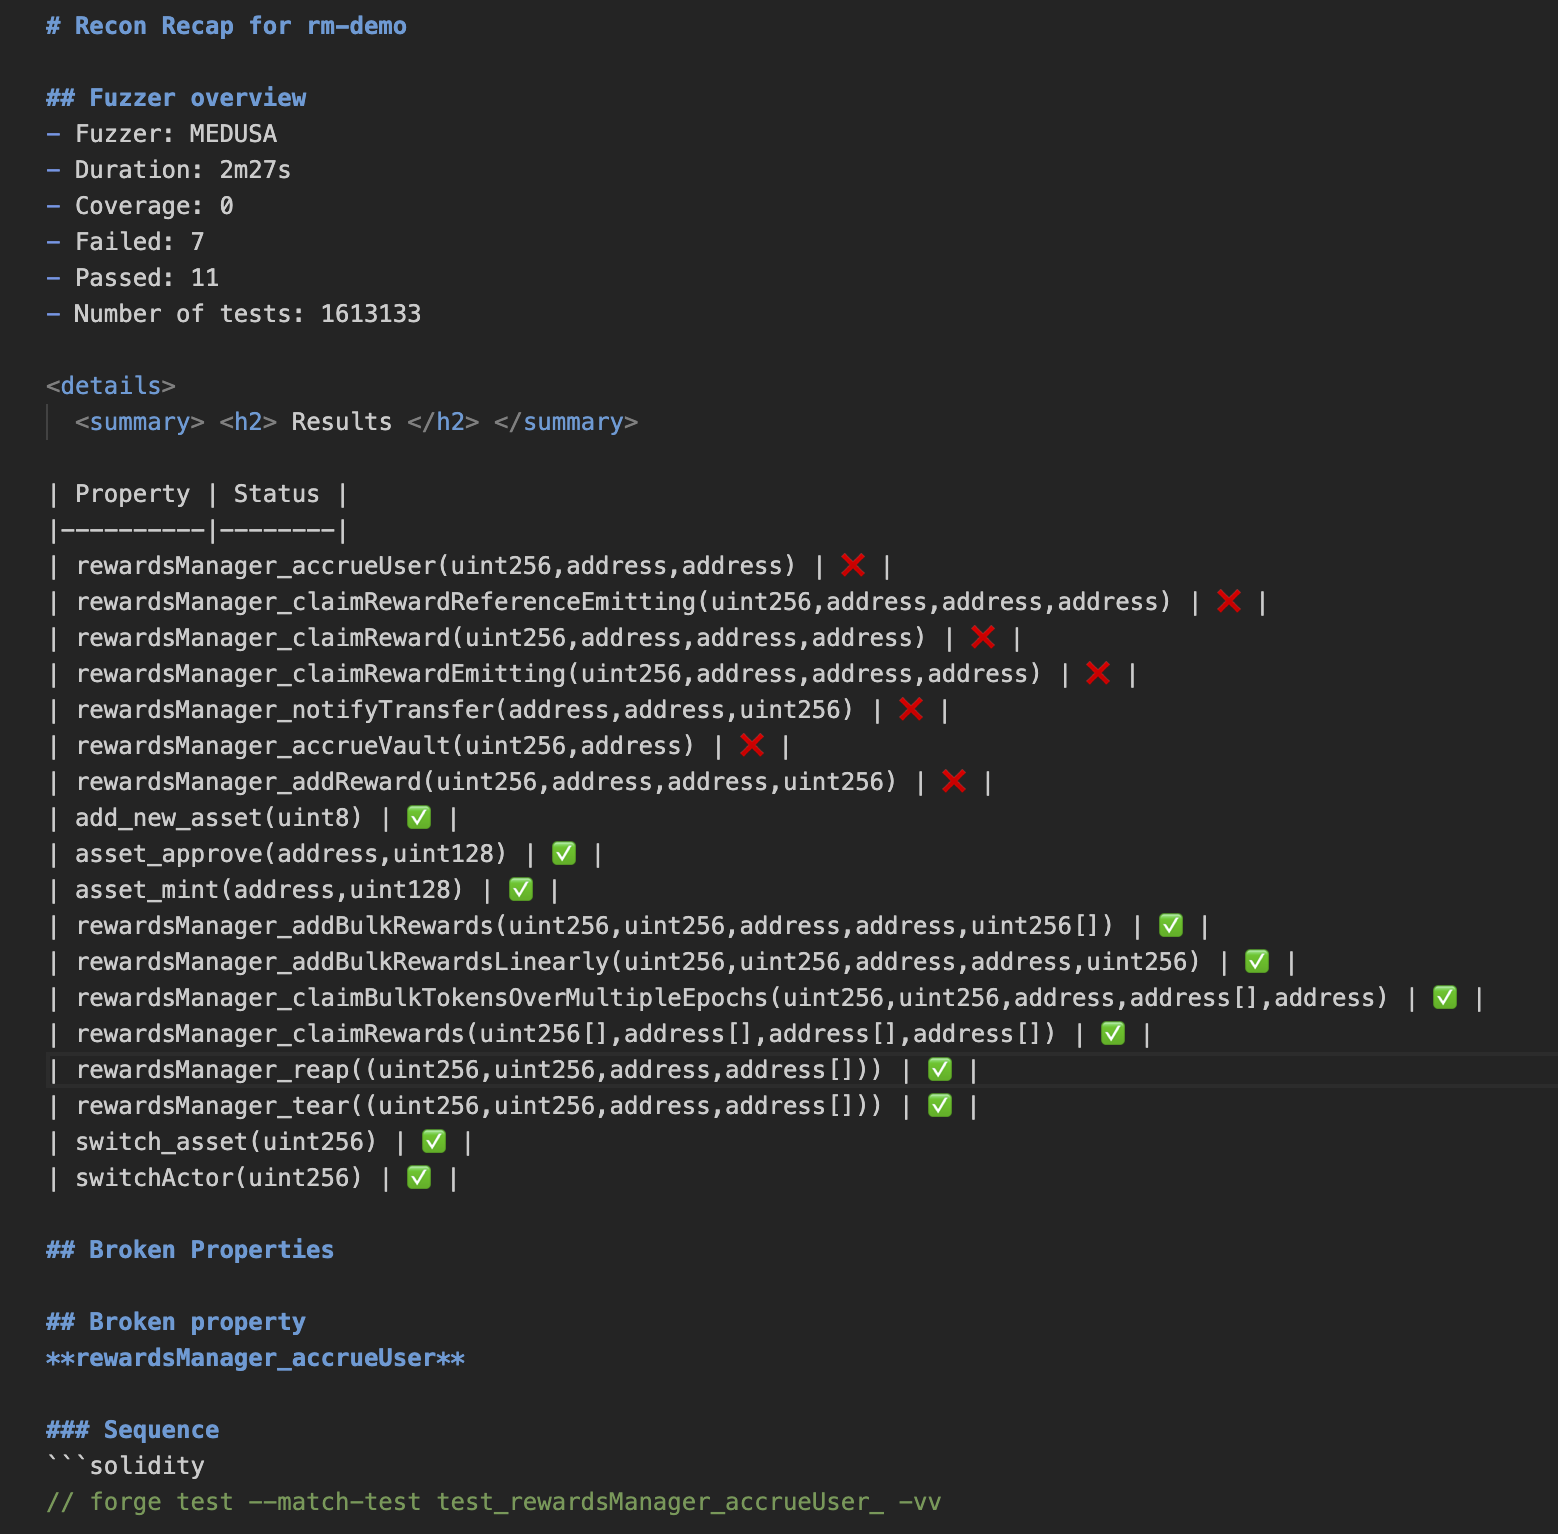
You can also view a condensed version of the coverage report which removes contracts that aren't touched by the fuzzer by clicking the open in new tab button in the report section.
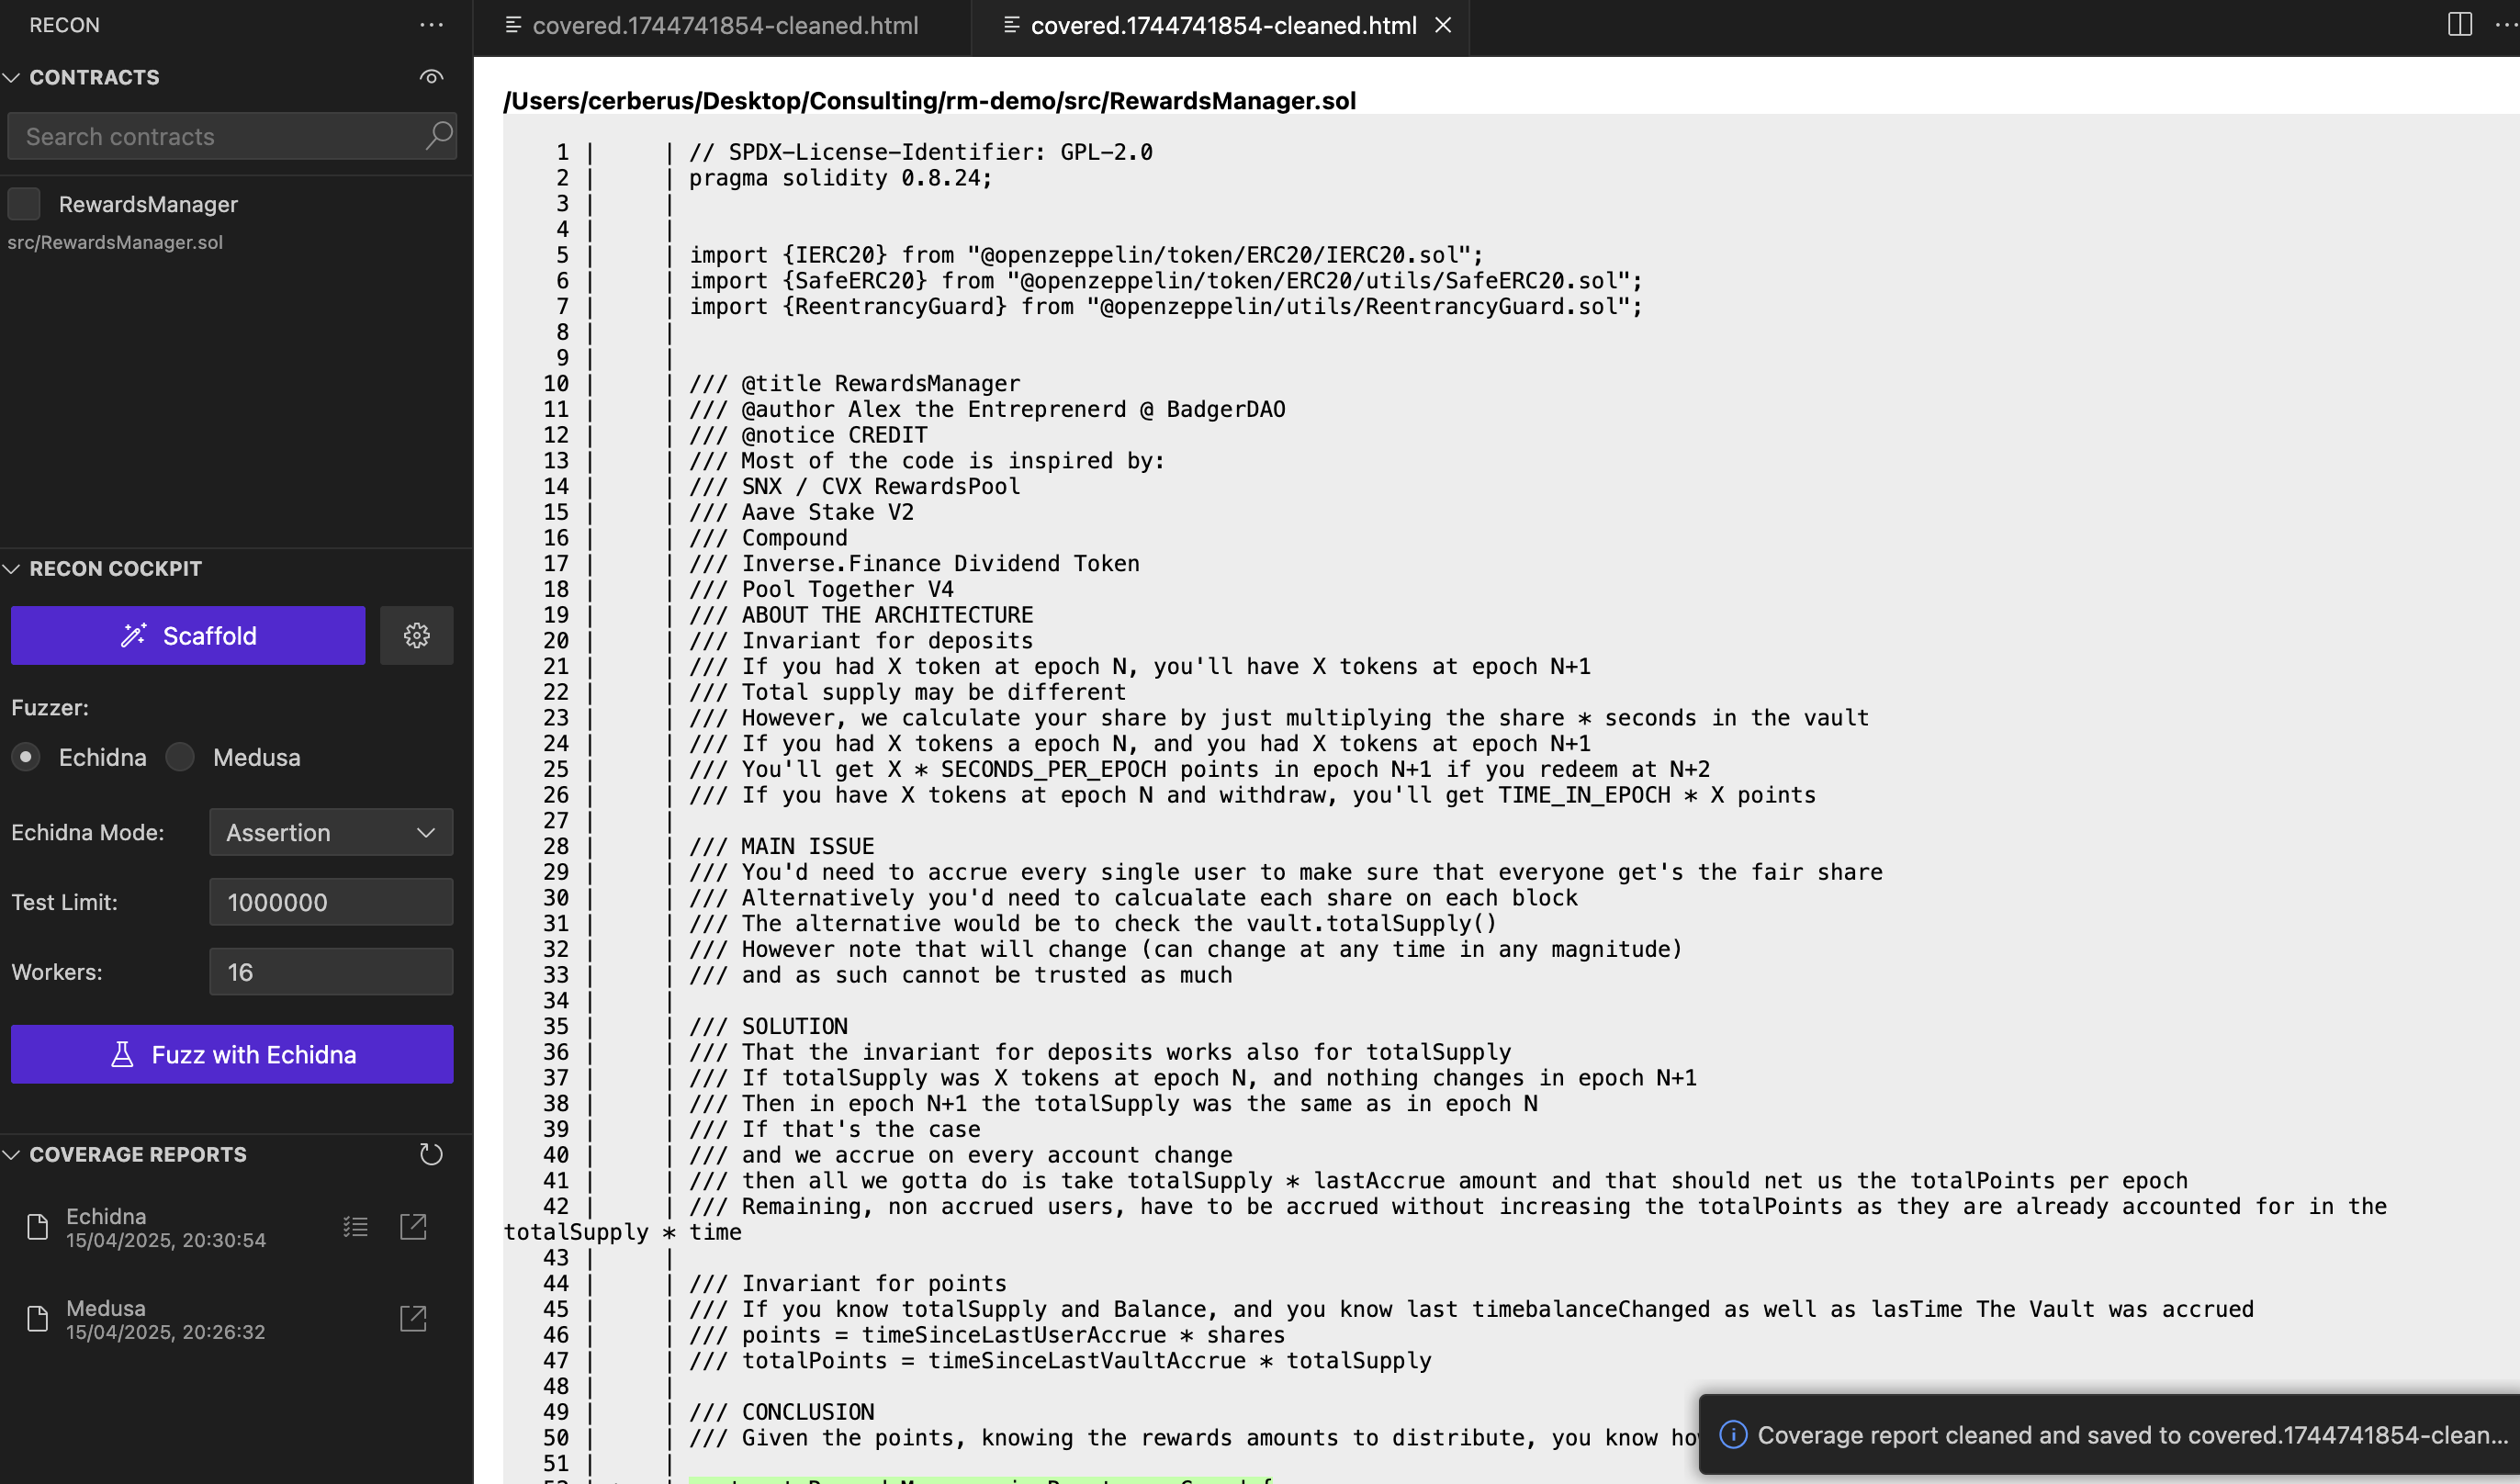
Reproducer Generation
If a property breaks, the extension will automatically generate a Foundry unit test reproducer for the property.
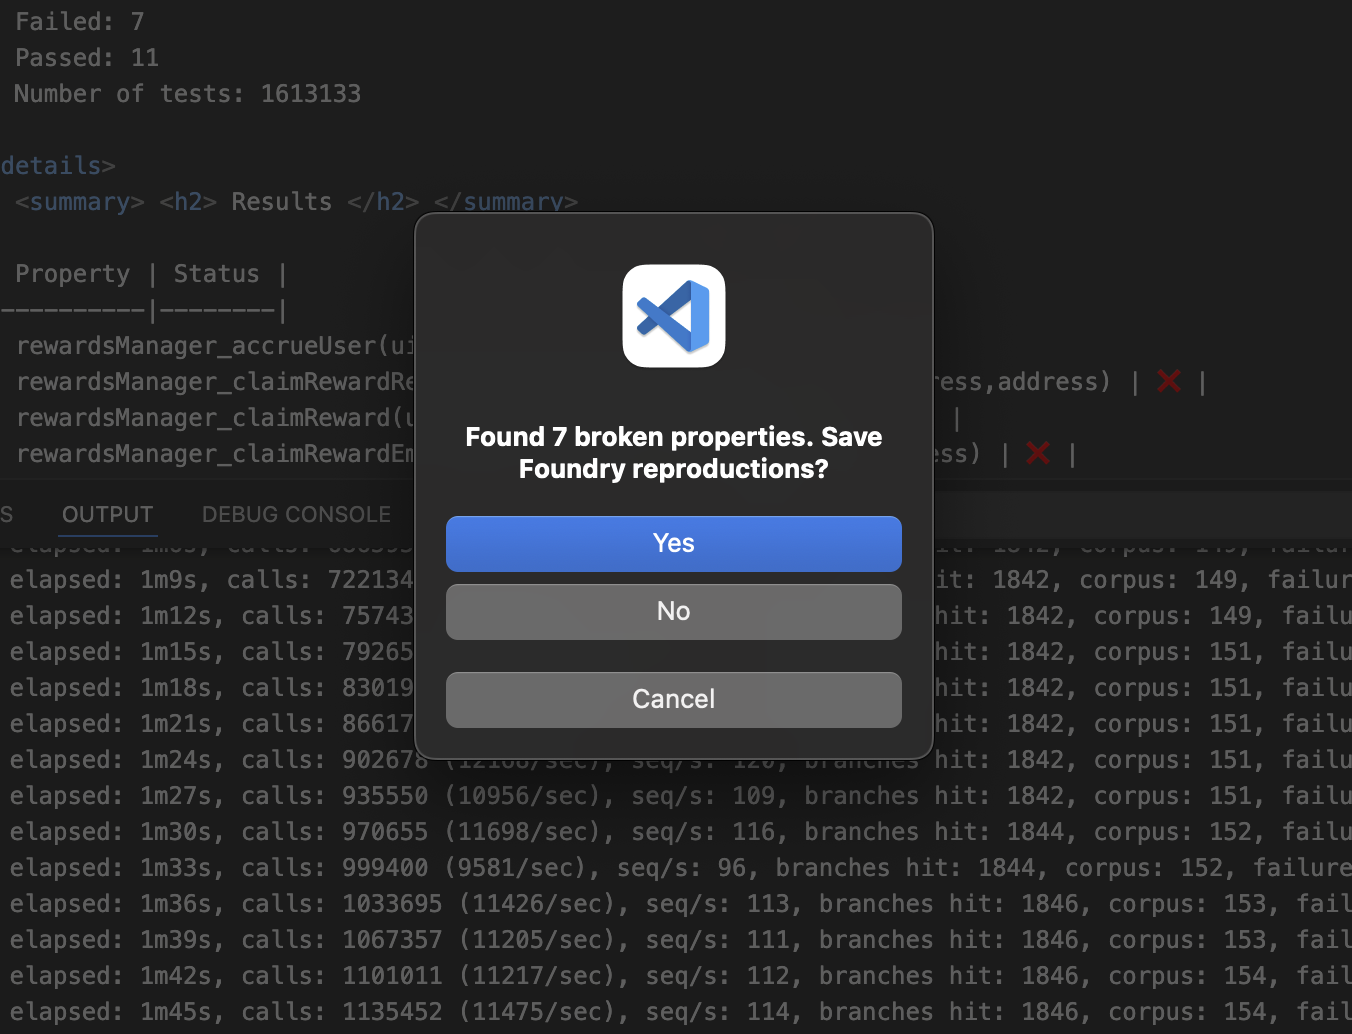
Clicking yes will add the reproducer to the CryticToFoundry contract that's created when you generate a Chimera template.
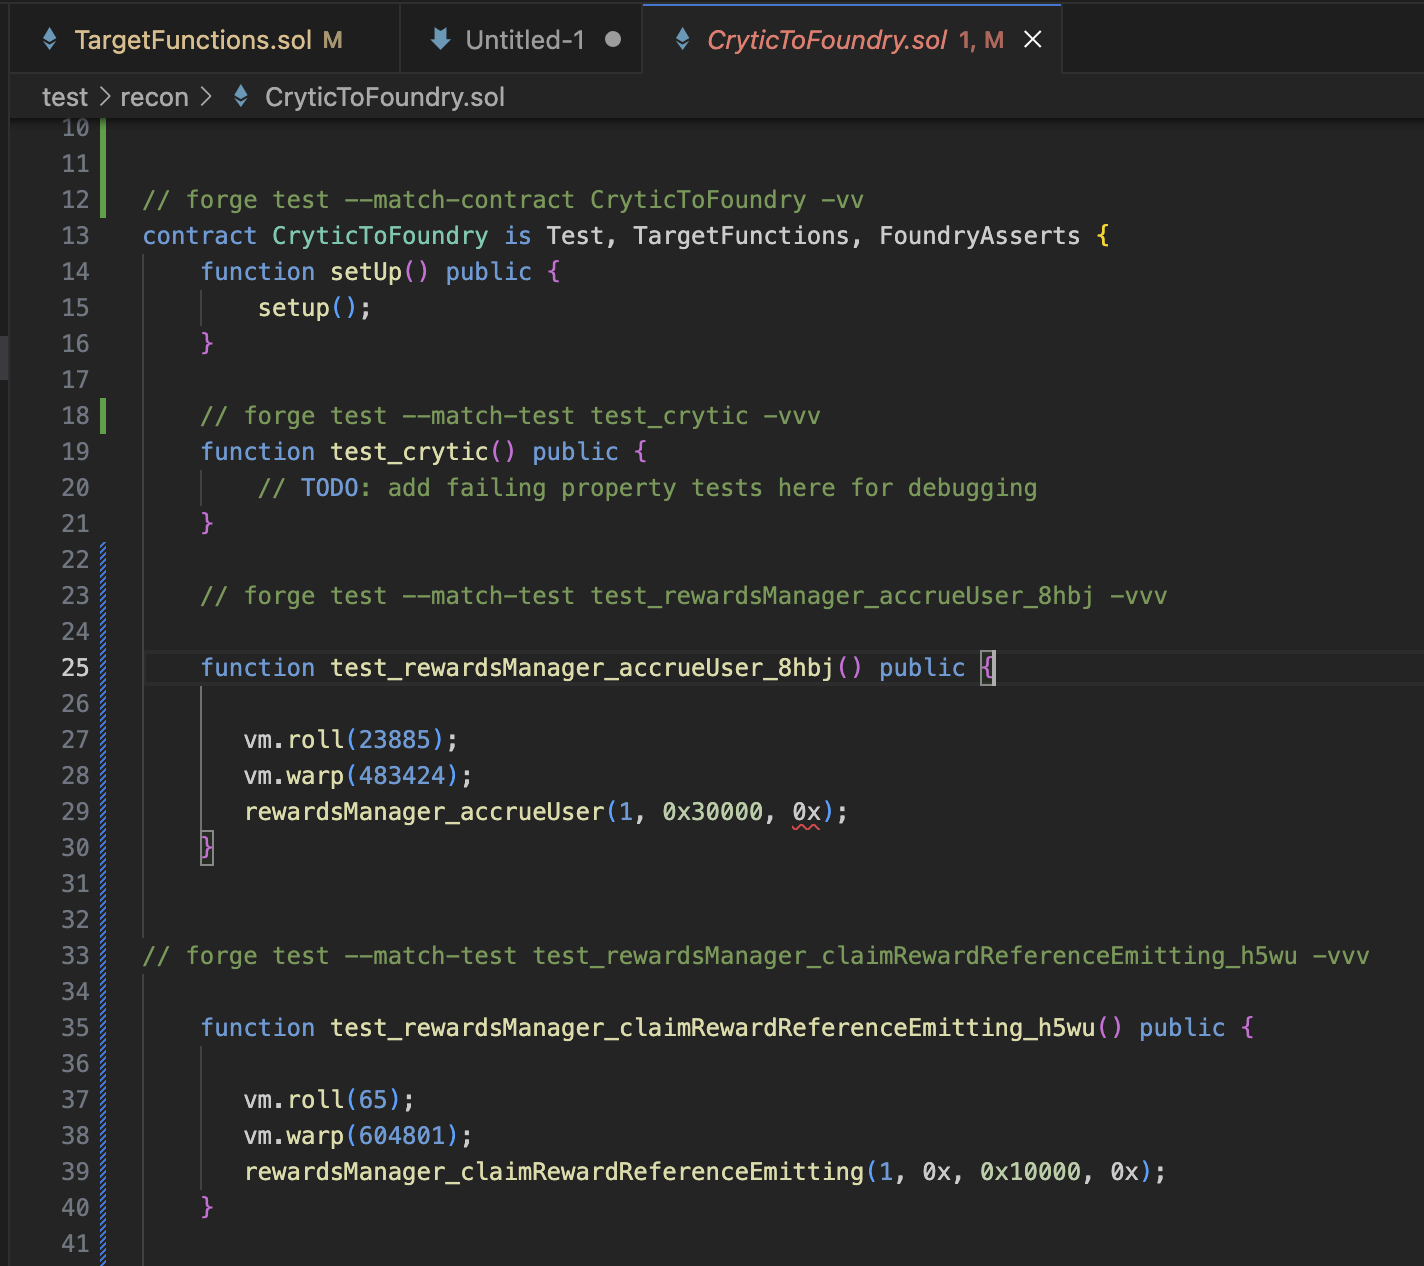
The Recon extension also provides a codelense utility for running the Foundry reproducer unit test above the function via the Run Test button.

Coverage Report Compressor
- Right click on the coverage report and select "Clean Up Coverage Report"
- This will compress the report by removing contracts not touched by the fuzzer from the coverage report
Display coverage report as overlay with coverage gutters
- To do this you just need to have the coverage gutters extension installed and click the report in the COVERAGE REPORT section
- This will display the coverage report as an overlay using coverage gutters
- To remove the coverage gutters you can click the File Uncovered button on the bottom of your VS code window
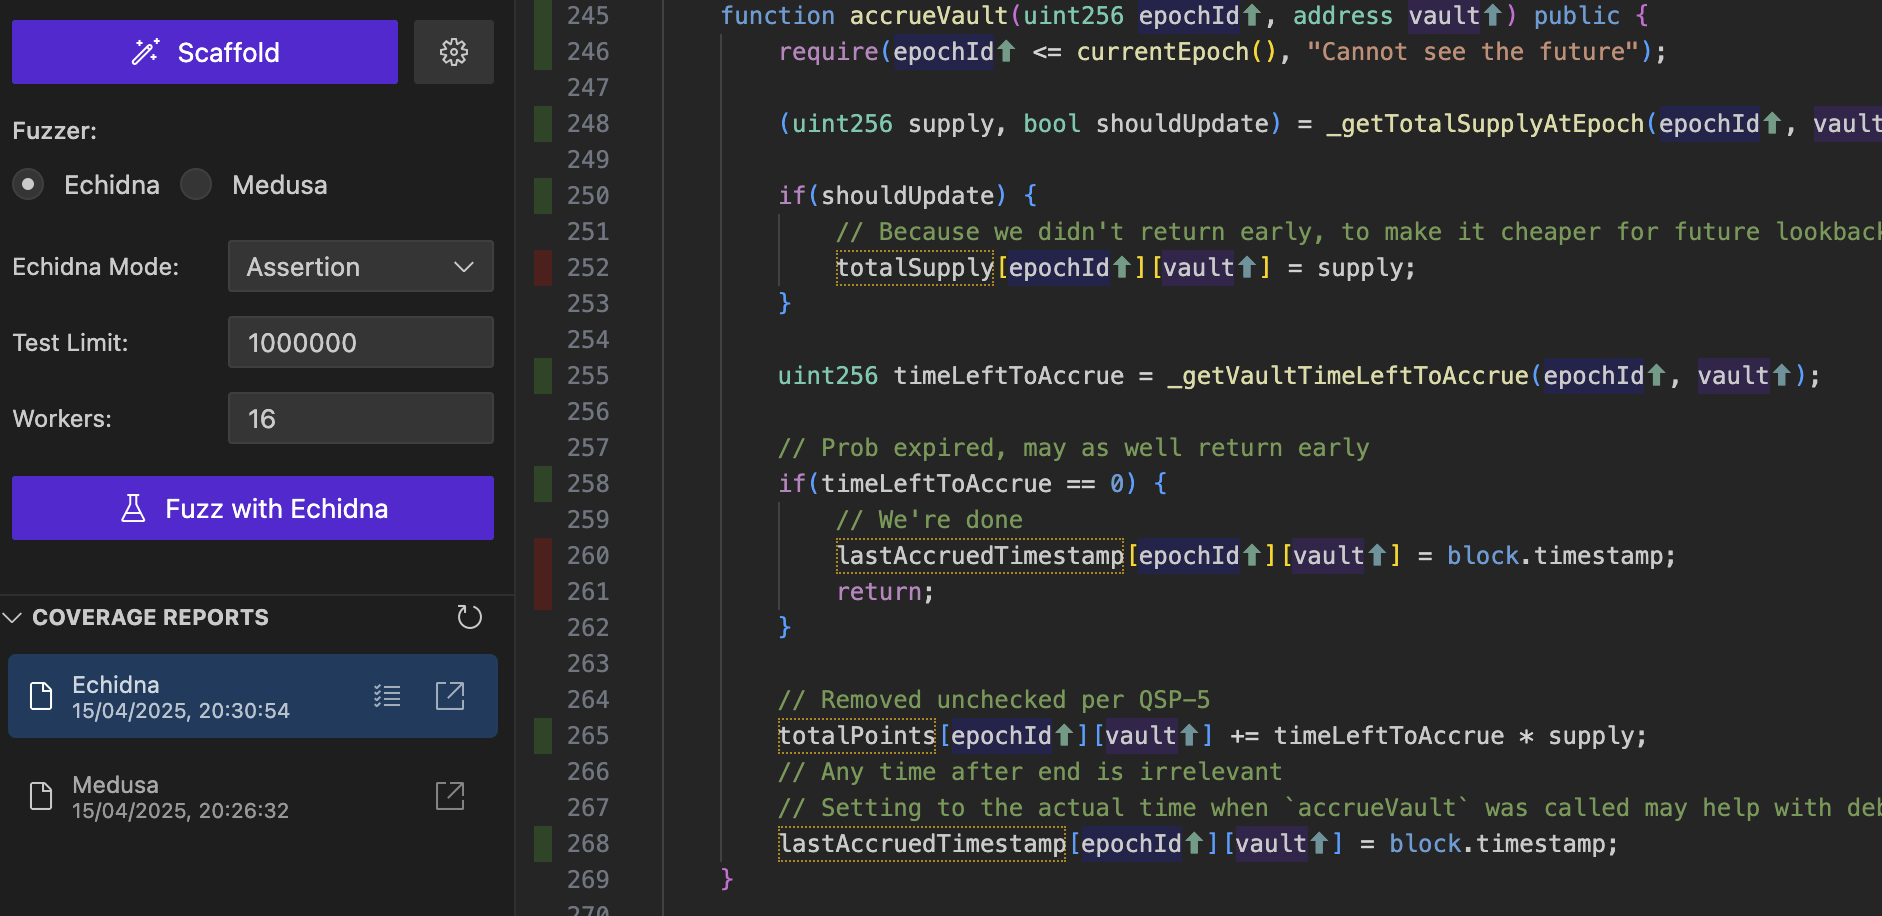
Medusa Log Scraper

Usage
- Paste your Medusa logs generated at the end of your test run
- All function calls will be scraped automatically from the pasted logs
- Each property will generate a Foundry reproducer unit test
- Toggle cheatcodes as needed
Echidna Log Scraper

Usage
- Paste your Echidna logs generated at the end of your test run
- All function calls will be scraped automatically from the pasted logs
- Each property will generate a Foundry reproducer unit test
- Toggle cheatcodes as needed
Invariants Builder

Scaffold an Invariant Testing suite in seconds!
Usage
- Paste your contract's ABI (available in the
out/directory after building your contracts using Foundry) - Add the name of your pasted contract's ABI in the "Your_Contract" form field
- Download the generated contracts into your repo using the "Download All Files" button
- Follow the instructions in the "Installation Help" section for the next steps after you've added the files to your repo
Bytecode Compare

Usage
- Paste 2 contract bytecodes
- Use the "Compare" button to generate a diff between them, optionally ignoring metadata
Bytecode To Interface

Usage
- Add a contract's bytecode: a. Using an rpc-url and contract address b. By pasting the bytecode directly
- Define an interface name to give your contract in the "Interface Name" form field
- Use the "Generate Interface" button to generate a Solidity interface for the given bytecode
Bytecode Static Deployment
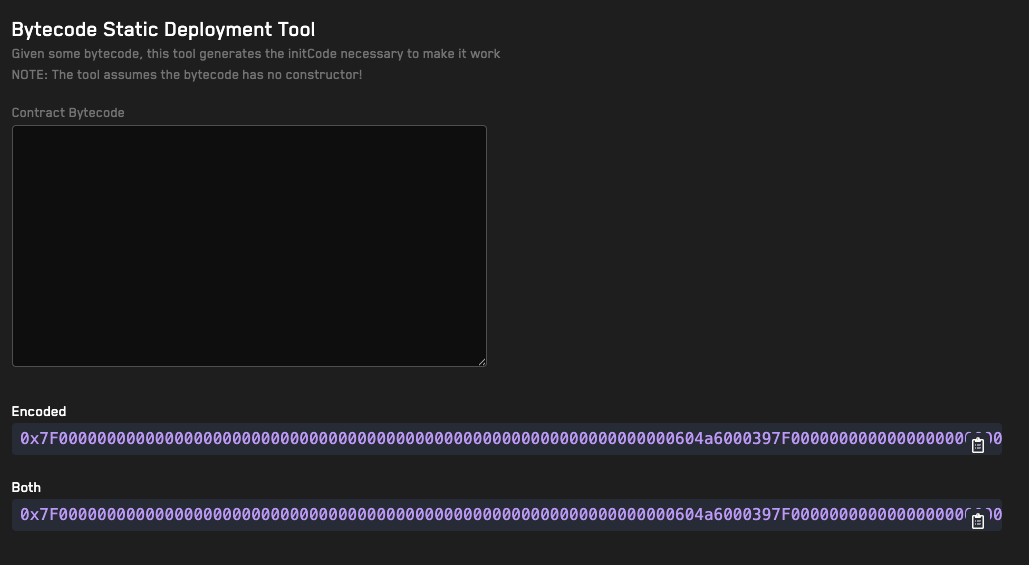
Usage
- Paste the deployed bytecode of EVM contract (this should not include the constructor as it will generate the Initcode from the bytecode)
- The tool will automatically output the Initcode (constructor bytecode that gets executed on contract deployment) in the Encoded field
- The Both field will include the Initcode and the deployed bytecode.
Bytecode Formatter
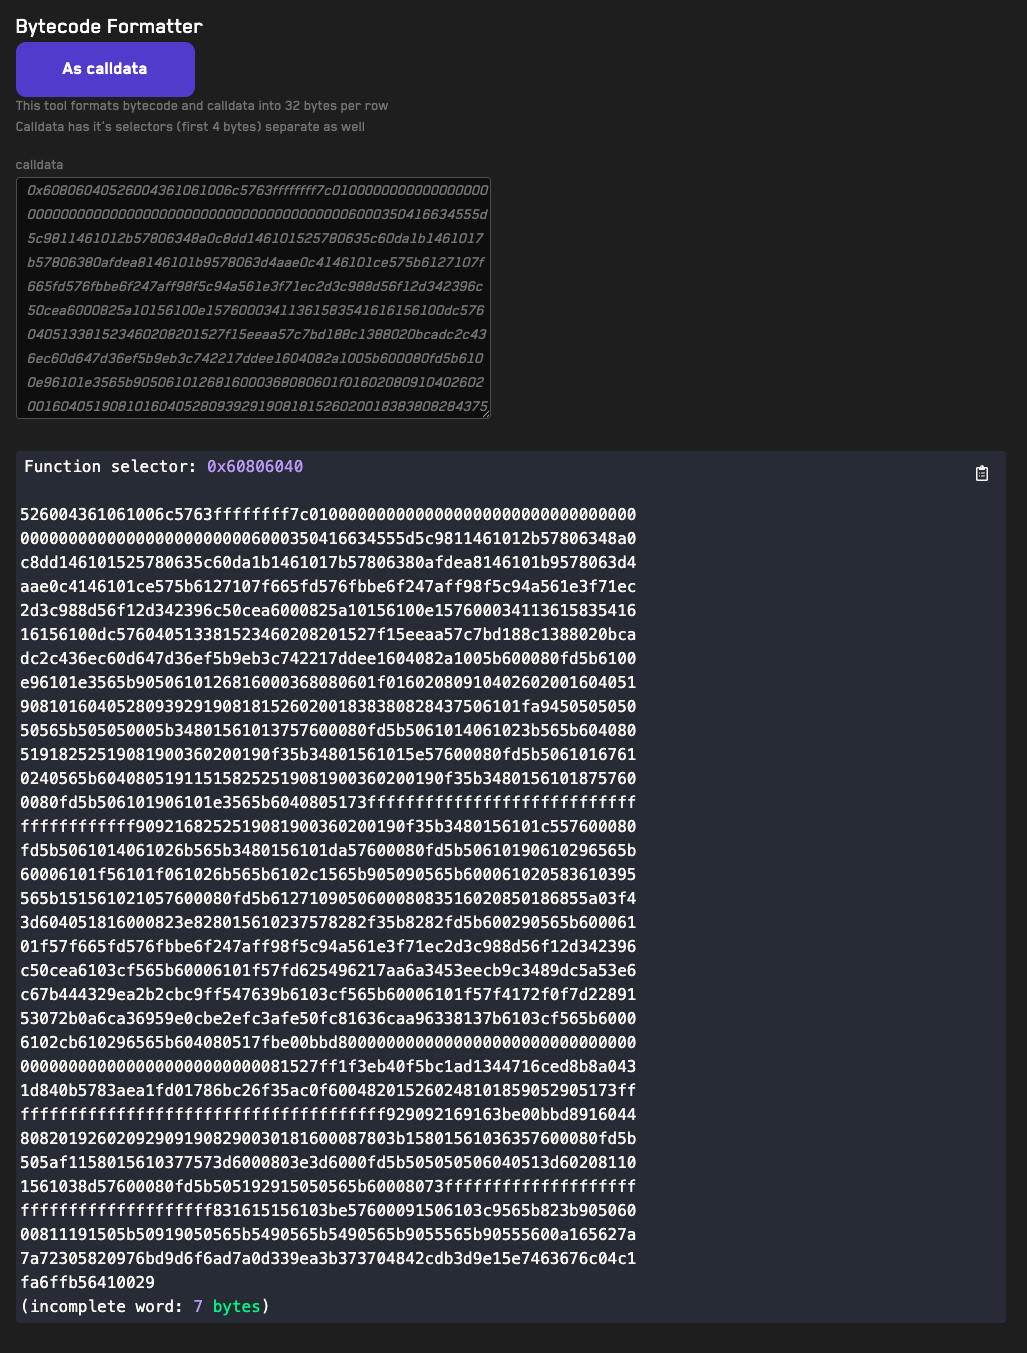
Usage
- Use the As calldata/As words buttons to select how you'd like to display the formatted data.
- Paste bytecode or calldata into the calldata field
- The tool will automatically format the bytecode or calldata into 32 bytes per row. For calldata the first four bytes will be used to extract the function selector.
String To Bytes
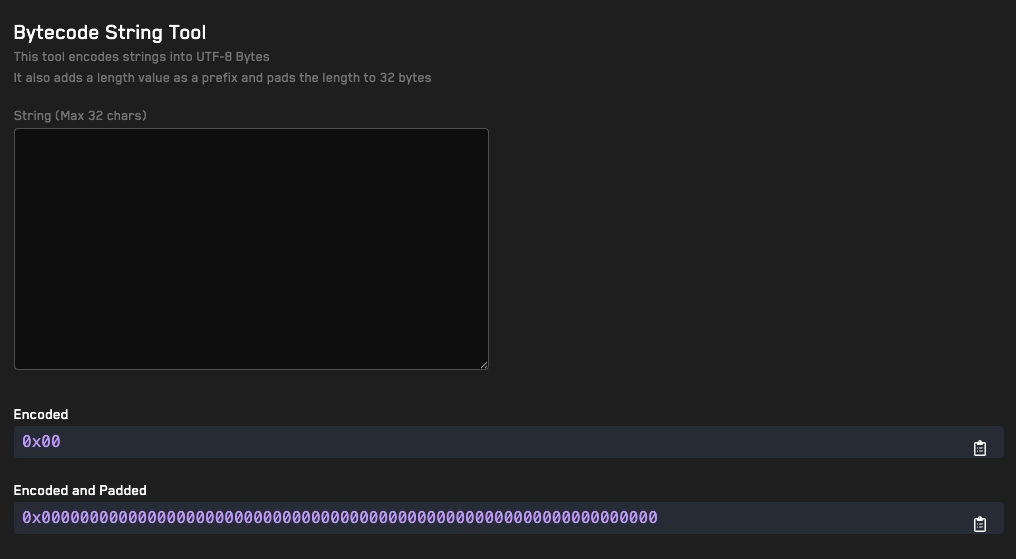
Usage
- Type a string in the String field (only strings less than 32 bytes are supported)
- The tool will automatically format the string using UTF-8 bytes encoding and add a length parameter. The topmost output will display the string without padding and the bottommost output will display the string with padding.
OpenZeppelin Roles Scraper

This tools allows scraping any role from the contract ABI
It also allows to retrieve the hash of any name
If the contract uses the Enumerable Roles Extensions you can also retrieve all addresses that have a role assigned to them
Usage
Paste any valid address and RPC Url
Get Role Members (Enumerable)
Retrieve all role members. Simply paste the role hash in the input and click on Get Role Members
Scrape Roles from ABI
Simply click the button, the tool will use WhatsABI to infer the contract ABI and return any public getter that ends with _ROLE
Generate the Role Bytes ID
Paste any role name (or any string)
And click on Generate Role ID to retrieve the role hash
Chimera
Chimera is a smart contract property-based testing framework. Write once, run everywhere.
Supports invariant tests written for:
- Foundry
- Echidna
- Medusa
- Halmos
Installation
forge install Recon-Fuzz/chimera
Motivation
When writing property-based tests, developers commonly face several issues:
- the amount of boilerplate code required
- the challenge of switching tools after the initial setup
- the difficulty in sharing results between different tools
Writing invariant tests that work seamlessly with Foundry, Echidna, Medusa, and Halmos is not straightforward.
Chimera addresses this problem by enabling a "write once, run everywhere" approach.
Limitations
Chimera currently only supports cheatcodes implemented by HEVM.
Foundry has extended these and offers functionality not supported by the HEVM cheatcodes, subsequently these must be accounted for when adding Chimera to a Foundry project as they will cause issues when running Echidna and Medusa. If adding Chimera to an existing Foundry project ensure that there are no cheatcodes implemented that aren't supported by HEVM as they will throw the following error: VM failed for unhandled reason, BadCheatCode <cheatcode hash>.
While medusa supports etch, echidna does not support it yet. Please note when using etch in an echidna environment it will not work as expected.
Create Chimera App
A Foundry template that allows you to bootstrap an invariant fuzz testing suite the Chimera Framework that works out of the box with:
- Foundry for invariant testing and debugging of broken property reproducers
- Echidna and Medusa for stateful fuzzing
- Halmos for invariant testing
It extends the default Foundry template used when running forge init to include example property tests supported by Echidna and Medusa.
Prerequisites
To use this template you'll need to have Foundry installed and at least one fuzzer (Echidna or Medusa):
Usage
To initialize a new Foundry repo using this template run the following command in the terminal.
forge init --template https://github.com/Recon-Fuzz/create-chimera-app
Build
This template is configured to use Foundry as it's build system for Echidna and Medusa so after making any changes the project must successfully compile using the following command before running either fuzzer:
forge build
Property Testing
This template comes with property tests defined for the Counter contract in the Properties contract and in the function handlers in the TargetFunctions contract.
Echidna Property Testing
To locally test properties using Echidna, run the following command in your terminal:
echidna . --contract CryticTester --config echidna.yaml
Medusa Property Testing
To locally test properties using Medusa, run the following command in your terminal:
medusa fuzz
Foundry Testing
Broken properties found when running Echidna and/or Medusa can be turned into unit tests for easier debugging with Recon (for Echidna/for Medusa) and added to the CryticToFoundry contract.
forge test --match-contract CryticToFoundry -vv
Halmos Invariant Testing
The template works out of the box with Halmos, however Halmos Invariant Testing is currently in preview
Simply run halmos on the root of this repository to run Halmos for Invariant Testing
Expanding Target Functions
After you've added new contracts in the src directory, they can then be deployed in the Setup contract.
The ABIs of these contracts can be taken from the out directory and added to Recon's Invariants Builder. The target functions that the sandbox generates can then be added to the existing TargetFunctions contract.
Log Parser
A TypeScript package to convert Medusa and Echidna traces into Foundry reproducer unit tests.
Available in an easy to use UI in our:
NPM
Installation
yarn add @recon-fuzz/log-parser
Usage
import { processLogs, Fuzzer } from '@recon-fuzz/log-parser';

// Process Medusa logs
const medusaResults = processLogs(medusaLogContent, Fuzzer.MEDUSA);

// Process Echidna logs
const echidnaResults = processLogs(echidnaLogContent, Fuzzer.ECHIDNA);
API Reference
processLogs(logs: string, tool: Fuzzer): FuzzingResults
Processes fuzzing logs and returns structured results.
Parameters
logs: string- The raw log content as a stringtool: Fuzzer- The fuzzer tool used (Fuzzer.MEDUSA or Fuzzer.ECHIDNA)
Returns: FuzzingResults
interface FuzzingResults {
  duration: string;
  coverage: number;
  failed: number;
  passed: number;
  results: any[];
  traces: any[];
  brokenProperties: any[];
  numberOfTests: number;
}
Medusa and Echidna Conversion to Foundry
Converting Fuzzer Logs to Foundry Tests
Both Medusa and Echidna logs can be converted into Foundry test cases using the provided utility functions:
// For Echidna logs
import { echidnaLogsToFunctions } from '@recon-fuzz/log-parser';

const foundryTest = echidnaLogsToFunctions(
  echidnaLogs,
  "test_identifier",
  "brokenProperty",
  { roll: true, time: true, prank: true }
);

// For Medusa logs
import { medusaLogsToFunctions } from '@recon-fuzz/log-parser';

const foundryTest = medusaLogsToFunctions(
  medusaLogs,
  "test_identifier",
  { roll: true, time: true, prank: true }
);
The conversion handles:
- VM state manipulation (block numbers, timestamps)
- Actor simulation (pranks for different senders)
- Function call sequences
- Special data types (addresses, bytes)
Generated tests will include the exact sequence of calls that triggered the property violation, making it easy to reproduce and debug issues found during fuzzing.
ABI to Invariants
NOTE: This repo is private, it's coming soon!
Given a contract ABI and options it creates:
- Target functions
- Create Chimera App Boilerplate
Available in an easy to use UI in our Invariants Builder
ABI to Mock
Given an ABI file generate a mock contract with functions that allow setting the return value of all view functions.
The simplest form of mocking that generates contracts that can be easily integrated into a fuzz testing suite.
Works well with the Recon Extension (coming soon) and the ABI to Invariants Builder.
Features
- Generates fully functional Solidity mock contracts
- Supports complex data types including structs and nested arrays
- Maintains function signatures and event definitions
- Customizable contract names and output locations
- Available as both a CLI tool and JavaScript library
Generated Mock Features
- Complete function signatures matching the original contract
- Setter functions for return values
- Complex type support (structs, arrays, mappings)
Installation
npm install abi-to-mock
Usage
Command Line Interface
npx abi-to-mock <abi-file> [options]

Options:
  --out, -o   Output directory (default: "./out")
  --name, -n  Contract name (default: "Contract")
Example:
npx abi-to-mock ./MyContract.json --out ./mocks --name MyContract
Using with Foundry
forge build

npx abi-to-mock out/ERC20Mock.sol/ERC20Mock.json --name Erc20Mock --out src/
Programmatic Usage
// Node.js
const AbiToMock = require('abi-to-mock');
// or ES Modules
import AbiToMock from 'abi-to-mock';

// From file
AbiToMock('./MyContract.json', './mocks', 'MyContract');

// From ABI object
const abi = [
  {
    "inputs": [],
    "name": "getValue",
    "outputs": [{"type": "uint256"}],
    "type": "function"
  }
];
AbiToMock.generateMock(abi, './mocks', 'MyContract');

// Browser usage
import { generateMockString } from 'abi-to-mock';
const mockCode = generateMockString(abi, 'MyContract');
API Reference
// Node.js API
AbiToMock(abiPath: string, outputDir?: string, name?: string): MockContract
AbiToMock.generateMock(abi: ABI[], outputDir: string, name: string): MockContract

// Browser API
generateMockString(abi: ABI[], name: string): string
Setup Helpers
These contracts were created with the intention of speeding up the setup process for an invariant testing suite.
For an example implementation of these contracts in use see the create-chimera-app repo.
ActorManager
The ActorManager contract serves as the source of truth for actors that are being used in the fuzzing suite setup.
The primary functions of interest when setting up a suite are:
_addActor- allows adding a new address as an actor that can be tracked_switchActor- this should be exposed in a target function that can be called by the fuzzer to randomly switch between actors
To use the actors stored in the ActorManager, add the asActor modifier on all of your target function handlers which pranks as the currently set actor.
For privileged functions you can use the asAdmin modifier which calls the target functions as the tester contract (address(this)). The tester contract is typically set as the default admin address by convention.
AssetManager
The AssetManager allows tracking all assets being used in the fuzz suite setup.
Similar to the ActorManager this serves as the source of truth for all assets used in the test suite and therefore no target function should be called that may transfer an asset not tracked in the AssetManager.
The primary functions of interest when setting up a suite are:
_newAsset- deploys an instance of theMockERC20contract and adds it to tracking so it can be accessed as needed_getAsset- used to clamp values used for tokens in calls to target functions_finalizeAssetDeployment- a utility for minting tokens added via_newAssetto all actors that have been setup and approving it to all contracts in the the system that may need to calltransferFromon it
Utils
Provides utilities for invariant testing
checkError- allows checking if a revert reason from a function call is equivalent to the reason passed in as theexpectedargument
The checkError function can take multiple string input types that may be thrown in the case of a function revert.
- error string - the string in revert due to a require statement (ex:
"a does not equal b"inrequire(a == b, "a does not equal b")) - custom error - custom errors defined in a contract's interface (ex:
error CustomError(),error CustomErrorWithArgs(uint256 val)); note that when passing in custom errors with arguments the argument name should be excluded (ex:"CustomErrorWithArgs(uint256)") - panic reverts - panic reverts for any of the reasons defined in the Solidity compiler here
    function counter_setNumber(uint256 newNumber) public updateGhosts asActor {
        try counter.setNumber(newNumber) {
            // passes
        } catch (bytes memory err) {
            bool expectedError;
            // checks for custom errors and panics
            expectedError =
                checkError(err, "abc") || // error string from require statement
                checkError(err, "CustomError()") || // custom error
                checkError(err, Panic.arithmeticPanic); // compiler panic errors
            t(expectedError, "unexpected error");
        }
    }
Panic
A library that provides named variables corresponding to compiler panic messages. Used to more easily access these messages when using the checkError utility.
library Panic {
    // compiler panics
    string constant assertionPanic = "Panic(1)";
    string constant arithmeticPanic = "Panic(17)";
    string constant divisionPanic = "Panic(18)";
    string constant enumPanic = "Panic(33)";
    string constant arrayPanic = "Panic(34)";
    string constant emptyArrayPanic = "Panic(49)";
    string constant outOfBoundsPanic = "Panic(50)";
    string constant memoryPanic = "Panic(65)";
    string constant functionPanic = "Panic(81)";
}
MockERC20
A minimal MockERC20 contract that lets you mock any standard ERC20 tokens that will be interacting with the system without requiring external dependencies.
Properties Table

This repo provides a template for creating a table to track properties that have been implemented for an invariant testing suite using the format that the Recon team uses in our engagements.
Examples
The following are examples of the use of this table for Recon engagements:
ERC7540 Reusable Properties
A collection of reusable properties for ERC-7540 asynchronous vaults.
Written in collaboration with Centrifuge.
Specification
| Property | Description | Category |
|---|---|---|
| 7540-1 | convertToAssets(totalSupply) == totalAssets unless price is 0.0 | High Level |
| 7540-2 | convertToShares(totalAssets) == totalSupply unless price is 0.0 | High Level |
| 7540-3 | max* never reverts | DOS Invariant |
| 7540-4 | claiming more than max always reverts | Stateful Test |
| 7540-5 | requestRedeem reverts if the share balance is less than amount | Stateful Test |
| 7540-6 | preview* always reverts | Stateful Test |
| 7540-7 | if max[method] > 0, then [method] (max) should not revert | DOS Invariant |
Usage
- Install the repo as a dependency to a Foundry project
forge install Recon-Fuzz/erc7540-reusable-properties --no-commit
- Inherit from the
ERC7540Propertiescontract in the contract where you've defined your properties. For a test suite harnessed with Recon it will look something like this:
abstract contract Properties is Setup, Asserts, ERC7540Properties {}
- Add a way to change the
actorstate variable in theERC7540Propertiescontract. The simplest way to do this is by exposing a target function with something like the following implementation:
    function setup_switchActor(uint8 actorIndex) public {
        actor = actorsArray[actorIndex % actorsArray.length];
    }
- The properties defined in the
ERC7540Propertiescontract are meant to hold for a vault implementation conforming to the ERC specification. If your implementation doesn't require certain properties to hold you can simply exclude them from your contract in which you define your properties:
abstract contract Properties is Setup, Asserts, ERC7540Properties {
    function crytic_erc7540_1() public returns (bool test) {
        test = erc7540_1(address(vault));
    }

    function crytic_erc7540_2() public returns (bool test) {
        test = erc7540_2(address(vault));
    }
}
by not adding a wrapper for properties other than erc7540_1 and erc7540_2 the other properties defined in ERC7540Properties don't get evaluated by the fuzzer.
Opsec Resources
These are a few resources, stemming from this talk we did to help founders ship safely: https://docs.google.com/presentation/d/1Tzcj7FPj8QmvjdO79vPqPsRxyyyEwFhWl6SoRzFZ_do/edit?usp=sharing
1 Hour Consultation
Recon offers ongoing security retainers to review multisig operations and transactions, to see if it's a fit and get some free advice, get in touch here: https://tally.so/r/3jpV6E
Smart Contracts
-
Building a Safe Protocol, a 1 hour discussion with 4 repeating DeFi founders on what it takes to ship safe protocols: https://x.com/i/broadcasts/1BdxYqLoRgBxX
-
Most known smart contract exploit list: https://rekt.news/leaderboard
Governance
-
The Right Way to Multisig, 2 hours of discussion on the dangers of Multisigs and Practical Day-to-Day Governance in protocols, and how to get it right https://x.com/getreconxyz/status/1885249716386226572
-
Review of most popular hardware wallet for security https://x.com/PatrickAlphaC/status/1904075663318847785
Web2
- Decode Calldata: https://calldata.swiss-knife.xyz/decoder
Physical Opsec
List of most known Physical Attacks tied to Crypto: https://github.com/jlopp/physical-bitcoin-attacks
Glossary
Actor
The address that will perform the calls specific to TargetFunctions. See ActorManager for how to use these in a test suite.
CryticTester
The invariant testing contract that's deployed in the Chimera Framework and that the fuzzer will use to explore state and properties with the target functions defined on it.
CryticToFoundry
A Foundry test contract used to implement unit tests of property-breaking call sequences (reproducers) obtained with testing tools (i.e. Echidna, Medusa, Halmos, etc.).
Clamping
Reducing the search space of a fuzzer for a handler function by excluding certain input values that may not provide meaningful coverage.
Dynamic Deployment
A technique that consists of adding custom handlers that will deploy new contracts, by leaving the configuration up to the fuzzer, this can help explore more unintuitive edge cases and configurations.
Dynamic Deployment is the opposite of a hardcoded config in Setup.
Invariant Testing
The act of testing logical statements about smart contracts using tools that manipulate their state randomly (fuzzers) or by following all possible paths (formal verifiers).
Property
A logical statement about a smart contract or system that can be tested.
Reproducer
A call trace generated by a tool (fuzzer, formal verifier) that breaks a property of a contract or system.
Invariant
A property that should always hold for a smart contract or system.
Fuzzer
An engine/solver, a program that can perform stateful tests on a smart contract or system.
Some fuzzers are concrete, others concolic, and others symbolic.
Handler
A wrapper around a target function that makes a call to a target contract.
Target Function
The set of functions that the fuzzer will call to explore state and properties for the smart contract or system.
Shrinking
A process performed by the fuzzer to remove unnecessary calls from a call sequence that don't contribute to breaking a property.
Line Coverage
The ability of the fuzzer to reach a specific line in the targeted contract.
Logical Coverage
The frequency with which the fuzzer reaches all possible logical paths in a function of interest.
Scaffolding
The set of smart contracts put into place to organize the code and tell the fuzzer how to explore states and test properties.
Echidna
A concrete fuzzer written in Haskell, using HEVM as its EVM engine.
Medusa
A concrete fuzzer written in Go, using GETH for the EVM engine.
Halmos
A symbolic fuzzer written in Python, using its own SEVM for the EVM engine.